Cementless Acetabular Components
Julius K. Oni
Darren R. Plummer
Craig J. Della Valle
Case Presentation
A 77-year-old female presents with 5 years of progressively worsening right hip pain. Her pain is mainly located in the groin with occasional radiation to the anterior knee. Her symptoms are aggravated by weight-bearing activities and relieved by rest. In the last 3 months, her pain wakes her up at night and she is limited to a three-block ambulation tolerance. She has tried multiple anti-inflammatory medications and acetaminophen with little relief.
The patient ambulates with an antalgic gait favoring the right lower extremity. On focused examination of the right hip, the patient has a 15-degree flexion contracture and further flexes to 90 degrees. She has no internal rotation and any attempt to internally rotate the hip elicits her groin pain. She has 15 degrees of external rotation, 15 degrees of adduction, and 35 degrees of abduction. She has free and painless range of motion of her right knee and is neurovascularly intact distally.
Her x-rays reveal severe degenerative joint disease of the right hip with presence of severe joint space narrowing, subchondral sclerosing, subchondral cysts, and osteophyte formation (Fig. 54.1A–D). She was indicated for a total hip arthroplasty (THA).
Indications
Indications for cementless acetabular fixation include symptomatic degenerative joint disease of the hip secondary to any of multiple etiologies including osteoarthritis, inflammatory arthritis, dysplasia, avascular necrosis, and trauma.
Contraindications
The presence of active joint infection or absence of viable bone for component support and ingrowth are contraindications to placement of a cementless acetabular component. Specifically, higher rates of failure have been reported in cases of radiation necrosis of the pelvis. In a study by Jacobs et al. (1), the effects of previous irradiation of the pelvis on the overall survival of cementless acetabular components were assessed. The authors evaluated both clinical and radiographic findings, and found that four of the nine (44%) patients previously irradiated experienced acetabular component failure at an average of 25 months following THA (1). If radiation necrosis of the pelvis is identified, alternative methods of reconstruction are needed to create a biomechanically strong construct that will not achieve biologic fixation. In these scenarios, we typically resort to a reconstruction cage.
Surgical Technique
Acetabular Exposure
Regardless of the surgical approach selected by the surgeon, complete exposure of the acetabulum and visualization of the acetabular rim is required. Place a blunt retractor anteriorly taking care to not damage the surrounding soft tissue structures. Our preference is a posterior approach to the hip, and if this is selected, it is imperative to ensure that the femur is adequately mobilized so that the acetabulum can be reamed, and the component inserted, in adequate anteversion. Then, divide the inferior capsule and place a blunt retractor around the inferior margin of the acetabulum. Identifying the transverse acetabular ligament has been shown to assist with acetabular component placement and is easily identified in most cases (Figs. 54.2 and 54.3) (2). Occasionally, dividing the transverse acetabular ligament may be needed to prevent the tendency of the reamer to migrate superiorly. A third retractor placed posteriorly as well as complete resection of the labrum from the acetabular rim should provide optimal exposure. Then identify the cotyloid fossa and remove all soft tissue to define the true medial wall and floor of the acetabulum (Fig. 54.2). Often, the fossa is filled with medial osteophytes, and in these cases, a small osteotome can be used to expose the fossa floor.
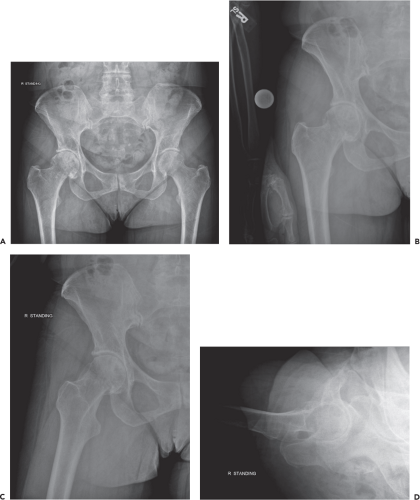 Figure 54.1. A–D: Preoperative x-rays showing severe degenerative joint disease of the hips. |
 Figure 54.2. Exposure of the acetabulum with femur retracted anteriorly (right). Note tag sutures on the posterior capsule to the left and patient’s head is toward the top of the photograph. Straight bar denotes the transverse acetabular ligament which will guide anteversion. Asterisk marks the cotyloid fossa and the true floor of the acetabulum which will guide reaming. |
Acetabular Reaming
Select an acetabular reamer that is approximately 4 mm smaller than the templated size of the cup. Reaming is initiated in approximately the same anteversion and abduction that the cup will be placed in (Fig. 54.4). This position is typically 35 to 45 degrees of abduction and 15 to 30 degrees of anteversion, depending on the surgical approach. Continue reaming with subsequent reamers in the desired position of final cup implantation until the true floor of the acetabulum is reached (Figs. 54.4 and 54.5) and the reamer makes contact with the anterior wall, posterior wall, dome, and lateral rim of the acetabulum. Frequently palpate the posterior and anterior walls of the acetabulum during the reaming process as these walls will determine the largest acetabular size that can be accommodated. It is important to avoid inadvertent superior migration of the reamer and a resultant higher hip center. The goal of reaming is to achieve a well-medialized, hemispherical cup that reestablishes a normal center of rotation. In addition, at the conclusion of reaming, a majority of the acetabular bed should ideally reveal bleeding cancellous
or subchondral bone, while the anterior and posterior columns maintain appropriate thickness.
or subchondral bone, while the anterior and posterior columns maintain appropriate thickness.
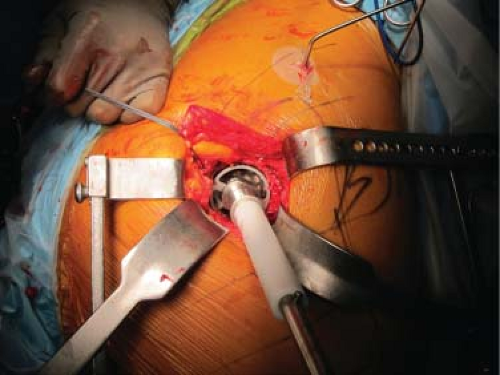 Figure 54.3. The acetabulum is reamed starting with a diameter 4 mm smaller than the proposed acetabular size. Reaming is performed in approximately the same anteversion and abduction that the cup will be placed in. The right side of the figure is anterior. |
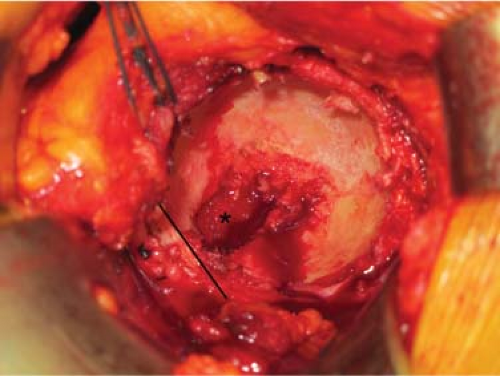 Figure 54.4. Close-up view of the acetabulum after initial reaming. Note again the transverse acetabulum ligament (straight bar) and true floor of the acetabulum (asterisk). In most cases reaming will continue until the true floor of the acetabulum is reached. Anterior is to the right. |
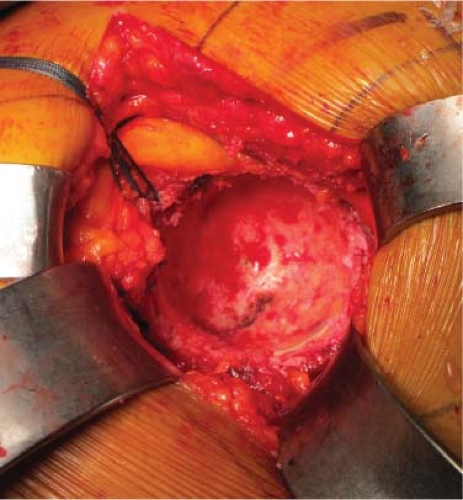 Figure 54.5. Reaming has now continued until the true floor of the acetabulum has been reached. Anterior is to the right. |
The amount of underreaming performed is generally based on surgeon preference, although much of the longer-term data on cementless acetabular components is based on the insertion of shells that were reamed “line to line” with the insertion of multiple screws (3), other reports have shown good results when a press fit of the acetabulum is used for initial component fixation (4). It is important to recognize that the labeled size of the implant may not match its actual size (frequently the cup is larger than its labeled size) and familiarity with this differential is critical to avoid inadvertent underreaming which can lead to a fracture of the pelvis during component insertion. Another point to consider is the size of the acetabulum itself; while a small 46-mm acetabulum in a smaller elderly female may not tolerate even 1 mm of underreaming, a 68-mm acetabulum in a large male may tolerate a much larger “press fit.” However, it has been shown that underreaming by >2 mm leads to a generally high risk of pelvic fracture (5).
The surgeon should also consider if the cup inserted will allow for adjunctive fixation with screws or if a cup with no screw holes will be utilized. In general, our preference is to use a cup that allows for the placement of up to three screws, and the socket is routinely underreamed by 1 mm. Some of this will be based on the results of trialing as described below. In cases where there is any question regarding the stability of the trial or bone stock of the acetabulum, a cup that allows for multiple screws for adjunctive fixation is utilized.
Acetabular Trialing
After preparation of the acetabulum, the trial shell should be inserted to verify size and position of the cup (Fig. 54.6


Related posts:


Stay updated, free articles. Join our Telegram channel
Full access? Get Clinical Tree
