CHAPTER 3 Basic techniques
Gun fa rolling 
How to practice Gun fa
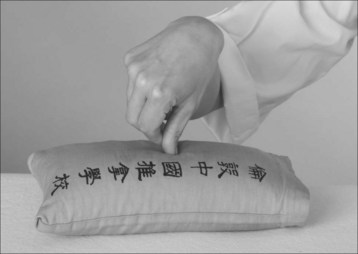
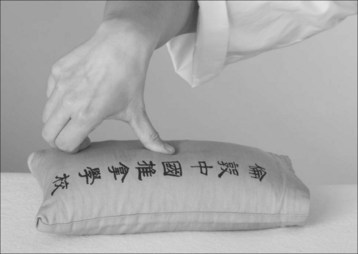
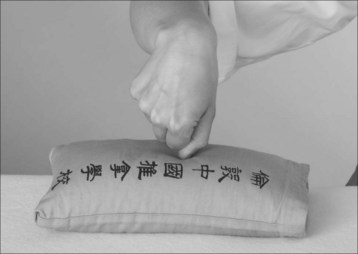
Starting position (Fig. 3.1)
• Put your rice bag on a table in front of you and slightly to one side. The table should not be too high; you need to feel that you can relax the weight of your arm down onto the rice bag. If you are practicing with your right hand, place the bag slightly to your right; this will give you enough space to allow your elbow and upper arm to swing freely.
• Stand with your feet shoulder width apart and knees slightly bent, or in a forward lunge posture.
• Place your little finger knuckle onto the rice bag, fingers relaxed and loosely curled. Imagine your knuckle is glued to the spot (some students find it helpful to mark a spot on the bag). The little finger knuckle is the pivotal point and never leaves the spot.
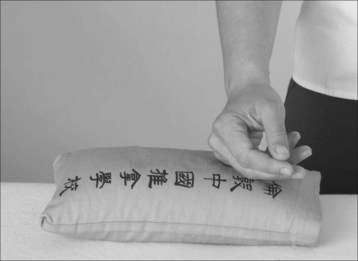
 : showing how to practice on a rice bag.
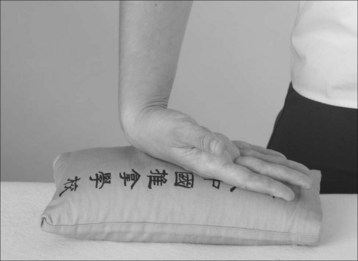
 : showing how to practice on a rice bag.
Suggestions for practice on a volunteer
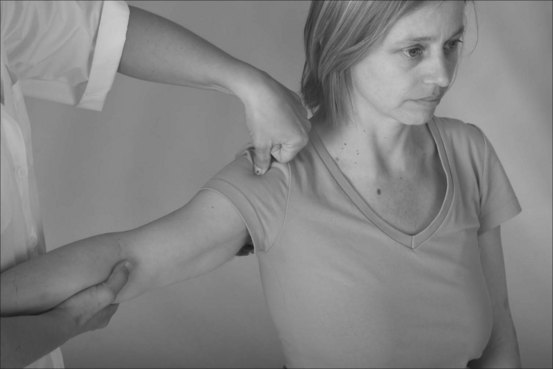
With your volunteer sitting in a chair, apply Gun fa around Fenchi GB21 in a focused manner then try moving from here up to Jianjing GB20. You will need to hold their head with your other hand and gently tilt it away from the side you are working on (Fig. 3.3). This is an example of Gun fa plus passive movement. Repeat on the other side.
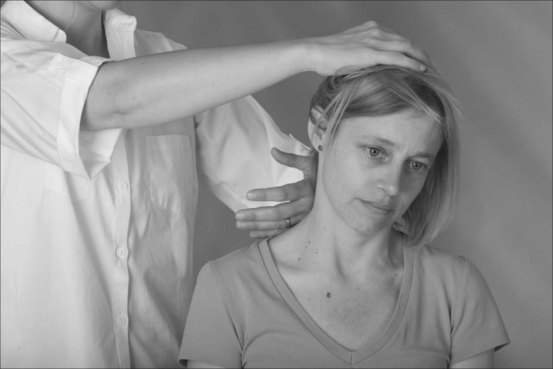
 : applying to the neck and nape.
Also in the sitting position apply Gun fa to the shoulder joint. Hold the volunteer’s arm around the elbow with your other hand, keeping their forearm close to your body. This will help to support their arm properly and keep you in a good position for applying passive movement to the joint. (Fig. 3.4)
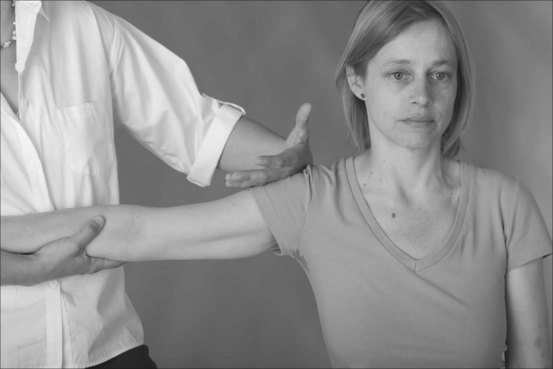
 : applying to the shoulder joint.
Tips for practice
• Relax, close your eyes or look anywhere other than your hand for half the practice time.
• Be as smooth and rounded as you can. There should be no jerky movements.
• Concentrate on your elbow and upper arm moving in and out like a chicken’s wing flapping in and out. Or think of squeezing air out of bagpipes that are under your armpit.
• Be consistent in pressure and speed. Start gently and moderately if working on a painful area, gradually building up speed to between 120–160 cycles per minute.
• Your fifth finger knuckle should stay in contact with the area being treated at all times.
• Use music to help you get into a steady rhythm.
• Keep breathing and watch your posture; keep upright and avoid hunching.
Watch out for the following common mistakes that can develop during the initial months of practice:
2. Driving the movement from the wrist rather than from the relaxed free movement of the elbow and forearm
3. The technique becomes jerky rather than smooth usually from adding too much pressure too soon
4. The pressure is uneven, usually too strong rolling out and too weak rolling back
5. The technique is too light and superficial rubbing back and forth over the skin surface
Clinical application and therapeutic effects
Common uses
• Use Gun fa for any type of Bi syndrome, any channel sinew problems such as muscular pain and stiffness, soft tissue injuries and repetitive strain injury (RSI). Use it for back pain and sciatica, frozen shoulder and tennis elbow.
• Gun fa is an essential technique in the treatment of Wei syndrome including post-stroke sequelae and all forms of paralysis and dysfunction of the motor nerves. Use it for any case that involves numbness and pins and needles in the limbs.
• It is also very effective as part of treatment for abdominal pain with Fullness and distension caused by Qi stagnation.
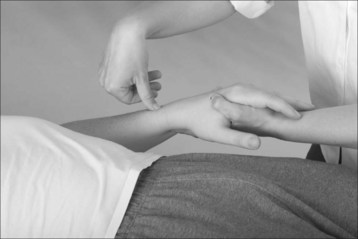
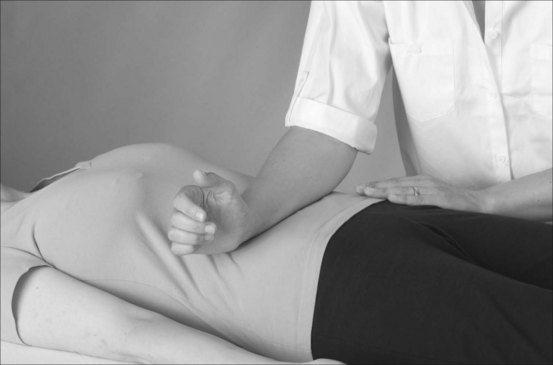
Yi zhi chan tui fa one-finger meditation pushing technique 
How to practice Yi zhi chan tui fa 
The technique can be broken down into the following three steps.
Step one – preparation
Place either the tip or pad of the thumb of your dominant hand on the spot. Whether you use the tip or pad depends on your personal anatomy – if your distal thumb joint is very flexible, you will find it easier to use the pad; most people, however, need to use their thumb tip. Keep your thumb perpendicular and curl your fingers into a loose, hollow fist. Do not hold your fingers tightly. Relax your shoulder and imagine your arm is resting on a tennis ball in your armpit. Drop your elbow so that it is lower than your wrist – this is often what makes the technique feel awkward, especially if your forearm extensors are tight and your wrist is not very flexible. Rest your other hand on the rice bag. (Fig. 3.5)
 : practicing on a rice bag, preparation step 1.
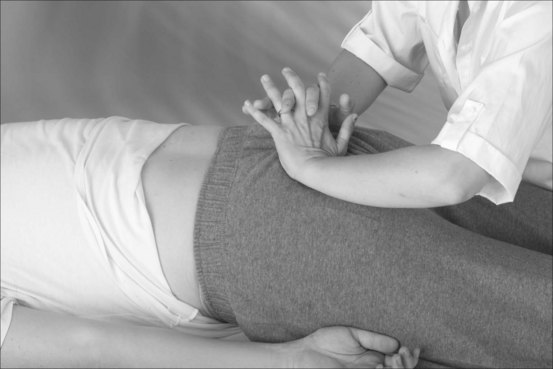
Step two – rocking out
Keeping your thumb ‘glued’ to the spot, allow the natural weight of your arm to drop into the rice bag. Using the muscles of your forearm, rock your wrist and relaxed fingers away from your body, extending your thumb. (Fig. 3.6)
 : practicing on a rice bag, step 2.
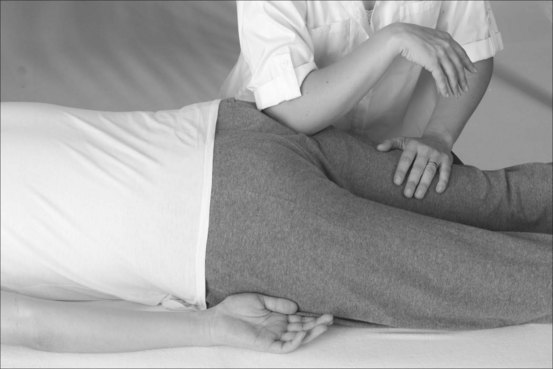
Step three – rocking in
Flex your forearm muscles and rock your wrist back towards you, bringing your fingers in towards your thumb, which now flexes backwards slightly. If you have a very flexible distal joint then you do not need to flex it backwards; just rock back and forth on the pad of your thumb. (Fig. 3.7)
 : practicing on a rice bag, step 3.
Applying Yi zhi chan tui fa to points (Fig. 3.8)
 : applied to a point on the body.
Moving Yi zhi chan tui fa
Tips for practice
• For point stimulation keep your thumb glued to the point at all times. Do not let it wander around off course.
• Make sure your shoulder is relaxed. Do not let it creep up towards your ear. Imagine your arm is resting on a tennis ball in your armpit.
• Keep your elbow lower than your wrist.
• Keep relaxed and get into a rhythm with the movement.
• Use the weight of your arm, not muscular force which will create stagnation.
• Close your eyes or look anywhere other than your hand for at least half of your practice time.
• Focus your mental attention and your energy gently on the tip of your thumb.
• Keep a sense of softness even when dispersing.
Clinical application and therapeutic effects
Where to apply the technique on the body
Yi zhi chan tui fa can be applied to all points, along channels and from point to point.
Tui fa pushing 
Tui fa is a relatively simple technique to perform. It involves pushing from one place to another, usually along a meridian or part of a meridian. It can be applied over clothes and a Tui na sheet, or directly onto the skin if you want to use an external herbal formula or massage medium. Tui fa can be applied with the thumb, fingers, palm, heel of the palm, knuckles or the elbow. (Fig. 3.9)
 : two palms on the back.
How to practice Tui fa 
Palm Tui fa
Try practicing using both palms on either side of the spine. Stand at the head of your volunteer and focus your Laogong PC8 points on the Bladder meridian. Allow your Qi to gather at your palms by focusing your mind there. Push down the Bladder channel from the top of the shoulders to the buttocks until the whole area feels warm (see Fig. 3.9). Then stand to one side of your volunteer and push with one palm from the buttocks to the end of the little toe. Repeat on the other side.
Heel of palm Tui fa
Put the heel of your palm on the area to be treated. Extend your wrist and your fingers; the fingers can be closed or slightly separated. Using the heel of the palm gives you a firmer pressure and is useful in areas with larger muscle groups such as the lower back, hips and thighs. (Fig. 3.10)
 : heel of the palm down the Stomach channel on the thigh.
Thumb Tui fa
Use either the pad of your thumb or the radial side. Tuck your fingers into the palm or rest them on the body. This method is useful on the face, head and neck and for tonifying points, particularly Back Shu points, in which case you apply the technique gently and with many repetitions: 100–300. (Fig. 3.11)
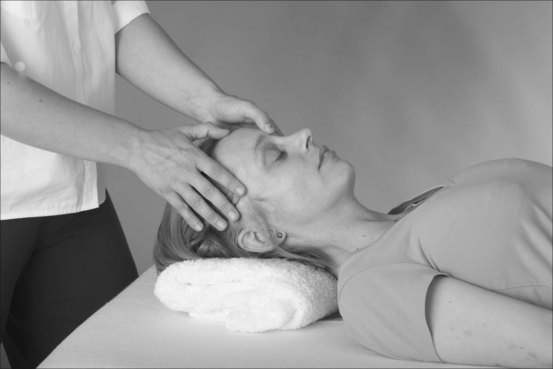
 : thumbs on the face.
Elbow Tui fa 
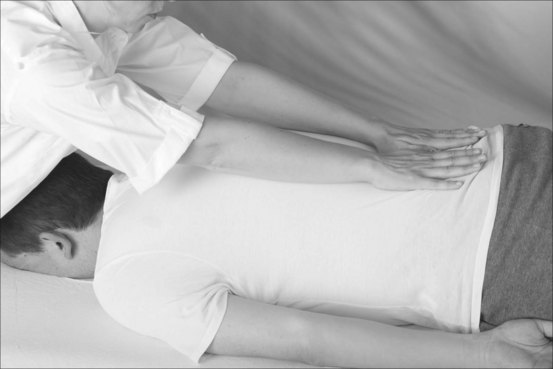
This is most commonly used on the back, down either side of the spine to stimulate the Huatuojiaji points. Apply a suitable massage medium first then put the tip of your elbow just to one side of the spine. With the palm of your other hand, guide and support the elbow; to do this make an ‘L’ shape between your thumb and index finger and cradle the elbow there. This makes the patient feel more comfortable and supported. Apply pressure with your elbow and push, sliding slowly down the back with your other palm behind. (Fig. 3.12)
 : elbow on the back.
Clinical application and therapeutic effects
Where to apply the technique on the body
Tui fa is extremely versatile and can be applied all over the body.
Rou fa kneading 
Rou fa is one of the most versatile and flexible Tui na techniques. You can use it anywhere on the body and can apply it with your thumb, middle finger, all four fingers plus your thumb, your whole palm, heel of your palm, major or minor thenar eminence. It can also be performed using the forearm or elbow for stronger, more vigorous stimulation. Rou fa is the root technique for four compound techniques (see p. 66) and because of its flexibility is often used as part of the coordinated techniques (see p. 73).
How to practice Rou fa 
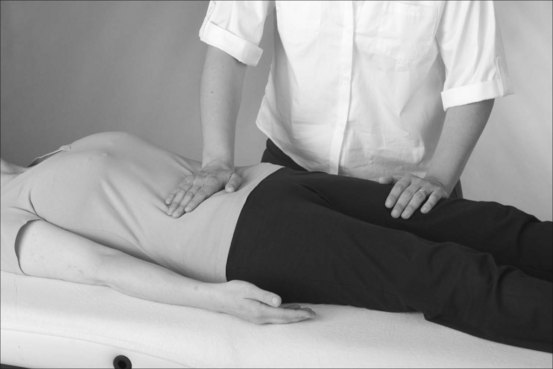
Example of working with your palm on the belly
Put your palm on your patient’s belly and focus your Laogong PC8 on your patient’s Zhongwan Ren12. Center and ground yourself and bring your breath, mind and Qi to your palm. Allow the weight of your arm plus a little additional pressure to drop down into your palm. Begin to knead circularly in a clockwise direction keeping your palm fixed and moving the underlying muscles (Fig. 3.13). Do not rub over the skin surface. Keep softness in your hand and wrist. Start slowly and gradually increase the speed to about 100 circles a minute. Knead until you feel the area become very warm. Repeat this over Qihai Ren6.
 : palm on the belly.
Now put the ulnar side of your forearm across your patient’s navel to stimulate Tianshu ST25, Daheng SP15 and Huangshu KD16. You will need to adopt a low posture with your knees bent. Keep your shoulder relaxed and begin to knead with your forearm in a clockwise direction. (Fig. 3.14)
 : forearm on the belly.
Example of working on points
Sit or stand depending on which part of the body you are working on and what feels most comfortable.
Example of various forms of Rou fa working down the back and lower limb
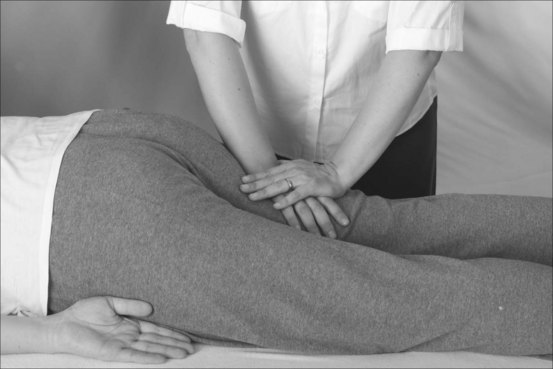
Now apply Rou fa to your patient’s sacrum and sacroiliac area using the heel of your palm and the major and minor thenar areas. Swap between these methods using whichever part of your hand fits most comfortably. Try using both hands together either side of the sacrum and around the hips. (Fig. 3.15)
 : heels of palms around the sacro-illiac area.
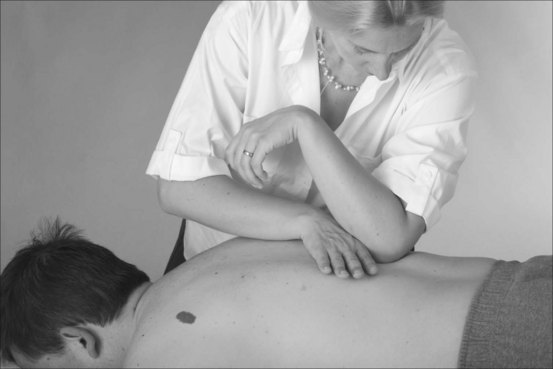
Now using the tip of your elbow, work deeply and briskly into major points around the buttocks such as Baohuang BL53, Zhibian BL54 and Chengfu BL36. When you work with your elbow, keep your wrist and hand relaxed. For support and for your patient’s comfort, cradle your elbow in the ‘L’ shape formed between the index finger and abducted thumb of your other hand and let that hand join your elbow in the kneading. (Fig. 3.16)
 : elbow on the buttocks.
Tips for practice
• Always move the underlying muscles and do not skim over the surface of the skin.
• Rou fa should feel soft and comfortable, deep and penetrating.
• You can stay in one place or move from one place to another, e.g. over the whole muscle group or along the course of a channel.
• Start slowly and gently, gradually increasing your pressure and speed.
Clinical application and therapeutic effects
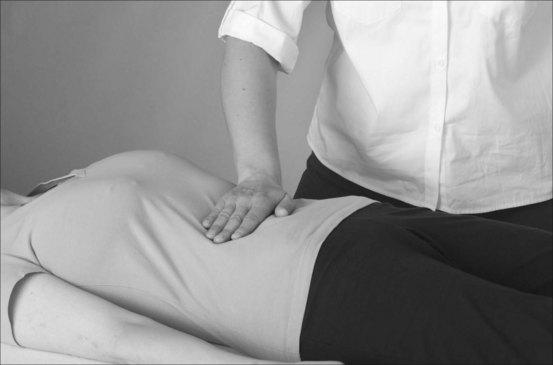
An fa pressing 
How to practice An fa 
 : tip of the thumb in the shoulder joint.
Example of An fa using the palm and heel of the palm
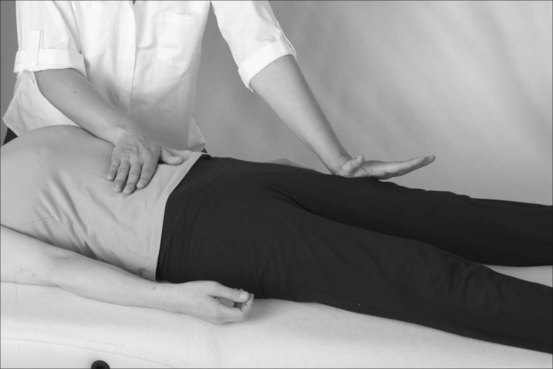
With your patient lying down supine, place your palm on their belly. Relax, ground and center yourself. Send your breath into your Laogong PC8 point. Starting at the level of the Dantian, apply pressure gradually as above (Fig. 3.18). Work with your patient’s breath. As they breathe in release your pressure and as they breathe out apply pressure. Work gradually and slowly in clockwise circles encouraging them to deepen their breath as you work. After several circles have been completed begin to work down their Stomach channel with the heel of your palm from Tianshu ST25 to Jiexi ST41. Do this three times on each side. Keep in contact with your patient at all times as you move along the course of the channel – just release your pressure and slide along to the next place.
 : palm on the belly.
When you are working on the limbs and back, remember to use your body weight to give you deeper pressure (Fig. 3.19). You can reinforce the pressure by using your other hand on top.
 : heel of the palm down the Bladder channel along the back of the leg.
Tips for practice
• Relax, check that you are grounded and centered and that your breath is moving freely.
• Use your Qi and breath as you start to push into the point.
• Use body weight, not muscular strength, for additional pressure.
• Take your time and do not ‘bash’ at it.
• You can reinforce the pressure by using your other hand or thumb on top.
• Do not break contact as you move along the course of a channel.
• Enjoy it. The more relaxed you are, the better it will be.
Clinical application and therapeutic effects
Where to apply the technique on the body
An fa can be used anywhere on the body to stimulate points and channels.
Therapeutic effects
• Slow, steady, gentle to moderate pressure for longer periods of time (over 3 minutes) will tonify, support and strengthen the channels, vital substances and Zangfu, calm the Shen, dispel anxiety and relax and strengthen muscles and tendons.
• Deep An fa held for 3 or more minutes will relieve pain, spasm and stasis and help to adjust and realign joints.
• Quick, rhythmic pressing and releasing will move and disperse stagnant Qi and Blood.
• Applied along the course of a channel using moderate pace and pressure, An fa will warm the channels and regulate and harmonize the flow of Qi and Blood and the functions of the Zangfu.
• Applied on the abdomen, An fa will aid digestion and remove retention of food.

Stay updated, free articles. Join our Telegram channel

Full access? Get Clinical Tree


