Basic Science of Bone Cement
Nanna H. Sillesen
Erik Malchau
Anders Troelsen
Henrik Malchau
Highlights of the Cemented Hip Arthroplasty
In 1960, Sir John Charnley described a new method of using polymethyl methacrylate (PMMA) as an anchoring medium for the femoral hip prosthesis (1). Combined with his research on the bone’s reaction to PMMA, Charnley developed a new surgical technique for hip arthroplasty that would revolutionize the treatment of joint dysfunction.
For many decades the cemented hip arthroplasty was the standard when dealing with serious hip joint dysfunction. In 1987 Jones et al. (2) alarmed the orthopedic community of “cement disease,” where they declared that cemented hip arthroplasty was unfit for any patient other than the elderly patient with a low activity level. The claims of cement disease are not attributed to any toxicity of the PMMA, but it was caused by a recent change in design of the femoral stem. The paper had much influence, and the use of cemented hip arthroplasty saw a decline, a trend ongoing ever since.
About Cement
The Material
Bone cement is PMMA, invented in the early 1900s and it was then better known as Plexiglas. PMMA is generated from methyl methacrylate (MMA) that is initiated to polymerize using benzoyl peroxide. The bone cement is distributed as a two-part system, consisting of a powder and a liquid. The powder consists of PMMA, MMA, and benzoyl peroxide. The reason for having some of the MMA already polymerized is to limit the shrinkage that occurs when polymerizing monomers as well as to lessen the exothermic energy released by the process. The liquid is MMA. When the polymerization reaction is initiated, the MMA swells as it is turned into PMMA, also the viscosity of the PMMA increases and will be rigid at the end of the reaction. The quality of the bone cement is highly dependent on what homogeneity is achieved when mixing the powder and the liquid. To achieve homogeneity it is important to have a fast mixing system to quickly and evenly mix the powder and the liquid. Mixing the components in a vacuum environment helps eradicate trapped air in the cement. Air bubbles increase porosity and lessen the mechanical strength properties of the material (3).
The cement’s function is to fixate the prosthesis components, and to transfer load from implant to bone as it serves as the bridge between these two modules. The interface between PMMA and the metal implant has been much discussed. When the prosthesis is implanted, a mechanical bond arises between metal and PMMA. However, this bond eventually ceases and thus all implanted stems will exhibit migration. The effectiveness of the interface of the PMMA to the stem is highly dependent on the design of the stem and its effect on the migration. Charnley achieved better results with high-polished stems in comparison with sand-blasted stems (4).
A successful interface between the bone and the cement is largely dependent on revascularization of the bone. Prepressurizing and vacuum mixing the cement allows for a larger percentage of shrinkage, as opposed to hand-mixed cement. The shrinkage permits revascularization to occur faster and prevents necrosis of the bone.
Cementing Techniques
Cementing the Femur
In the first generations of cemented hips the cementing techniques were rather unrefined. The femoral canal was fit out by curetting the cancellous bone and the bone cement was mixed by hand. The cement was placed with a manual antegrade technique into the femur and pressurized by hand.
With the second generation of cementation the bone was prepared with irrigation. The cement was introduced into the femur via a cement gun and a distal cement restrictor was placed to enhance the pressurization (5). It has over time become apparent that pulsatile bone lavage before cementing optimizes the bone bed and cement penetration (6). Pulsatile lavage, placement of the cement via a gun along with a cement restrictor to create a high pressure on the cement, are all mandatory parts of modern cementing techniques (7,8).
The modern cementing technique relies on occluding and sealing of the intramedullary canal to generate the sufficient pressure to enhance cement penetration and strength (9). Outcomes are better with a well-documented cement of medium or higher viscosity (10,11).
The femoral intramedullary canal is opened in the same fashion as for noncemented total hip arthroplasties (THAs). When preparing the femoral canal for the cement, it is important to preserve about 2 to 3 mm of the strong cancellous bone in the canal to allow for the best interdigitation of cement and bone (12). The femoral canal and cancellous bone are then cleaned with pulsatile lavage to remove excess blood, fat, and shattered trabecular bone (Figs. 16.1 and 16.2) in order for the best possible penetration of cement into the intertrabecular spaces. Reaming the femoral canal too aggressively should be avoided because the shear strength of the bone–cement interface will be diminished (11,12,13). The distal femur is blocked with a distal cement restrictor, which comes in various designs and materials. The cement restrictor can show minor migration distally when the cement is added into the femoral canal, but optimally the plug stays in the intended position without leaking when pressure is brought to the cement (Fig. 16.3).
The cement is vacuum mixed and applied retrograde via a cement gun (Fig. 16.4) and the intramedullary pressure of the cement is intentionally increased with a femoral pressurizer to strengthen the cement mass and allow for the best possible penetration into the cancellous bone (Fig. 16.5) (14).
Some stem designs are provided with a distal centralizer, at the tip of the stem, to place it in the center of the femoral canal; this device also comes in various designs (Fig. 16.6).
The stem is then gently immersed at a speed of 1 cm/s (0,25 inch/s) into the cement under pressure and held in the desired position until the cement is dry (Fig. 16.7). These techniques are currently considered to be the “gold standard” of modern cementing technique, which significantly enhance implant survival rate (7) and improve both the long-term abilities and the bone–cement interface (15,16).
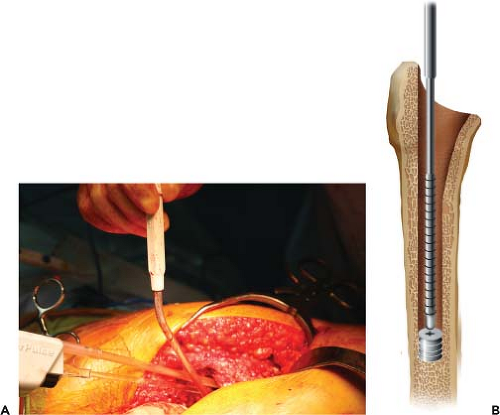 Figure 16.1. A: Pulsatile lavage of the femoral canal. B: Graphical presentation of pulsatile lavage. |
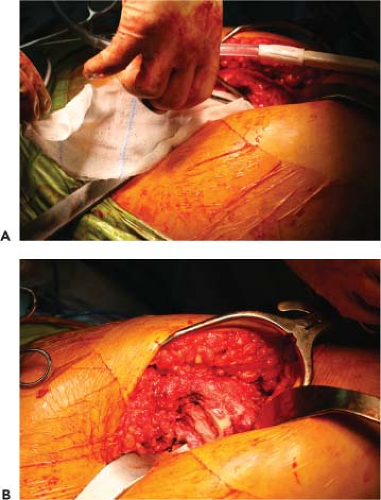 Figure 16.2. A: Cleaning and drying the femoral canal with wet gauze, before applying the cement. B: Gauze in the femoral canal. This is to ensure that the canal stays dry and clean while waiting for the cement to be ready to use. |
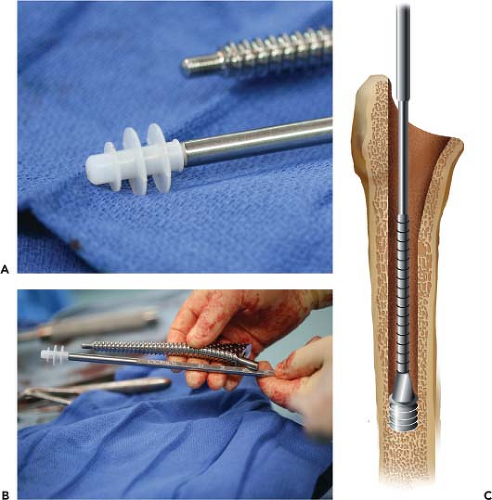 Figure 16.3. A: Distal femoral plug on the plug inserter. These come in various designs, all with the basic idea to plug the femoral canal so the cement stays in the intended area around the stem. B: Measuring depth of plug placement into the femoral canal. C: A graphical presentation of the placement of the distal plug. |
 Figure 16.4. A: Vacuum mixing of the cement. B: Applying the cement mixer on to the cement gun. |
 Figure 16.5. A: Application of the cement in to the femoral canal. B: Femoral pressurizer added onto cement gun tip. C: Applying pressure to the cement in the femoral canal. D: Graphical presentation of cement pressurization. |
Cementing the Acetabulum
The modern acetabular cementing techniques are based on many of the same principles that apply to the femur. These include preparing the bone bed with pulsatile lavage and applying the cement under pressure to have it penetrate the cancellous bone bed.
After reaming—in a similar fashion as used for noncemented cups—anchoring holes are drilled into the acetabular bone bed to provide the cement with an enhanced grip (Fig. 16.8). Pulsatile lavage is performed to clean the cancellous bone from blood and marrow. The cement is then applied to the acetabulum while continuously applying pressure with an acetabular pressurizer or a sponge in a sterile glove (Fig. 16.9) (17). The pressure must exceed 5 kPa, which is the pressure threshold to prevent blood from laminating between the bone and the cement that can compromise anchoring of the cement (18,19).
Implant Design: The Femoral Stem
The cemented femoral components depend on many design factors and are also affected by patient and surgeons’
circumstances. The two main areas of concern are the long-term clinical performance of the stem and the practical issues of instrumentation and versatility of the system. The stem design must be able to perform well in the complex interaction with cement and a variety of clinical scenarios.
circumstances. The two main areas of concern are the long-term clinical performance of the stem and the practical issues of instrumentation and versatility of the system. The stem design must be able to perform well in the complex interaction with cement and a variety of clinical scenarios.
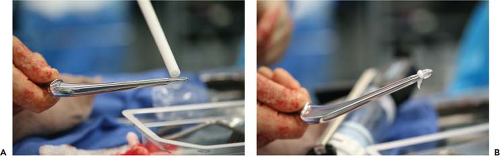 Figure 16.6. A: Adding a bead of cement onto the stem for the distal centralizer. B: Distal centralizer applied onto stem on a bead of cement. |
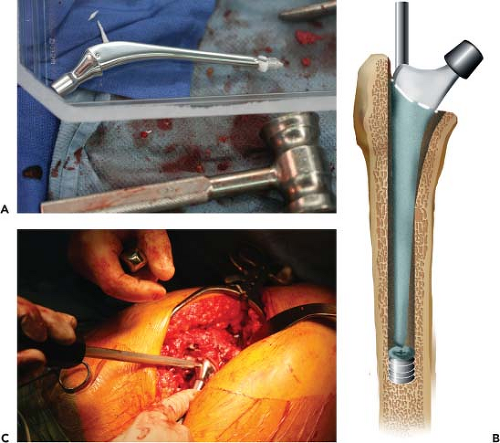 Figure 16.7. A: Polished stem ready to immerse into cement in the femoral canal. B: Graphical presentation of an immersed stem. C: The stem is merged into the cement in the femoral canal. Excess cement is removed from around the neck of the stem. Small particles of excess cement can cause inflammation, increased wear to the polyethylene liner, and compromise articulation. |
The original Charnley stem design models were polished (DePuy International Ltd. Leeds, UK). One example of his stem designs is one with relatively rounded edges in the medial cross-section, it is polished, has a small collar, and it is rounded proximally. Another of Charnley models is the double-tapered stem without a collar; it is also polished, but has a more square-rounded profile in the cross-section. After the polished stem was introduced, the design showed good qualities because of the polished surface in combination with the viscoelastic properties of the cement. The design and polish allowed microsubsidence of the stem within the cement causing stress relaxation of the cement and thereby preserving a balanced loading of cement and bone. This type
of loading pattern was later described as the force-closed mode of fixation (20).
of loading pattern was later described as the force-closed mode of fixation (20).
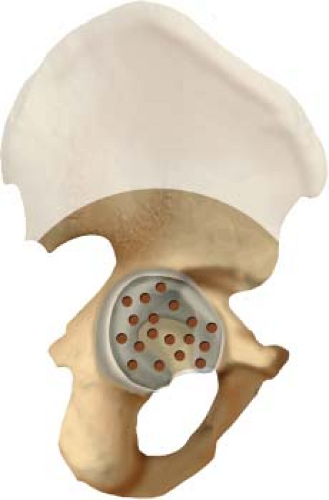 Figure 16.8. Graphical presentation of the acetabulum prepared with holes for the cement. |
Stem designs has in recent years changed toward increasing roughness of the stem surface based on a philosophy of a rigid interlock between the cement and the stem being more optimal (later described as the shape-closed fixation). The deterioration of outcome brought by this development along with some unsuccessful cement products was partly because of the increased use and development of uncemented stem designs for primary THA (10).
The shape-closed fixation is a design that accomplishes rigid fixation at the stem-cement interface. The surface of these designs has a matte or textured surface that allows for the cement to permeate into the surface of the stem creating a solid bond in shape between the cement and the stem. The surface can be matte, grit blasted, small metal beads, trabecular metal, porous surface, a precoating, or have indentations—all various attempts to create the best mode of fixation (Fig. 16.10).
The philosophy of force-closed fixation design is based on the polished stem, similar or in line with the design from the original Charnley stems. The fixation is based on the balance of forces without requirement of a rigid bond between the cement and the stem. The smooth surface allows the stem to subside within the cement mantle, usually a couple of millimeters within the first years in vivo, until the stem and cement has reached an equilibrium of forces (Fig. 16.11).
The energy transmission in this design system causes the cement to compress radially by compression, convening the energy to the compact bone of the femur. The polished stem migrates more distally and it produces various micromotions disrupting the bone–cement interface which causes the cement to compress. However, this does not seem to cause cracks or fractures in the cement. Apparently, the cement withholds energy better when compressed compared to loading in tension or by shear as it is the case for stems with a rough surface (21,22).
Stem designs with a rough surface acquire a perfect bonding, namely shape-close fixation, between stem and cement at all times. Some studies have found this design to have a high interface strength (23). The fatigue life of the cement-stem interface is also found to be significantly higher (24) and associated with better short to medium survival (25,26,27). However, in one study the precoated stems had a loosening rate at 24% with an average of 8 years follow-up, which is a poorer survival rate compared to the polished stems (28,29,30), findings confirmed by several other preclinical and clinical studies (31,32,33,34,35). In comparison to polished stems, for example, the Exeter modular stem shows a survival rate of 85.8% to 93.5% at 27 years with the end point being aseptic femoral loosening (36). Thus, despite the theoretical advantages of the fully coated rough stem design, the precoating is currently a disadvantage for the long-term survival of such femoral implants (35,37,38,39,40


Related posts:


Stay updated, free articles. Join our Telegram channel
Full access? Get Clinical Tree
