Chapter 7 Autologous Chondrocyte Implantation
Introduction
Historical Perspective
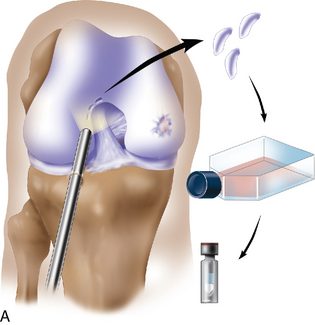
Autologous chondrocyte transplantation is known as autologous chondrocyte implantation (ACI) in North America. After several visits to Sweden in the early 1990s, I adapted the technique described by Peterson and coworkers1 (Figure 7–1). After institutional review board approval was given in 1994, the technique of ACI has been used to manage large acute and chronic focal articular cartilage injuries in the knee since March 1995. As of 2010, more than 600 treatments have been performed at our institution. More than 15,000 patients have been treated with ACI in North America and another 20,000 have been treated worldwide, for a total of 35,000 patients.
In my experience, the patient who is highly motivated, is realistic about the rehabilitation protocol, is a nonsmoker, and is not using narcotics for pain management is desirable. A strong social support system and a sense of vitality as measured by the Medical Outcomes Study 36-Item Short-Form Health Survey (SF-36) proved to be high statistical predictors of a good physical outcome in a study conducted at our institution and presented at the International Cartilage Repair Society in Toronto Canada 2001.2 Patients younger than 18 years also have an excellent chance of returning to full activities.3
This chapter discusses the role of ACI for the treatment of full-thickness cartilage injuries of the knee. Since the initial publication on this topic,1 there has been a renewed interest in the treatment and research of this clinical problem. The earlier published study indicated good and excellent results in 14 of 16 patients treated on the weight-bearing femoral condyles. Only 2 of 7 patients with patellar lesions who were treated had similar results.
Indications
The initial early indication for ACI was a symptomatic full-thickness weight-bearing chondral injury of the femoral articular surface in a physiologically young patient who was compliant with the rehabilitation protocol. The results of chondral injuries for the patellofemoral joint were not as consistently high as the results of femoral weight-bearing condyles. Cases of osteochondritis dissecans have also done well.4 The ideal indication for ACI is treatment of a symptomatic unipolar Outerbridge grade III or IV injury, with no more than the reciprocal articular surface having Outerbridge grade I to II chondromalacia.
However, these injuries are uncommon. In a classic review of 31,516 knee arthroscopies, Curl et al5 found that the incidence of an isolated femoral condyle defect in patients younger than 40 years was less than 5%. However, the incidence of articular cartilage injuries throughout the knee was almost 60%. This has also been my experience.
Because of the heterogeneous nature of articular cartilage defects found in knee arthroscopies that are symptomatic yet focal in nature, early on I elected to classify the treatments into relatively homogeneous groups: simple, complex, and salvage.6,7
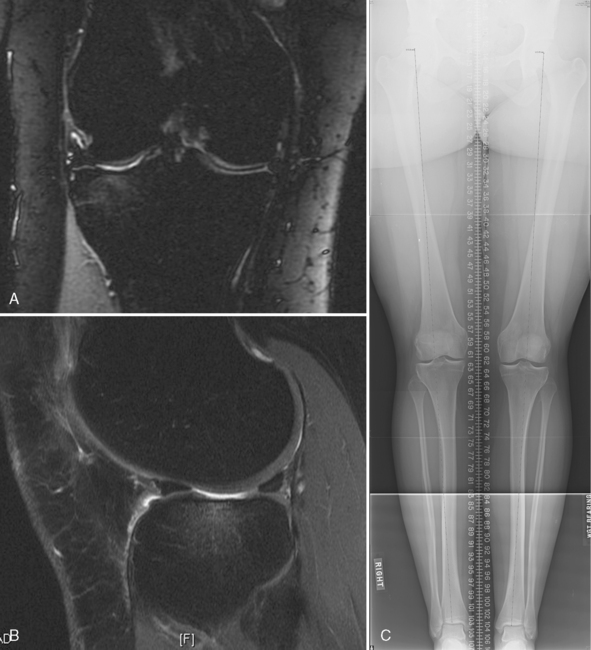
Management of the larger group of patients in the complex and salvage treatment categories has resulted in excellent clinical outcomes despite the heterogeneous nature of the cartilage injuries.7 For this reason, my approach to treating young patients who are disabled with pain and poor function involves careful assessment of long-leg alignment x-ray films, a well-preserved weight-bearing joint space or early joint space narrowing, magnetic resonance imaging (MRI) scan, or arthroscopic evidence of focal acute or chronic articular cartilage injury. If the lesions are focal in nature when assessed arthroscopically and have identifiable borders and reasonable cartilage thickness, I consider the patient for ACI if the patient’s symptoms appear to be referrable to the areas of chondral damage. A cartilage biopsy is then performed, and the cells are cultured, cryopreserved, and stored for second-stage implantation.
Arthroscopic assessment and cartilage biopsy for cell culturing
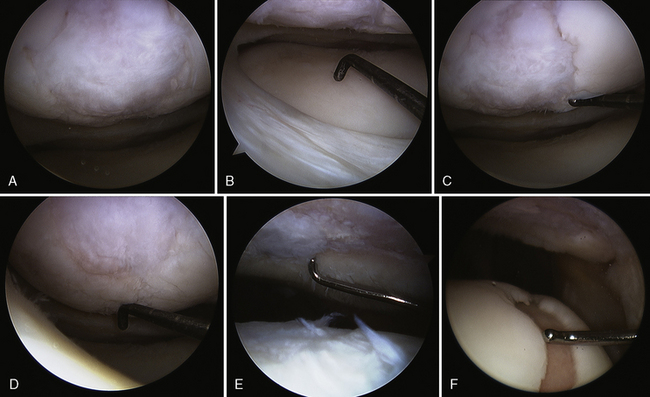
Arthroscopic assessment of the joint and possible biopsy for articular cartilage culturing require careful and systematic evaluation of the articular surfaces with an arthroscopic probe to demonstrate and determine the extent of grade III and IV chondromalacia of the symptomatic lesion. The opposing tibial articular surface must be probed throughout to ensure that the meniscus is intact, the articular surface is healthy, and the chondromalacia is no greater than grade II (superficial fissuring) ideally, otherwise it may also be considered for repair if the radiographic joint space is intact and the defect rim is healthy (Figure 7–2). The femoral condyle lesion should be assessed for its anterior to posterior length and whether it is a contained or an uncontained lesion. The quality and thickness of the surrounding articular cartilage should be assessed. This will determine whether healthy cartilage will be available for periosteum or colagen membrane suturing or whether an uncontained chondral injury will require suturing through synovium or small drill holes through the bone. The posterior extent of the lesion is critical because it must be accessed at the time of open arthrotomy for periosteal suturing.
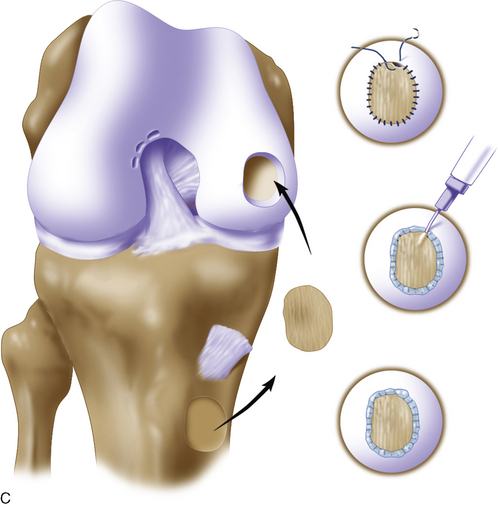
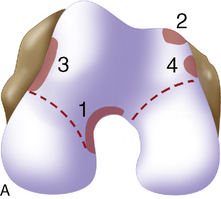
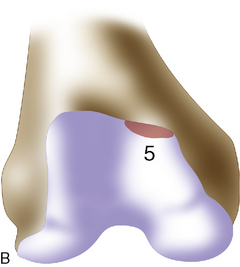
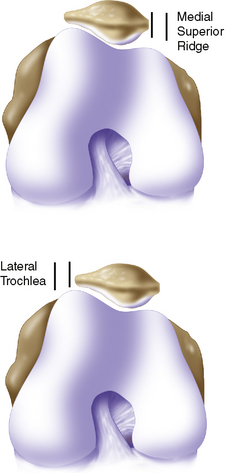
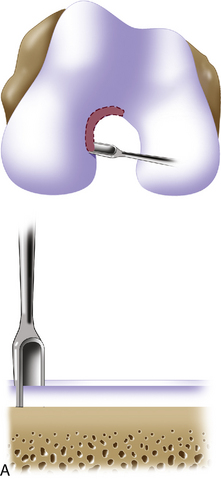
If a lesion is considered appropriate for treatment, then a biopsy site for cartilage procurement must be selected (Figure 7–3). In Europe, the site most commonly chosen for biopsy is the superior medial edge of the trochlea, adjacent to the medial patella (odd) facet (Figure 7–4). The biopsy site will not produce a reciprocal symptomatic injury because there will be no opposing articular surface to make its contact. The patellofemoral joint must be assessed carefully. If a patellar facet is overhanging on the medial side, often the superior lateral facet may be harvested. My preferred location is the superior and the lateral intercondylar notch because it is convenient and is known to not create problems when removed, as in anterior cruciate ligament (ACL) reconstruction (Figure 7–5). Finally, the superior transverse trochlea margin adjacent to the supracondylar synovium, which may be biopsied through a separate superior portal, or the distal lateral trochlea at the sulcus terminalis as per harvesting an osteochondral autograft transfer system graft. At the time of open implantation, the synovium may be advanced over the biopsy site via sutures through the articular cartilage.
Surgical correction of background factors predisposing to chondral injury
Long-leg alignment is evaluated in all patients (see Chapter 3) with double leg stance long alignment digital radiographs that include the hip, knee, and ankle for varus and valgus mechanical alignment assessment. Clinical examination is notoriously unreliable for long-leg alignment.
Patellofemoral alignment is assessed by clinical examination with localization of the tibial tubercle, determining the quadriceps angle measured with the patella in the reduced position in the trochlea, the presence of a J-sign as the patella relocates from the extended into the flexed position, and the absence or presence of crepitus of the patella with active extension of the knee. If the patient is overweight and the clinical examination is difficult, a computed tomographic (CT) scan can be performed with the knee in extension, first with the quadriceps in the relaxed and then in the contracted position to assess patellofemoral subluxation (see Chapter 10). Dye can be added within the joint to localize and measure the chondral defect(s) in the patella, trochlea, or both.
Surgical implantation of autologous chondrocytes
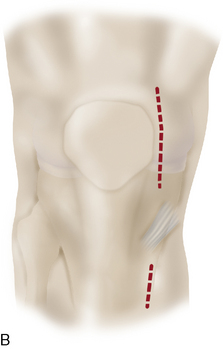
For a unicondylar injury, a medial or lateral parapatellar arthrotomy is used. This is usually accomplished through a midline skin incision or a longitudinal parapatellar incision. Adequate exposure is crucial to good suturing of periosteum, and several retractors are often required in order to obtain this goal. Posterior lesions on the femur will often require hyperflexion of the knee and occasional takedown of the meniscus in subperiosteal fashion with intermeniscal ligament takedown and coronary ligament release off the tibia as the meniscus is peeled back with the entire sleeve of tissue (Figure 7–6). A repair of these at the end is then undertaken during closure. For multiple lesions, a traditional medial parapatellar arthrotomy is often required with subluxation or dislocation and eversion of the patella with hyperflexion.
Defect preparation is critical. Radical debridement of all fissured and undermined articular cartilage surrounding the full-thickness chondral injury to healthy contained cartilage is desirable. Early failures occurred due to inadequate debridement with poor integration to adjacent cartilage, leading to progression of disease in the adjacent nondebrided fissured cartilage or delamination of the repair tissue from the damaged native tissue. Oval or curvilinear excisions are made using a no. 15 blade to incise the articular cartilage vertically down to the subchondral bone plate without penetrating the bone. Small ring or closed curettes and periosteal elevators are used to debride the degenerating articular cartilage back to healthy host cartilage. Maintaining an intact subchondral bone plate without subchondral bone bleeding is important. It is essential not to perforate the subchondral bone plate so that a mixed marrow cell population does not populate the chondral defect in addition to the end-differentiated chondrocytes that have been grown in vitro. A contained lesion is desired, and it is better to leave a minimally chondromalacic cartilage border than to remove the border and leave an uncontained lesion that would require suturing to synovium or microholes through bone drills (Figure 7–7). Once a healthy defect bed is prepared, its length and width are measured. If the bed is irregularly shaped, then a template can be made with sterile tracing paper (sterile glove packaging paper works well). A sterile marker can be used to make a template of the defect, which can be cut out to fit the defect perfectly. This template then can be oversized by approximately 2 mm in both length and width on the periosteal site when it is prepared (the periosteum shrinks as it is procured). Alternatively, this can be measured and marked with a marker pen directly onto the periosteum if it is an uncomplicated shape and then cut directly (Figure 7–8).
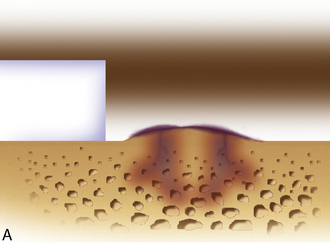
Any subchondral thickening, sclerosis, or intralesional osteophyte formation at the base of the chondral defect as a result of a prior marrow stimulation technique (drilling, abrasion, microfracture) should be taken down to the level of native subchondral bone. This can be performed with a rongeur and a high-speed bur (usually 5-mm diameter) to the level of native subchondral bone (Figure 7–9). This will provide a cavity for the cell suspension, which is injected underneath the membrane cover and will lessen the stiffness of the subchondral bone so that newly forming cartilage repair tissue will integrate and form a new osteochondral unit with a viscoelastic cartilage surface, a subchondral bone plate that is not overly stiff to cause premature degeneration of the tissue and a normal subchondral cancellous bone. Surprisingly, this thickened and calloused bone does not bleed when a tourniquet is let down. Bleeding, if it occurs, usually is scant and easily managed with a neural patty soaked with thrombin and epinephrine or with a drop of fibrin glue. Occasionally a fine-tip electrocautery is used.
Periosteum may then be placed gently onto the defect in the appropriate orientation. Nontoothed forceps are used to handle the periosteum by its edges only. Suturing is usually done with 6.0 Vicryl suture on a P-1 cutting needle, which has been immersed in sterile mineral oil or glycerin. An 8-inch length usually is adequate; the remainder of the suture is cut off and discarded. Suturing is done in an interrupted and alternating fashion. Sutures are placed through the periosteum and then the articular surface. The knots are tied on the side of the periosteum so that they remain below the level of the adjacent cartilage. In this way, they will not unravel with motion and evert the periosteal edge; rather, they act as a washer seal on the edge of the vertical articular cartilage defect (Figure 7–10). Hence, a watertight seal can be obtained by suture technique alone in most cases. When alternately suturing corners, the analogy of tightening up a drum skin alternately is followed. In this way the patch is tensioned adequately throughout the entire defect, and the most superior aspect of the periosteal patch is left open to accept saline to check edge integrity and then chondrocytes. Interval sutures of approximately 3 to 6 mm are made and protrude through the articular surface by at least 3mm.
Advanced techniques for surgical transplantation of autologous chondrocytes
Exposures
Posterior Femoral Lesions and Tibial Plateaus
When attempting to approach a femoral condyle lesion that is very posterior or a tibial plateau lesion, and a takedown of a soft tissue envelope to varying degrees may be necessary. This involves incising the intermeniscal ligament followed by the coronary ligament attachment to the tibial plateau with a subperiosteal peel off the tibia in a posterior direction. It is easier to perform on the medial side with a long sleeve of medial retinaculum to the deep portion of the medial collateral ligament in the midcoronal plane. This usually is enough to get to a posterior medial femoral condyle. Two options are available to get to the midportion of the medial tibial plateau or the posterior portion. The deep medial collateral ligament may be further taken off in a continuous sleeve with the anterior portion until the entire tibial plateau is delivered anteriorly by externally rotating the tibia and hyperflexing the knee. Transosseous sutures with no. 2 Ethibond can be used to reattach the sleeve of tissue back to its native position at the time of closure. This process is relatively easy when the sutures are passed almost at the level of the joint where the metaphyseal bone is softer and the suture needle can pass directly through the bone in one easy step. The anterior horn of the medial meniscus is reattached through transosseous sutures back to its native origin. The intermeniscal ligament is repaired. The other option is to take down the origin of the medial collateral ligament with a bone block off the femoral condyle, which completely opens up the medial side of the knee. I have found that this is rarely necessary and that the first option is preferable unless a very posterior medial tibial plateau requires suturing (Figure 7–11).
Approaching the lateral tibial plateau or posterior lateral condyles is often more difficult. A lateral parapatellar arthrotomy is performed. The intrameniscal ligament is released and the coronary ligament with the anterior horn of the lateral meniscus peeled subperiosteally with the sleeve, which will often include some of the attachment of the iliotibial band insertion at Gerdy’s tubercle. The patella is subluxed into the medial parapatellar gutter, and the knee is hyperflexed and internally rotated. This will usually deliver the lateral tibial plateau quite well and will expose the posterior lateral femoral condyles. This step may not be possible if the knee is stiff and the tibial tubercle insertion is located very laterally. In this situation, TTO with a subvastus lateral arthrotomy is recommended, which will easily expose the distal lateral femoral condyles and the entire tibial plateau. The meniscus may still need to be taken down and reapproximated after the procedure for tibial plateau injury is completed (Figure 7–12).
ACI plus High Tibial Osteotomy, High Tibial Osteotomy Plus Tibial Tubercle Osteotomy, Distal Femoral Varus Osteotomy
A common wear pattern is a varus knee with a medial femoral condyle lesion or a varus knee in combination with a trochlea or patellar injury. If the condition is a medial femoral condyle defect with a varus knee, a longitudinal incision is made from the superior medial pole of the patella longitudinally and distally to the inferior aspect of the tibial tubercle (Figure 7–13). A medial parapatellar arthrotomy is performed, the defect is débrided, and a template is made. The template is applied to the periosteum, which has been exposed distal to the pes anserinus tendons, and the periosteum is harvested. Takedown of the pes tendons and superficial medial collateral ligament is performed in preparation for tibial valgus-producing osteotomy (see Chapter 8). The osteotomy is performed and fixated. The tourniquet is let down, and any bleeders in the soft tissue envelope or the subchondral bone plate in the area to be transplanted are resolved. Careful suturing and transplantation to the medial femoral condyle is performed.
If arthroscopy revealed maltracking of the patella with or without a chondral defect, TTO is performed with a medial subvastus and lateral subvastus arthrotomy elevating the extensor mechanism proximally. The defects are debrided, the periosteum is harvested, and the tibial valgus osteotomy is performed and fixated (see Chapter 8, combined osteotomies). The periosteal covers are microsutured and transplanted. The tibial tubercle is repositioned and centered to normalize the extensor mechanism forces postoperatively.
ACI plus Tibial Tubercle Osteotomy for Posterior Exposure/with Patella/Trochlea ACI
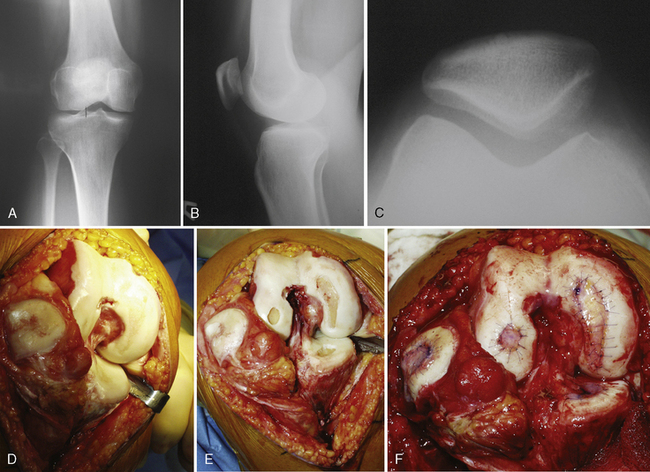
Patellofemoral maltracking combined with a trochlea or patellar chondral injury requires careful preoperative assessment by physical examination and CT or MRI. TTO combined with soft tissue realignment to ensure proper tracking is paramount to successful graft healing. My preference is a longitudinal incision just off the midline laterally. In this way, as the tibial tubercle is anterior medialized a skin incision is placed over the anterior muscle compartment and not over a bony prominence. In the event of wound breakdown, the bone is not exposed and the health of the wound is optimized. A lateral subvastus arthrotomy allows visualization of the posterior femoral condyle, damaged patella, trochlea, or all of these. Assessment of dysplasia of the trochlea can be performed at this time. The laxity of the medial soft tissue envelope also can be assessed. If the medial side of the knee is excessively lax to patellar stability, then a medial arthrotomy is performed, leaving a good cuff of tissue attached to the patellar portion of the extensor mechanism. TTO can then be performed either leaving the distal hinge attached per a classic Fulkerson-type osteotomy or making an oblique distal countercut and elevating the extensor mechanism proximally (Figure 7–14), a posterior lateral osteochondritis dissecans lesion.
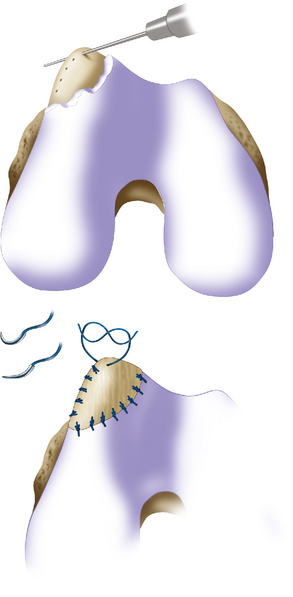
Trochlea debridement and transplantation of the surfaces can then be easily performed. Trochlea articular cartilage is generally 3 to 5 mm thick. In order for postoperative rehabilitation to proceed without patellofemoral catching sensations, the debridement should shape the proximal and distal (or leading and trailing) margins of the defect so that they slope slightly toward the subchondral bone bed, and the medial and lateral margins should be vertical. When a defect is confined to an isolated medial or lateral trochlea facet, then microsuturing a periosteal or collagen membrane flush to the articular surface is easy. However, when the defect crosses the midline sulcus, the order of stitching is important to restore concavity of the trochlea (Figure 7–15). Microsuturing without attention to this step will result in a flat trochlea sulcus and abnormal forces to the membrane with possible early failure.
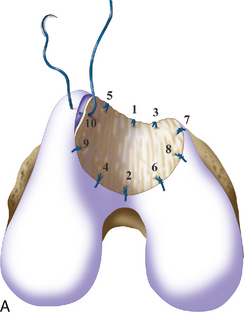
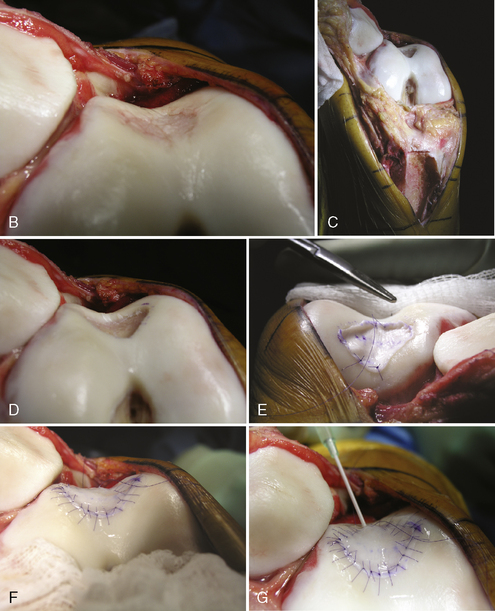
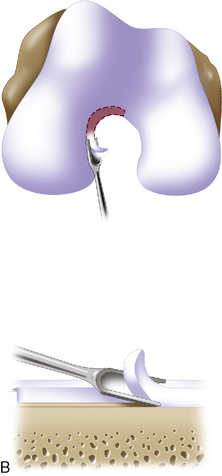
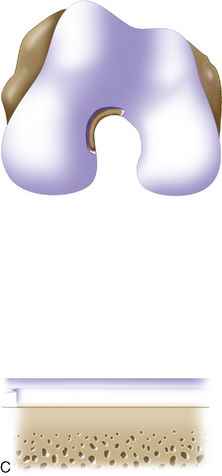
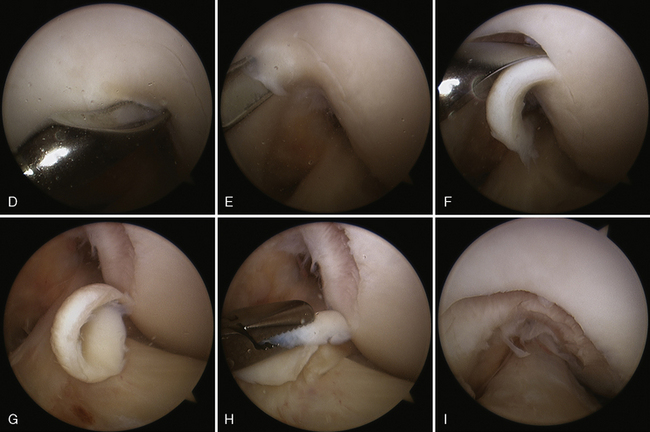
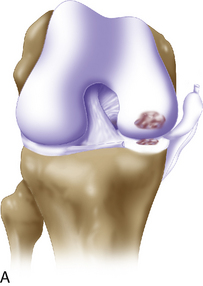
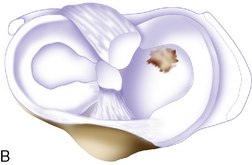
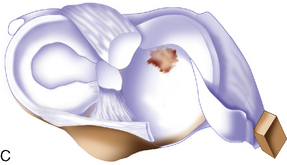
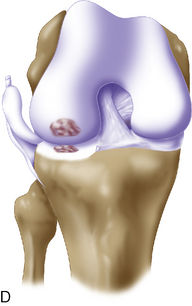
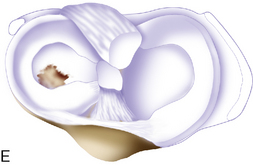
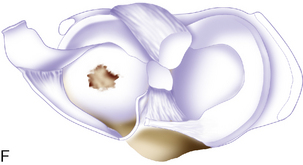
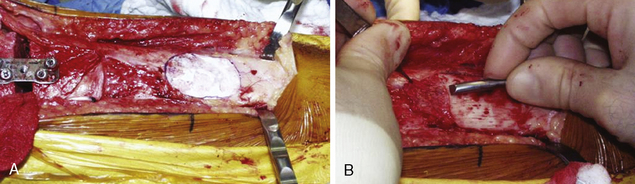
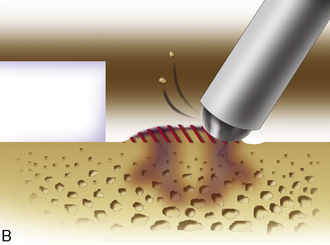
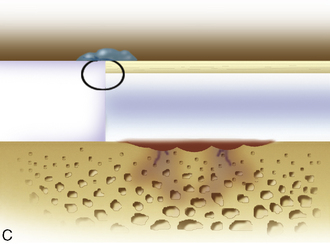
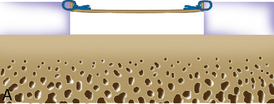
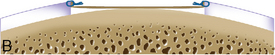
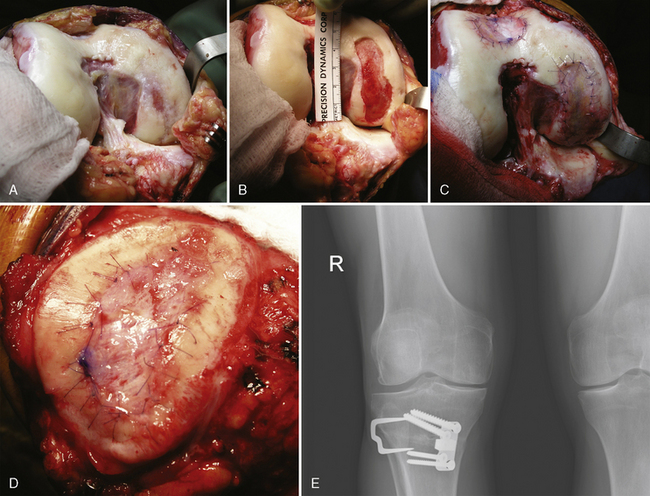
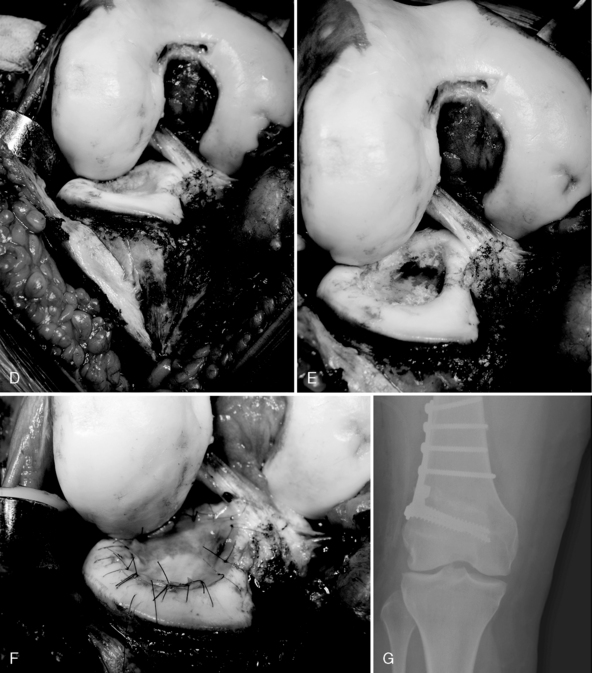
Figure 7–15 Autologous chondrocyte implantation suturing technique to the trochlea, combined with tibial tubercle osteotomy. A, When microsuturing a large defect of the trochlea across the midline sulcus, it is important to oversize the membrane in a medial to lateral direction. Suturing in a proximal to distal direction starting at the midline sulcus and working laterally and medially allows restoration of the concavity of the sulcus without undue tension on the membrane and an even depth throughout the entirety of the cartilage defect. B, Close-up view of a trochlear defect in the left knee of a 32-year-old man who had undergone an extended tibial tubercle osteotomy as shown in Figure 7–14. C, The defect is clearly V shaped and will require a careful suturing technique to the store at the articular topography. D, Close-up view after debridement. E, Microsuturing should start at the central sulcus proximal and distal (as shown) in an alternating medial and lateral pattern to restore the concavity to the trochlea. F, Final appearance of the trochlea membranes sutured in place and sealed with fibrin glue. The superior opening sutures are left long. G, Injection of autologous chondrocyte suspension underneath the opening, which was closed after the defect was filled.
Similarly, after tibial tubercle proximal ionization with subvastus laterally release, patella debridement and transplantation of the surfaces can be easily performed. The patellar cartilage is generally thicker than the trochlea (5-mm thick), so consideration for restoring the articular surface shape with the microsuturing technique is important (Figure 7–16). The medial and lateral margins of the debrided defect should be vertical to the subchondral bone, and the proximal and distal margins should be slightly sloped to ensure that tracking occurs without mechanical symptoms to the patient. However, circumferential vertical margins are necessary when cartilage is a thin. In this situation, the microsuture technique is even more critical to restoring the normal median ridge of the patella and ensuring that the membrane cover is not bottomed out on the subchondral bone. With this technique, there is always a cavity for the cell suspension to grow to the membrane surface.
Related posts:
 Chondral Injury and Osteoarthritis: The Impact of Articular Cartilage Lesions
 Use of Fresh Osteochondral Allograft for Chondral and Osteochondral Defects in the Knee
 Patient Evaluation, Cartilage Defect, and Evidence: Putting It All Together
 Patient-Specific Unicompartmental and Bicompartmental Resurfacing Arthroplasty
 Emerging Technologies
 Tibial Osteotomy
Stay updated, free articles. Join our Telegram channel

Full access? Get Clinical Tree


