Arthroscopic Treatment of Fractures about the Shoulder
Historically fractures about the shoulder have been managed in an open manner. However, with the advent of advancing technology and evolving techniques, many injuries can now be managed with arthroscopic reduction and internal fixation (ARIF).
Priority number one is (and will always remain) to accomplish the most optimal result for every patient we encounter. A well-performed open fracture fixation is preferable to a mediocre arthroscopic procedure. However, if the arthroscopic technique can be done well and reliably, it offers significant advantages. First and foremost is the advantage of minimally invasive techniques. Similar to the philosophy of percutaneous fixation of periarticular fractures of the lower extremity, minimizing soft tissue dissection with an arthroscopic technique may preserve greater blood supply and thus lead to improved healing with a lower risk of infection. With glenoid osteosynthesis, the greatest benefit of an arthroscopic approach is the ability to obtain and maintain a reduction without the subscapularis tenotomy that is required to obtain access to the joint during an open approach. Paralleling the advantages of arthroscopic rotator cuff repair over open rotator cuff repair, arthroscopic fixation of tuberosity fractures may lead to decreased postoperative stiffness and lower incidence of infection. Based on these advantages, we have gradually increased the number and types of fractures we manage arthroscopically. As one’s skills improve, increasingly complex fractures may be managed arthroscopically.
GLENOID FRACTURES
Glenoid fractures may result from high-energy axial or off-axis load injuries, or they may occur in association with traumatic anterior shoulder dislocations. Acute lesions, particularly those that are large, often benefit from operative management. The size and quality of the bone fragment is usually the determining factor in the decision of whether to use screw fixation or to incorporate the fragment in a Bankart repair with suture anchors (see Chapter 12 “Repair of Anterior Instability without Bone Loss” for full discussion). After initial closed reduction of an anterior dislocation (which is typically rather easy because of the glenoid fracture), postreduction radiographs should be obtained to determine the status of the glenoid and humeral head after the reduction (Fig. 19.1). We also obtain a computed tomography (CT) scan, preferably with three-dimensional (3D) reconstructions, on these traumatic injuries (Fig. 19.2).
For younger active patients (<30 years old), we fix almost all glenoid fractures, either with suture anchors or with screws. In older patients, we consider acute screw fixation of glenoid fractures that are >20% of the glenoid width. Thankfully new techniques and technology have made glenoid fractures more amenable to arthroscopic repair. Our surgical planning for these fractures takes several factors into consideration:
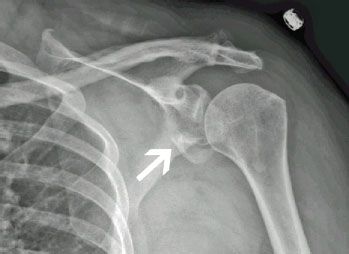
Figure 19.1 Anteroposterior (AP) radiograph of a left shoulder demonstrates a large displaced anteroinferior glenoid fracture (white arrow).
Bony Bankart Fracture Repair
Diagnostic arthroscopy is performed via the standard posterior portal. Typically, joint visualization is initially obscured by fracture hematoma. An arthroscopic shaver is used to evacuate the fracture hematoma and fully visualize the fracture fragment. The anterior portal is placed as low as possible to maximize the potential to reach the inferior glenoid through this portal (Fig. 19.4). Next the anterosuperolateral (ASL) portal is established. This will be an important viewing portal as well as a working portal (Fig. 19.5). It is important to utilize arthroscopic cannulas in all three intra-articular portals. This will allow for easy exchange of the arthroscope and instruments into whichever portal offers optimal visualization/instrumentation. Any associated pathology is then identified. However, since it is important to address the fracture prior to excessive swelling and fluid extravasation, one should delay any additional procedures until after the bony Bankart lesion is addressed.
Once the bony Bankart is identified, it must be mobilized. Use a 15° arthroscopic elevator (Arthrex, Inc., Naples, FL) from the anterior portal or the ASL portal to fully elevate and mobilize the fracture fragment. Unless the fracture is extremely fresh (a week or less), some fibrous and perhaps even bony healing may have already occurred. Just as with a typical Bankart lesion, complete mobilization of the tissue is essential in order to reestablish the normal tension of the anterior band of the inferior glenohumeral ligament (Fig. 19.6). If the fracture is more than a few weeks old, significant bony union may have already occurred in a malunited position. If this is the case, the arthroscopic elevator may be used to perform an osteotomy through the fracture callus. Care should be taken to maximize the size of the fracture fragment and minimize any additional comminution during the osteotomy (Fig. 19.7A). After the fracture fragment has been thoroughly freed, the bone should be freshened to remove any soft tissue to maximize the amount of bone healing that will occur (Fig. 19.7B). A helpful trick with these injuries, as well as with regular Bankart lesions, is to place one traction suture at the superior edge of the displaced labrum. This traction suture can be delivered out the ASL portal and will help in determining when adequate mobilization of the lesion has been achieved (Fig. 19.8).
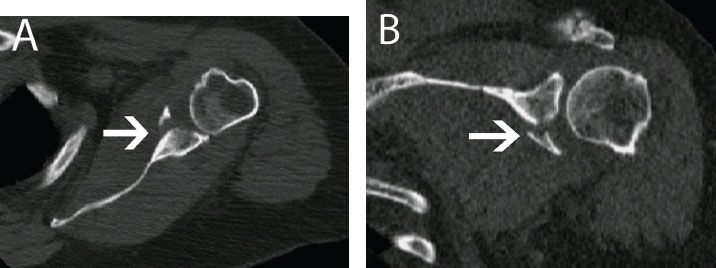
Figure 19.2 (A) Axial and (B) coronal reconstruction CT views of the same left shoulder as in the previous figure demonstrate a relatively large and displaced anteroinferior glenoid fracture (white arrow).
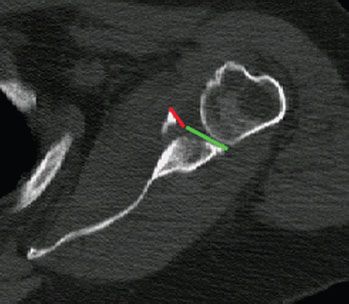
Figure 19.3 The axial view of the CT scan demonstrates that the displaced fracture fragment (red line) measures approximately one-third of the anterior to posterior diameter of the glenoid (red line plus green line).
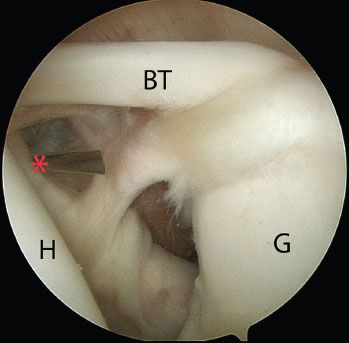
Figure 19.4 Posterior view of a left shoulder demonstrates a spinal localization needle entering (asterisk) the glenohumeral joint over the lateral half of the subscapularis. Notice that the spinal needle is aimed upward toward the superior glenoid and thus starts on the skin relatively low. BT, biceps tendon; G, glenoid; H, humerus.
Once sufficient mobilization has been achieved, a provisional reduction is performed with a grasper. The reduction and fragment are evaluated for proposed fixation sites. The fracture fragment may not fit perfectly into the glenoid defect like a puzzle piece, as some mild comminution or cartilage damage occurs in almost every case and will obscure the fracture margins. With a little fragment manipulation, one should be able to confidently determine the correct position for the fragment even if it does not key in perfectly.
Next is perhaps the most critical portion of the procedure. For optimal screw fixation of a fracture fragment, success is largely dependent on obtaining the proper angle of approach. Specifically, the screws should intersect the fracture line at as close to a right angle as possible. This cannot be achieved through a standard anterior portal. Therefore, we find it critical to create a 5 o’clock portal for this procedure (see Chapter 1 “Advanced Shoulder Arthroscopy Essentials” for portal descriptions). An optimal angle should be confirmed with a spinal needle before proceeding (Fig. 19.9). Because the goal is screw fixation perpendicular to the fracture rather than anchor placement, the guide wire will usually enter the skin more medial than the anterior portal.
A 1.6-mm guidewire for the Nesting Guide Sleeve System (Bone Loss Set; Arthrex, Inc., Naples, FL) (Fig. 19.10) is inserted adjacent to the localization spinal needle. Once the guidewire is appropriately positioned, the spinal needle is removed. A small incision is made and the Nesting Guide Sleeve is then inserted over the guidewire, passing bluntly through the subscapularis, and then into the intra-articular space. This device is sufficiently rigid to assist in fracture reduction as well (Fig. 19.11).
In order to allow the screw head to sit directly on bone, electrocautery is used to create a small window along the anterior edge of the fracture fragment. If anterior labrum is still attached to the glenoid fragment (which is typically the case with bony Bankart fractures), it is left in place, and this window is created anterior to the labrum (Fig. 19.12). The screw should be positioned over the anterior edge of the glenoid (medially) beneath the labrum so that the screw head will not make any contact with the humeral head. If the screw must be positioned more laterally, then the labrum should be elevated, the screw placed, and then the labrum positioned over the top of the screw head.
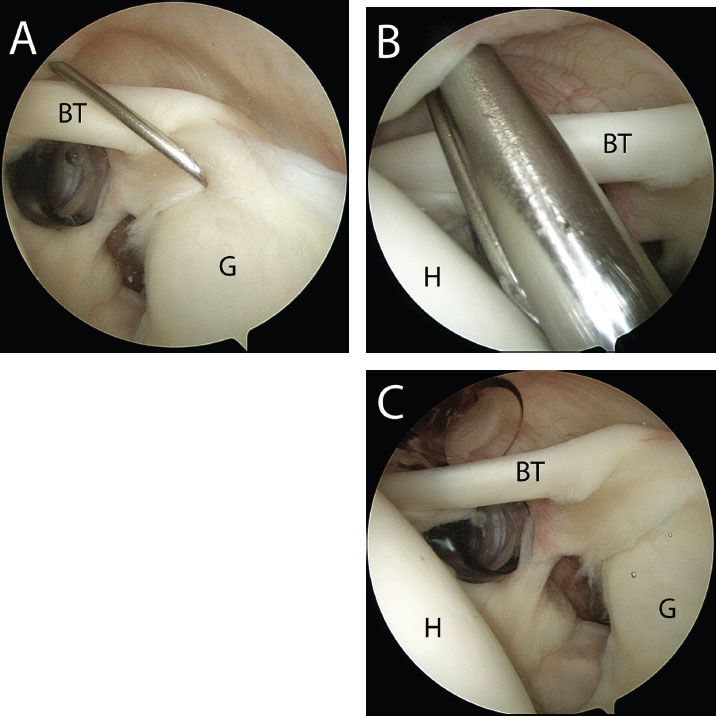
Figure 19.5 Posterior view of a left shoulder demonstrates (A) spinal needle localization for placement of an ASL portal. The spinal needle enters the glenohumeral joint with approximately a 45° angle of approach to the superior glenoid. B: The capsule is incised adjacent to the spinal needle and a switching stick is placed, followed by removal of the spinal needle. C: Both anterior and ASL working portals are now positioned appropriately within the glenohumeral space. BT, biceps tendon; G, glenoid; H, humerus.
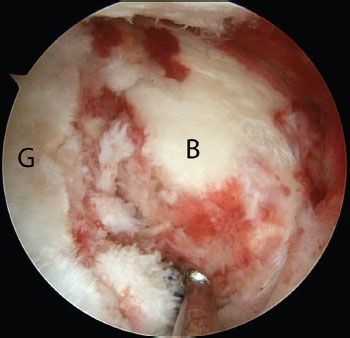
Figure 19.6 Left shoulder viewed from the ASL portal shows an anterior glenoid fracture (right). B, bony Bankart lesion; G, glenoid.
Utilizing the previously placed traction suture and the Nesting Guide, the fracture is reduced. Inferior screw fixation is performed first. While visualizing from the ASL portal, the guidewire is advanced, oriented perpendicular to the fracture plane. The screw length is measured with the screw sizer. Although the screws are self-drilling and self-tapping, we generally predrill the near cortex of the fracture fragment to avoid torque and fracture displacement with screw insertion. A 2.75-mm drill is used to predrill the near cortex, and a 3.75-mm titanium screw of appropriate length is then screwed into place. When the screw head nears the fracture cortex, one should advance the screw slowly and secure the screw “two fingers tight.” It is critical not to split the fracture fragment at this point (Fig. 19.13).
Once the inferior screw has been placed, a second point of fixation must be achieved. If the fragment is of sufficient size to allow for a second screw, then this is placed approximately 1 cm superior to the first screw. As an alternative, if there is fear of fracturing the fragment, a PushLock anchor (Arthrex, Inc., Naples, FL) may be used superiorly as a second point of fixation. A bone socket is created for the PushLock anchor superior to the bony fragment, thus averting the risk of damaging the fragment. Often, the traction suture previously placed in the superior corner of the labrum is ideal for fixation at the PushLock anchor site (Fig. 19.14). The fixation is then assessed for stability and reduction. For rehabilitation after ARIF of glenoid fractures, we have patients follow the same protocol as that of a standard Bankart repair, with the exception that we delay strengthening until 3 months postoperatively (see Chapter 20, “Postoperative Rehabilitation”).
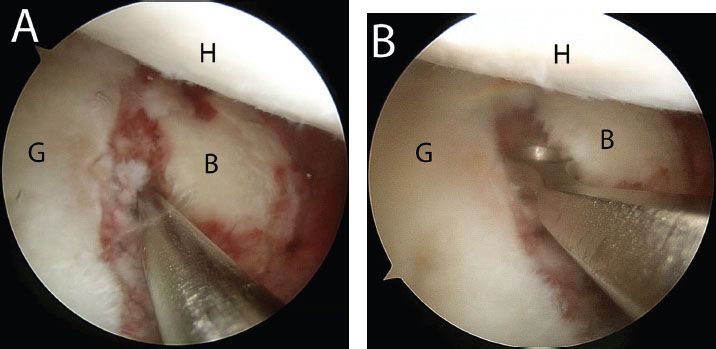
Figure 19.7 Left shoulder, ASL viewing portal. A: Using a 15° arthroscopic elevator (Arthrex, Inc., Naples, FL), the bony Bankart lesion is mobilized being careful to avoid obscuring the fracture margins. B: A ring curette is used to remove fibrous tissue and expose bone. B, bony Bankart lesion; G, glenoid; H, humerus.
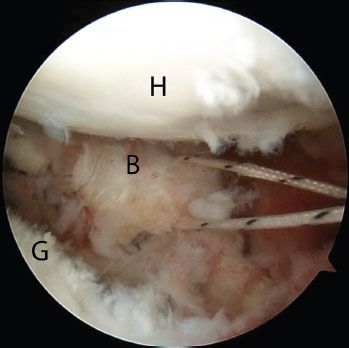
Figure 19.8 Left shoulder, ASL viewing portal. A traction suture is placed at the superior margin of the bony Bankart fragment. This is pulled out the anterior (in this case) or the ASL portal to assist with fracture reduction during the repair. B, bony Bankart lesion; G, glenoid; H, humerus.
Other Glenoid Fractures
Although the bony Bankart fracture is clearly the most common glenoid fracture encountered, other patterns can be seen as well (Fig. 19.15). The general principles of fixation as outlined above should be followed no matter where the fracture occurs:
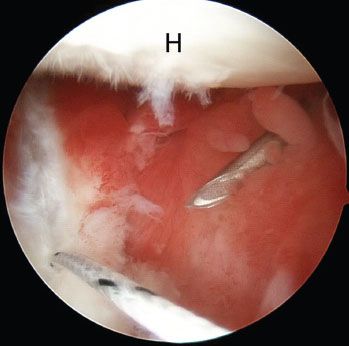
Figure 19.9 Left shoulder, view from the ASL portal demonstrating spinal needle localization of a 5 o’clock portal that enters the joint through the subscapularis. This 5 o’clock portal is necessary to achieve an angle of approach perpendicular to the fracture line. H, humerus.
Stay updated, free articles. Join our Telegram channel

Full access? Get Clinical Tree


