Fig. 6.1
FAST program workstation
The FAST Program committee first deconstructed arthroscopy into its most basic elements (Table 6.1), which were then incorporated into the teaching curriculum. For example, beginning arthroscopists must first learn about the instrumentation itself, including scope optics and fundamental concepts of periscoping and telescoping. It is important to provide a cognitive foundation that can be built upon. Then the learners go through a sequence of exercises to teach image centering, stability, and horizon control, before moving on to telescoping, periscoping, and target tracking (Table 6.2). All of this happens with just one hand (the one holding the scope). Once image control starts to become more natural, then probing, grasping, and biting elements are introduced. Each skill should be practiced with both hands. This logical progression is intended to encourage good skills that can be built upon, while motor elements become automated (which leaves more cognitive “room” for integration and complexity). Most important, the FAST Program is designed to catch and correct poor motor habits early. This approach should enhance educational efficiency and overall quality.
Table 6.1
Task deconstruction basic arthroscopy skills
Equipment tutorial |
Basic image skills |
Triangulation |
Track and probe |
Moving target |
Switch hands |
Shaver control |
Scope tools |
Manage multiple simultaneous variables |
Table 6.2
Deconstruction of basic arthroscopy imaging
Center the image |
Steady the camera |
Control the horizon |
Telescope (z-plane) |
Track the target (x/y planes) |
Periscope (with 30° offset) |
Once the learner achieves sufficient proficiency with basic triangulation skills, the FAST Program provides modules for suture anchor insertion into synthetic bone, suture passage and retrieval through synthetic soft tissue, and knot tying. These intermediate skills can be rolled up into the stereotypical steps of labral repair and rotator cuff repair, all performed on an abstract physical model (in other words, prior to practice on a dry model of a joint or a cadaver specimen). This is a much less expensive way to learn and rehearse the basic steps of the procedure, which are best mastered before rehearsal on complex and expensive joint simulators.
One of the most challenging aspects of skills training is the development of valid and reliable performance metrics that can be used by trainees and educators. At the time of writing of this chapter, this important step is still underway. At times, the best way to evaluation performance is with a check list and subjective assessment, for example with a visual analog scale (i.e., an OSATS). Another approach is to use a checklist to monitor for technical errors and critical errors. In the case of arthroscopic knot tying, we were able to incorporate direct and objective performance assessment with the FAST Program knot tester (Fig. 6.2). This device is used to apply fifteen pounds of tensile load for 10 s to a loop of #2 high strength suture created by arthroscopic knot tying using the FAST workstation (Fig. 6.1). Expansion of the loop is measured, with loop expansion ≥3 mm considered to be a knot “failure” (since high strength suture is relatively stiff, and ultimate load is much higher than 15 lb, loop expansion reflects the weakest link, which is the knot). This approach was then used to collect data for a cohort of arthroscopy experts (faculty arthroscopy educators at the AANA Orthopaedic Learning Center), which was then used to formulate an appropriate benchmark for learners (defined as no more than two knots “failed” out of five sequential knots tied and tested) [3].
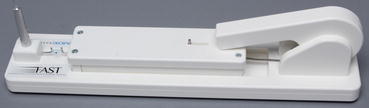
Fig. 6.2
FAST program knot tester
6.3 Basic Dry Anatomic Models
Basic dry anatomic models allow practice in a more realistic setting and so are useful for the next step in arthroscopic learning after mastering core skills with nonanatomic trainers. These models have replaceable parts so they are partly reusable. This makes them relatively inexpensive to use and ideal for repetitive practice. Both labral repair and rotator cuff repair can be practiced, encompassing the basic skills of cannula insertion and use, anchor insertion, suture passage, and knot tying specifically for these procedures. The best known of these trainers is the “Alex” shoulder model. It can be placed in either the lateral or beach chair position and can be used with either a clear plastic or opaque cover. The first step in practice uses the clear cover and the student can practice with or without the need of an arthroscope (Fig. 6.3). With an opaque cover, an arthroscope is necessary. Now the student can develop arthroscopic skills in coordination with instruments and implants. Standard operating room arthroscopy systems can be used but much less expensive alternatives are available. Some of these systems use a simple video camera, which connects to a desktop or laptop computer via a USB port. Less expensive light sources are also available for use with these cameras.
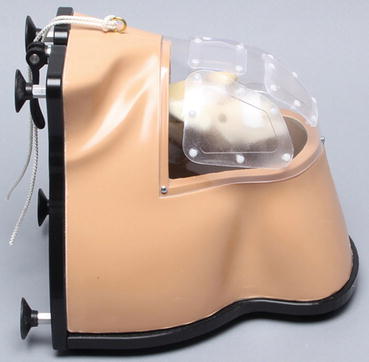
Fig. 6.3
Alex shoulder model
There are limitations with these models anatomically, which is what makes them inexpensive, but their ease of use and availability are an advantage for training basic skills.
Related posts:

Stay updated, free articles. Join our Telegram channel

Full access? Get Clinical Tree


