Arthroscopic Rotator Cuff Repair
James C. Esch MD
Jeffrey W. Tamborlane MD
The glenohumeral space and arcomiohumeral distance are carefully evaluated on the anteroposterior (AP) radiograph for arthritis, aseptic necrosis, and calcifications.
A magnetic resonance image (MRI) provides an excellent image of a torn rotator cuff, showing the subscapularis tendon and status of the deltoid muscle. The size and shape of tendon tears can also be evaluated.
Surgery usually provides good pain relief. Weakness, however, is slower to recover and will not recover completely if there is significant muscle atrophy.
If the tear is irreparable, bursal tissue and spurs can be debrided but the coracoacromial arch should be preserved.
The methods for tendon immobilization are capsular release, coracohumeral ligament releases at the rotator interval, and interval slides.
Some surgeons recommend use of a shoulder immobilizer for 4 to 8 weeks after surgery, particularly after repairs of massive cuff tears.
Shoulder arthroscopy has improved our understanding and treatment of rotator cuff tears. It facilitates easy viewing from different angles, as opposed to open treatment, which when performed through a small incision has a limited exposure in part due to the acromion. This arthroscopic viewpoint has led to the recognition of several common rotator cuff tear patterns (1). Tear pattern recognition, suture anchors, and tissue-passing instruments enable the surgeon to mobilize and repair a torn rotator cuff to its bony footprint with consistency. Associated pathology within the shoulder joint-articular cartilage, glenoid labrum, and biceps tendon problems can also be treated. We rely on the arthroscope to repair most rotator cuff tears.
The surgeon must carefully examine routine anteroposterior (AP), axillary, and arch radiographs. The glenohumeral space and acromiohumeral distance are carefully evaluated on the AP view for arthritis, aseptic necrosis, and calcifications. The axillary view is routinely obtained because it tells the surgeon whether an os acromion is present. The arch view shows acromion shape and thickness. Additionally, a weight-bearing “push-up” AP view, in which upward pressure is placed on the humerus, can be obtained to evaluate narrowing of the acromiohumeral space (Fig 19-1).
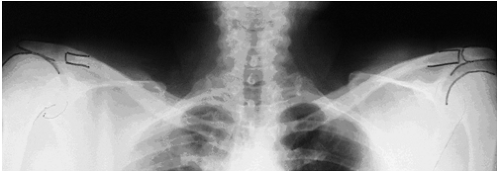 Fig 19-1. AP “Push-up” view with narrowed acromion to humeral head space on the right shoulder. (From Warner JJP, Iannotti JP, Flatow EL, eds. Complex and Revision Problems in Shoulder Surgery. 2nd ed. Philadelphia: Lippincott Williams & Wilkins; 2005. ) |
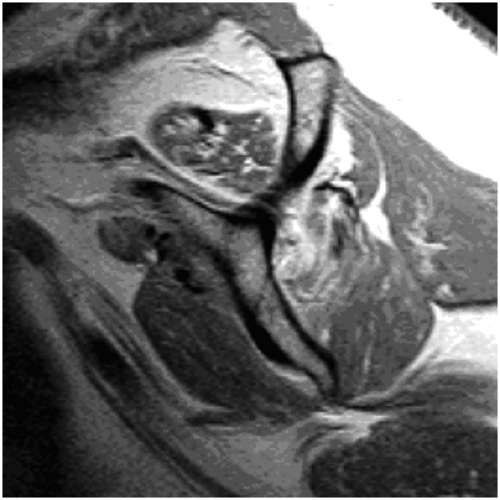 Fig 19-2. Oblique sagittal T2-weighted MRI of patient with massive rotator cuff tear shows atrophy and fatty degeneration of the supraspinatus and infraspinatus muscles. (From Mellado JM, Calmet J, Olona M, et al. Surgically repaired massive rotator cuff tears: MRI of tendon integrity, muscle fatty degeneration, and muscle atrophy correlated with intraoperative and clinical findings. AJR. 2005;184:1456–1463. ) |
Magnetic resonance imaging (MRI) imparts the best image of a torn rotator cuff, showing the subscapularis tendon and status of the deltoid muscle. The size and shape dimensions of supraspinatus and infraspinatus tendon tears are also revealed. Pre-operative evaluation of muscle atrophy is another advantage of MRI. MRI muscle evaluation can show normal muscle, partial fatty infiltration of one muscle, complete atrophy of the supraspinatus, or atrophy of the supraspinatus and infraspinatus (Fig 19-2).
Smaller scanners and newer software afford excellent images in a convenient office setting. The orthopaedic surgeon should personally review the MRI scan.
The office radiographs and MRI complement the patient’s history of symptom onset, discomfort, and loss of function. Discuss the ease or difficulty of repair with the patient as well as the extent of rehabilitation and the expected result. Surgery provides good pain relief. Weakness, however, is slower to recover and will recover incompletely if there is significant muscle atrophy. Patients with significant pain are usually unaware of any accompanying weakness. The patient should have a clear idea of the goals and problems of surgery. Despite these caveats, some patients will have unrealistic expectations for surgical correction of their symptoms. We also point out to the patient that an MRI obtained after surgery may show incomplete healing of the rotator cuff repair (1).
Small to large tears of the supraspinatus and infraspinatus tendons can be repaired by standard arthroscopic repair techniques. Tear size and configuration dictate the specific surgical technique. Repair usually requires a combination of a margin convergence and a tendon-to-bone repair using suture anchors. The goal of margin convergence is to reduce the tension on the tendon to bone repair. Margin convergence involves suturing the anterior and posterior leaves of the tear in a sequential side-to-side manner, starting medially and proceeding laterally until the tear converges toward the bony footprint. The free edge is then attached to the footprint with suture anchors. The value of an arthroscopic rotator cuff repair is that one obtains a secure arthroscopic repair through smaller incisions, without disruption of the deltoid muscle attachment. The final repair is “decompressed” by smoothing the undersurface of the acromion.
Arthroscopic repair of a massive cuff tear is unpredictable. Surgical visualization and mobilization determine whether a massive tear is repairable, partially repairable, or irreparable. A tear is not deemed irreparable until it is evaluated at the time of arthroscopy. Many tears that appear irreparable pre-operatively can be mobilized by capsular techniques and interval slides (2), enabling a partial or complete repair of a once “irreparable” tear. These patients with massive tears usually obtain good pain relief but continue to have weakness due to atrophy of a cuff muscle (3).
If the tear is indeed irreparable, debride the bursal tissue but preserve the coracoacromial arch. Some surgeons prefer to “decompress” the undersurface of the acromion by making the underside of the acromion flat. But the insertion of the coracoacromial ligament onto the undersurface of the acromion must be preserved. If the coracoacromial ligament is removed, the humeral head may “escape” anteriorly, leading to anterosuperior shoulder instability.
There are many different strategies that have been described regarding the management of rotator cuff tears arthroscopically. The following techniques are the authors’ preferred approach to this problem.
The surgeon must balance skill versus ego in arthroscopic rotator cuff repair. He or she must be in control of the operating theater. Detailed knowledge of the proper tools for passing suture through the cuff, suture management, and knot tying techniques is essential. The skills required for the specific steps can be honed using a shoulder model.
The surgeon must have not only a favorite plan, which we will call Plan A, but also Plan B as well as Plan C. A surgeon who is learning arthroscopic rotator cuff repair can easily bail out of the arthroscopic procedure at any time and proceed to an open repair of the rotator cuff through a mini deltoid-splitting incision.
Control Bleeding
Controlling bleeding is essential for a good repair. Some tips for efficient control of bleeding include flowing fluid in through the arthroscope, controlling outflow through the shaver blades, and being aware of the nuances of an arthroscopic fluid management system.
The anesthesiologist lowers and safely monitors the systolic blood pressure in the range of 90 to 100 mmHg. Electrocautery or radiofrequency devices can be useful to stop any troublesome bleeding vessels. Nonsteroidal anti-inflammatory drugs (NSAIDs) and other drugs that can cause bleeding should be discontinued at least seven days before surgery. We recommend avoidance of NSAIDs after rotator cuff repair because they may interfere with healing of the rotator cuff tendon to the bone (5).
Patient Positioning
In our practice we place the patient in the lateral decubitus position. Turn the operating table so the anesthesiologist is at the foot (Fig 19-3).
Prepare and drape the shoulder after the arm is suspended with 10 to 15 pounds of weight. Perform a glenohumeral arthroscopy in a systematic fashion using a standard posterior portal and an anterior portal through the rotator interval. Treat any cartilage and labrum pathology. Examine the rotator cuff tear and evaluate the cuff footprint.
Portal Placement
Create three portals for the rotator cuff repair. Enter the subacromial bursa from the posterior portal for initial viewing. Create the lateral portal three fingerbreadths lateral to the acromion. Remove any bursa that interferes with visualization and debride dystrophic calcifications and irregular edges of the torn rotator cuff. Make the anterior subacromial portal by entering the bursa just lateral to the coracoacromial ligament. This enables the cannula to be easily moved and does not disrupt the coracoacromial arch. Excise bursa as necessary for visualization. Use electrocautery as necessary to control bleeding. Create additional portals as necessary. Insert suture anchors through a mini-portal off the edge of the acromion. The additional superior portal behind the acromioclavicular joint can be used for a suture-retrieving device to pass sutures through the edge of a crescent-shaped tear (6).
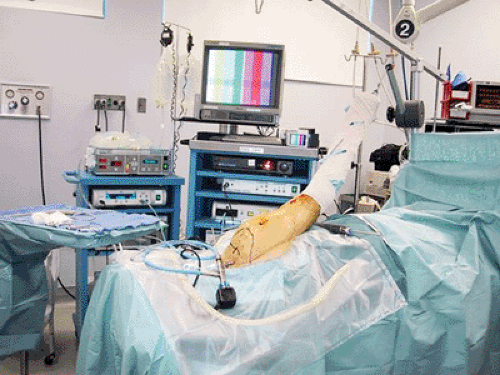 Fig 19-3. Patient positioning in lateral decubitus position. The anesthesiologist is at the foot of the table. (From Warner JJP, Iannotti JP, Flatow EL, eds. Complex and Revision Problems in Shoulder Surgery. 2nd ed. Philadelphia: Lippincott Williams & Wilkins; 2005. ) |
We prefer the lateral subacromial portal—the “50-yard line” view—for optimal viewing of the rotator cuff. Place plastic 7- to 8.5-mm cannulas in the anterior and posterior portals for use in passing tools and suture. Move the tools, suture, and arthroscope as needed. Do not lock yourself to one portal.
Preparing the Site and Beginning the Repair
Remove the bursa tissue as necessary for visualization of the cuff repair. Find a tissue plane that allows you to see the extent of the cuff tear. Free up any adhesions between the cuff or bursa and the overlying acromion. Use a shaver-blade or high-speed burr to remove any remaining rotator cuff at the greater tuberosity insertion. Gently debride the surface of the bone to provide bleeding for repair of the cuff to bone. Gently shave the edges or layers of the rotator cuff edges, but do not excise any significant pieces of the torn cuff that are mechanically sound.
Determine Tear Configuration
The next step involves determining the configuration and reparability of the cuff. Use probes or grasping forceps to assess how you are going to repair the rotator cuff. You can use grasping forceps in both hands while your assistant holds the arthroscope. You must determine first the feasibility of a repair and then, if feasible, the steps necessary to achieve it. You should be able to diagram on paper your final repair, even if you ultimately make changes as you proceed.
Rotator cuffs tear in a crescent-, L-, or U-shaped fashion. Crescent-shaped tears (Fig 19-4) are supraspinatus (and sometimes infraspinatus) tears that can be repaired directly to the bony footprint under minimal tension with double-loaded suture anchors placed though a mini-portal off the edge of the acromion.
The sutures can be passed though the free edge of the tear using direct suturing, penetrate and grab, or shuttle techniques. The suturing and grasping tools can be passed from the anterior, posterior, superior, or lateral portal. Create additional portals as necessary.
L-shaped tears run parallel to the anterior edge of the supraspinatus (Fig 19-5), and U-shaped tears are located in
the infraspinatus-supraspinatus interval. With L-shaped tears, the posterior leaf is more mobile then the anterior leaf (capsule in the rotator interval), whereas both leaves are mobile with U-shaped tears.
the infraspinatus-supraspinatus interval. With L-shaped tears, the posterior leaf is more mobile then the anterior leaf (capsule in the rotator interval), whereas both leaves are mobile with U-shaped tears.
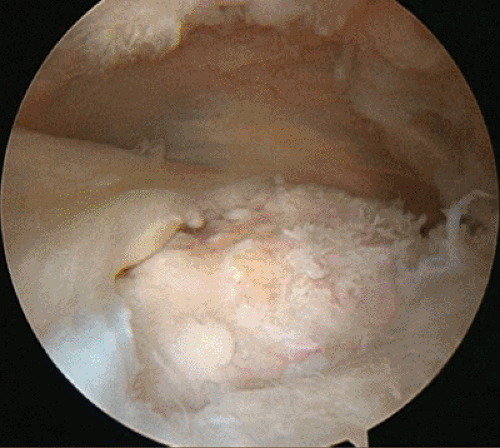 Fig 19-4. Crescent shaped rotator cuff tear. These tears can be repaired directly to bone with suture anchors under minimal tension. (From Warner JJP, Iannotti JP, Flatow EL, eds. Complex and Revision Problems in Shoulder Surgery. 2nd ed. Philadelphia: Lippincott Williams & Wilkins; 2005. ) |
 Fig 19-5. L-shaped rotator cuff tear. These tears require margin convergence sutures placed side-to-side along the anterior leaf. This will result in a crescent shaped tear, which can be repaired directly to bone. (From Warner JJP, Iannotti JP, Flatow EL, eds. Complex and Revision Problems in Shoulder Surgery. 2nd ed. Philadelphia: Lippincott Williams & Wilkins; 2005. ) |
Therefore, repair L- and U-shaped tears initially by a side-to-side margin convergence using a free suture, creating in effect a small crescent-shaped tear; then attach the free edge of the tear to the bone using the suture anchor technique. Sometimes, you will need to place the sutures through the torn cuff only after the suture anchors have been appropriately positioned in the bony footprint because the footprint will be covered during margin convergence and access to it will be lost. Include any layering of the torn rotator cuff into your suturing technique, just as is done in open surgery.
Suture Passage and Stitch Configuration
The author uses one of three methods for passing suture from a suture anchor through the rotator cuff. These are direct suture passage, penetrate and grab, and, suture shuttle techniques. By using these devices, the sutures can be passed as a simple, mattress or T-stitch configurations. The simple stitch requires passage of one limb of the suture through the rotator cuff and tying the suture (Fig 19-6). A mattress stitch is performed by passing both ends of a suture through the rotator cuff and tying the ends together (Fig 19-7).
Related posts:
 Periarticular Ligamentous Tissue: A Biochemical and Physiologic Assessment
Functional Spinal Rehabilitation
Acute Injuries: Shoulder Fractures and Acromioclavicular and Sternoclavicular Joint Injuries
Intra-Articular Lesions
Posterior Cruciate Ligament Reconstruction with the Posterior Inlay Graft
Anterior Cruciate Reconstruction
Periarticular Ligamentous Tissue: A Biochemical and Physiologic Assessment
Functional Spinal Rehabilitation
Acute Injuries: Shoulder Fractures and Acromioclavicular and Sternoclavicular Joint Injuries
Intra-Articular Lesions
Posterior Cruciate Ligament Reconstruction with the Posterior Inlay Graft
Anterior Cruciate Reconstruction
Stay updated, free articles. Join our Telegram channel

Full access? Get Clinical Tree


