Anterior Cervical Diskectomy and Fusion
Ehsan Saadat
John G. Heller
John M. Rhee
Illustrative Case
A 58-year-old woman with 2 years of progressive cervical myelopathy, manifesting as hand dysfunction and gait imbalance. There is overall mild cervical kyphosis and a spondylolisthesis at C3-4. Magnetic resonance imaging (MRI) demonstrates mild-to-moderate cord and/or compression from C4-7 (Figure 1-1).
Radiologic Assessment
X-rays
Note the presence of any anterior and/or posterior osteophytes, ossification of the posterior longitudinal ligament (OPLL)
Note the overall neck alignment, angle of the disks at the operative levels, any evidence of spinal instability
Note the position of the shoulders in relation to the interspaces and how much the shoulders will need to be taped distally to visualize on lateral intraoperative x-ray, depending on the level being addressed.
MRI
Note the location of neurologic compression, osteophytes, and/or disk herniation.
Carefully assess vertebral arteries for anatomic variations, specifically medial aberrancy, and to determine safe zone for exposure and instrumentation.
Note the depth and amount of lateral offset of the vertebral artery with respect to the uncus. This is important to know when performing an uncovertebral/foraminal decompression to adequately decompress the root while avoiding artery injury (Figure 1-2).
Computed tomography scan
Obtained when needing to evaluate the extent of osteophyte formation, or when suspicious about the presence of OPLL
Carefully assess the transverse foramen for the vertebral artery for all surgical levels.
Measuring the anterior-posterior length of the vertebral bodies on preoperative axial imaging is helpful in providing a first estimate of screw length in the final construct.
Special Equipment
High-speed burr
Microcurettes
Microscope is used by JMR in all cases and is optional for JGH.
Positioning
Patient is positioned supine on regular OR table (reversed), with a bump under the scapula to increase neck extension and with the head on a foam donut to prevent pressure necrosis.
Place a long drawsheet on the OR table before positioning the patient on the table. This is used to tuck the arms after induction of general anesthesia.
Foam padding is placed on the outside of each arm. The intravenous tubing and leads are kept on the outside of the foam padding.
The arms are secured on each side by pulling the drawsheet over the arm and then tucking the sheet under the patient.
If harvesting iliac crest, a bump is placed under the ipsilateral hip, and iliac crest is widely prepped and draped.
Shoulders are taped down using wide silk tape starting at lateral acromion, looping around the bottom of the OR table.
Assistant maintains traction while tape is applied.
Important to avoid excessive traction on the shoulder to avoid brachial plexus injury (Figure 1-3).
If not using a microscope, the OR table is kept level.
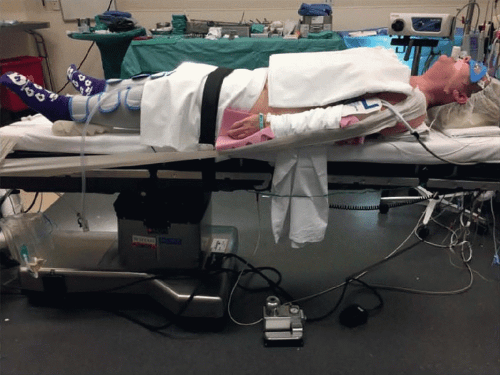
If using a microscope, the OR table is placed in reverse Trendelenburg position to ensure operative levels are vertically aligned (Figures 1-4 and 1-5).
Anesthesia and Neuromonitoring Concerns
General endotracheal anesthesia is used.
The eyes are covered with a “Zorro mask” eye protector. The endotracheal tube is then pulled over the face over a small foam padding and secured with tape.
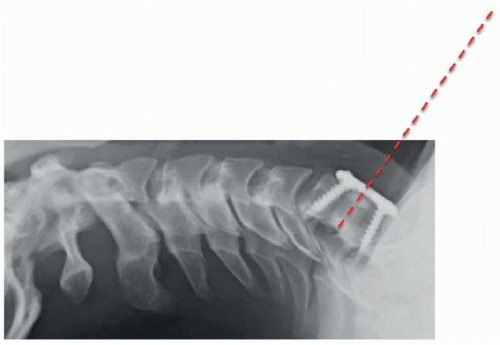
For procedures involving C4 and above, nasotracheal intubation can be considered in select patients to facilitate access by allowing dental apposition. The need for this can be assessed by examining the position of the mandible with respect to the line of sight to the desired disk space on a preoperative lateral x-ray.
We typically use neuromonitoring only in myelopathy cases. For radiculopathy, monitoring can be considered depending on the patient’s body habitus to potentially identify positioning-related issues (eg, shoulder taping and peripheral nerve compression during tucking of arms in large patients).
Localization of Incision
Surface landmarks are helpful in identifying the appropriate location of the incision (Figure 1-6).
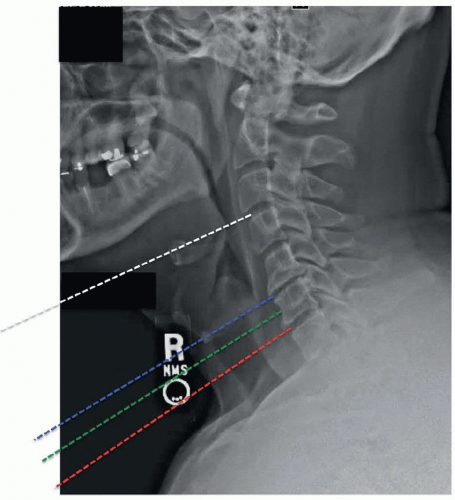
Approximate location of incision can also be estimated on the basis of distance between mandible and sternum on preoperative lateral x-ray (Figure 1-7).
Approach
We generally utilize a transverse incision for 1- to 3-level anterior cervical diskectomy and fusions (ACDFs). A longitudinal incision can be considered for 3+ levels, depending on body habitus.
For transverse incision: in the preidentified natural skin crease determined with the method described earlier, the incision is started at midline and extended laterally past the medial edge of the sternocleidomastoid (SCM). Large incisions in natural creases heal more cosmetically than small ones outside of creases.
Stay updated, free articles. Join our Telegram channel

Full access? Get Clinical Tree


