Anterior Approach (Fracture Table)
Navid M. Ziran
Joel M. Matta
Background
Robert Judet performed the first anterior approach (AA) total hip arthroplasty (THA) in 1947 at the Raymond Poincaré Hospital in France. The patient was supine on an orthopedic (Judet) table (1). The approach was called the Hueter approach, more commonly known today as the Smith-Petersen interval (2). The AA for THA was never adopted in North America at that time. In 1996, the senior author considered adopting the AA technique for THA to reduce dislocation risk without compromising the abductors. The two most common approaches at that time for THA were the posterior and transgluteal (Hardinge) approaches. Surgeons utilizing the posterior approach commonly stated, “I don’t like the Hardinge because of potential for limp,” and surgeons utilizing the Hardinge approach commonly stated, “I don’t use posterior because of potential for dislocation.” AA offered the possible advantages of both approaches and the disadvantages of neither. The question for the primary author was: how technically possible and safe was the AA? The first surgeries performed utilizing the AA by the senior author were very challenging often with prolonged surgery times. Perceived patient satisfaction, however, in terms of earlier function with less pain, led the senior author to persist. Over time, modifications of the technique, including improved instrumentation as well as new orthopedic table developments made the technique as efficient, facile, and safe as other techniques.
Following this initial development period, the past 10 years have shown a steady increase of AA THA in North America. AA adoption has been driven by both surgeons and patients. Reasons for adoption voiced by surgeons include quicker recovery, fewer dislocations, and more accurate cup position and leg length. “Word of mouth,” as well as greater access to medical information, has influenced patient choices. We expect the percentage of primary hips performed by AA to continue to grow.
There are numerous advantages of the AA compared to other surgical approaches to the hip. First, the hip joint is closer to the skin via the AA as opposed to the posterior approach and utilizes the interval between the sartorius (femoral nerve) and tensor fascia lata (superior gluteal nerve). Second, the AA affords maximum preservation of muscle. As a result, dynamic stability of the hip is maintained with minimal incidence of abductor dysfunction or postoperative limp. Other potential advantages of the AA include shorter length of stay, decreased pain, and no range-of-motion restrictions, although these claims continue to be debated. Furthermore, because of precise implant positioning, dislocation risk (0.1%, senior author’s current unpublished cohort) and abnormal wear are significantly reduced; more importantly, limb length and offset are precisely matched to the contralateral side.
THA via the AA can be performed with or without the orthopedic table. The table facilitates both manipulation of the lower extremity as well as proximal femoral exposure–even in obese patients. Fluoroscopic-aided implant positioning is also facilitated since the lower extremities can be “fixed” to the table while the table is manipulated to achieve a level pelvis; this enhances the capability to achieve accurate cup placement and reproduce contralateral leg length and offset.
In this chapter, the authors present AA THA as performed by the senior author starting in 1996 and undergoing refinements up to the present day. As in most surgical techniques the “devil is in the details,” and it is the authors’ wishes that these details, along with the AA THA technique as a whole, are both conveyed to the reader.
Indications
The indications for all primary THA (hips not previously operated) include a painful hip joint from osteoarthritis, posttraumatic arthritis, rheumatoid arthritis, congenital/adult hip dysplasia with subsequent arthritis, avascular necrosis of the femoral head or neck, failed previous hip surgery, acute traumatic fracture of the femoral head or neck, and ankylosis. Revision surgery via the AA can also be performed to revise acetabular and/or femoral components although this discussion is beyond the scope of this chapter.
Contraindications/Limitations
The surgeon should consider another approach in the following situations: presence of a large posterior acetabular defect and significant preoperative heterotopic ossification (except anterior heterotopic ossification).
Positioning
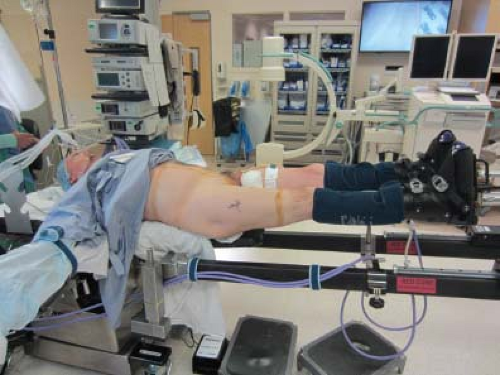
The patient is brought to the operating room and anesthesia is administered on the gurney. Either general or regional anesthesia can be administered, although the authors prefer general anesthesia since it offers more consistent muscle relaxation. The patient is then transferred supine to the hana® table (OSI, Union City, CA). A padded perineal post is placed and the patient is slid down against the post. The arms are placed at 70 to 80 degrees in abduction with padding placed under bony prominences and no pressure on the ulnar nerve. The patient’s feet are placed in padded liners and then inserted into the hana® table boots. The boots are attached to the table spars and locked into position. The table spars should be flexed approximately 5–10 degrees. The legs should be internally rotated approximately 15 degrees to maximize the radiographic appearance of neck offset and visualize the tensor muscle for the approach. The traction should be locked. Hair should be clipped from the midthigh, groin, and abdomen. The abdomen (approximately up to the xiphoid) and hip should be prepped and draped to the midthigh. The authors prefer to use ChloraPrep® solution. Patient positioning is shown in Figure 7.1.
In addition to the anesthesiologist, the operative team consists of the surgeon, his/her assistant, the scrub technician, the circulating nurse/table operator, and the x-ray technician. If necessary, the circulating nurse should be educated on the correct operation of the orthopedic table.
Incision and Initial Exposure
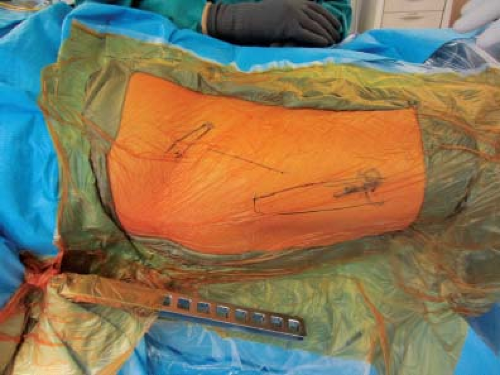
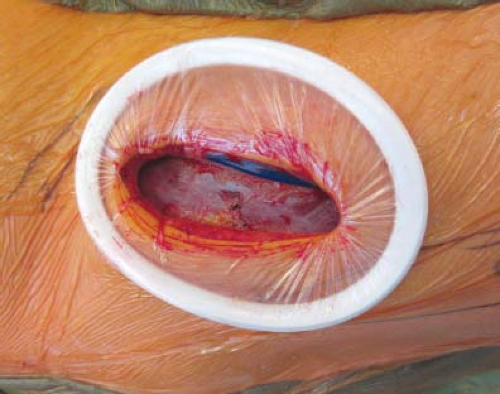
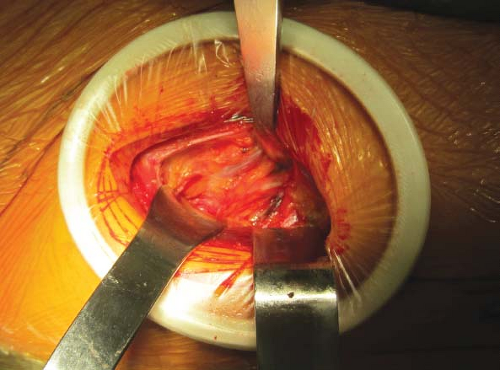
The landmarks of the AA are the anterior-superior iliac spine (ASIS) and the top of the greater trochanter. The incision begins approximately 1 cm distal and 3 cm lateral to the ASIS directed obliquely distal and posterior toward the anterior border of the femur. If the patient is thin, the bulge of the tensor can be visualized, especially with the leg in slight internal rotation. The incision is ideally located at the junction of the posterior one-third and anterior two-third portion of the muscle (Fig. 7.2). Sharp dissection is performed down to the fascia of the tensor. The subcutaneous tissue can be gently finger dissected proximally and distally, but not anteriorly or posteriorly; too much subcutaneous dissection can create dead space for a potential fluid collection. A skin Protractor® (Gyrus ACMI, Scarborough, Massachusetts) can be used at this point, if desired. There are several anatomic clues to ensure that the surgeon is over the tensor. First, the fascia over the tensor is more translucent than the iliotibial band, which is located posteriorly. Next, there is frequently a small fascial perforating vessel directly over the tensor that needs to be coagulated. Lastly, the fibers of the tensor should be parallel to the skin incision. The tensor fascia, with the skin Protractor® in place, is shown in Figure 7.3.
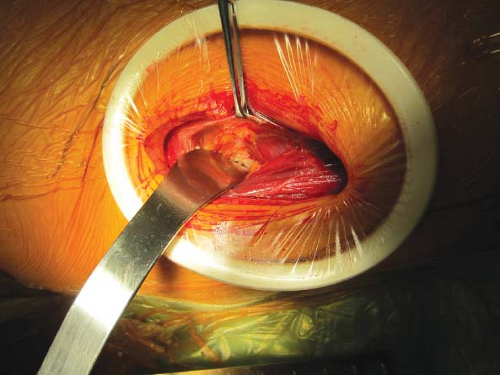
The tensor fascia is then sharply incised in-line with the skin incision and extended slightly proximal and distal to the skin incision. An Allis clamp is placed over the anterior aspect of the fascia and the muscle is gently finger dissected medially, both proximally and distally, as shown in Figure 7.4. There is a definite plane medially, as the tensor is contained in a fascial “pillow.” At this point, the anterior-inferior iliac spine (AIIS) can be digitally palpated. The lateral femoral neck is distal and directly posterior to the AIIS. In hips with significant arthritis/wear or short femoral necks, the position of the lateral femoral neck may
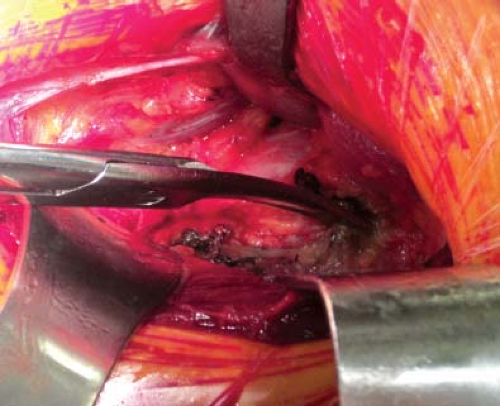
be different (i.e., more proximal). At this point, a Cobra retractor is placed in this “pocket” lateral to the femoral neck and medial to the tensor and the gluteus minimus (Fig. 7.5). The assistants should avoid placing too much pressure on the tensor muscle during retraction to prevent injury. There should be no muscle located medial to the retractor once it is placed. Sometimes, a small portion of the gluteus minimus is located medial to the Cobra. If this occurs, the retractor should be replaced medial to the gluteus minimus. Next, the reflected head of the rectus femoris is identified along the anterior neck capsule. A sharp Hohmann retractor is then placed with its tip on the femoral neck and “slid” under the rectus femoris onto the anteromedial neck. The anterior neck capsule is now exposed. A Hibbs retractor is placed on the distal aspect of the tensor muscle retracting it laterally to expose the lateral femoral circumflex vessels. Figure 7.6 shows the Cobra around the lateral neck, the Hohmann around the medial neck, and the Hibbs retractor gently retracting
the distal tensor to expose the lateral femoral circumflex vessels. There may be two “leashes” of the lateral femoral circumflex bundle, one proximally and one distally. These leashes can be coagulated or suture ligated. Figure 7.7 demonstrates transection of the coagulated lateral femoral circumflex vessels. The fascia over the vastus lateralis is then released using Mayo scissors–this frees up the vastus lateralis and more importantly helps to mobilize the tensor muscle. Meticulous and efficient initial exposure is key to the rest of the procedure. The initial AA approach exposure takes approximately 5 to 10 minutes.
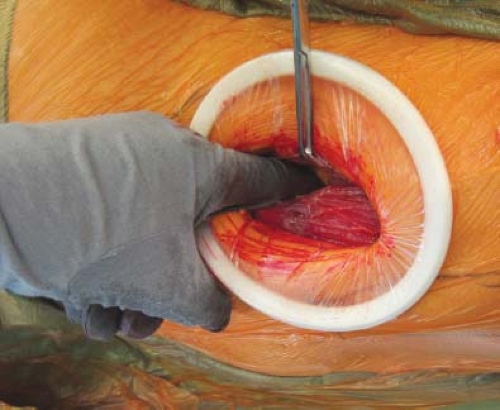 Figure 7.4. After the tensor fascia is incised, the tensor muscle is bluntly dissected off the fascia medially, both superiorly and inferiorly. |
Capsular Exposure
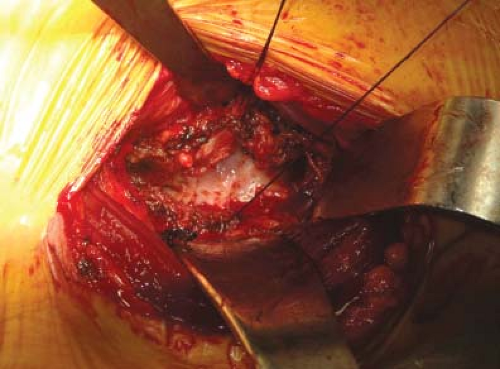
After the initial exposure, an L-capsulotomy is performed of the anterior neck capsule using a cautery knife. Proximally, the cut is made lateral to the AIIS. Distally, the surgeon can palpate the anterior tubercle on the greater trochanter–the cut should be aimed toward the lateral aspect of this protuberance. The cut should then proceed inferomedially along the vastus ridge, proximal to the vastus lateralis. The anterior and lateral capsules are then tagged with no. 1 Vicryl suture as shown in Figure 7.8. A Cobra retractor replaces the Hohmann retractor along the medial neck on the inside of the capsule. The Cobra on the lateral neck capsule is placed inside the capsule. The hip joint should now be exposed.
Femoral Head Dislocation
A small Hohmann is placed under the anterior capsule along the anterior acetabular rim to expose osteophytes and/or ossified labrum. These ossifications are removed using a ½-in straight osteotome. Three turns of traction are applied to the extremity and should open up the joint. If the joint does not open, ensure that the foot is properly placed in the boot and the contralateral lower extremity gross traction is locked. A skid is then placed first superior to the head and then medial to the head as shown in Figure 7.9A,B. During medial placement, the skid should be placed “around” the head into the medial joint. A corkscrew is then advanced into the center of the femoral head–during initial insertion, the corkscrew can be angled, but its final position should be perpendicular to the floor as shown in Figure 7.10. This angle is important so that when the head is dislocated and the corkscrew handle is externally rotated, it does not damage the tensor muscle. The rotation is unlocked and the leg can be externally rotated about 25 degrees. Dislocation is performed by pushing the head out with the skid and pulling the head “up and out” with the corkscrew (Fig. 7.11). It is important to pull the head “up and out” in one maneuver. The authors find that
general anesthesia facilitates head dislocation compared to spinal anesthesia. If the head does not come out, a ¾-in curved osteotome can be used to cut the ligamentum teres. Head dislocation may be difficult. Particular attention should be placed on placement of the corkscrew in the center of the head, muscle relaxation, and utilizing proper technique to pull the head out (“up and out” vs. pure external rotation).
general anesthesia facilitates head dislocation compared to spinal anesthesia. If the head does not come out, a ¾-in curved osteotome can be used to cut the ligamentum teres. Head dislocation may be difficult. Particular attention should be placed on placement of the corkscrew in the center of the head, muscle relaxation, and utilizing proper technique to pull the head out (“up and out” vs. pure external rotation).
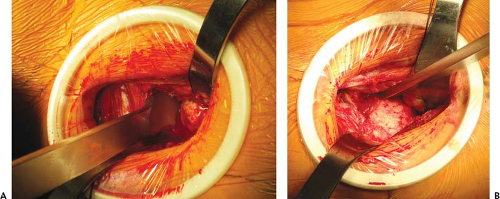 Figure 7.9. A:
Get Clinical Tree app for offline access
Stay updated, free articles. Join our Telegram channel
Full access? Get Clinical Tree


|
