M. Bradford Henley
Michael J. Gardner

Sterile Instruments/Equipment
- Tourniquet if desired
- Small pointed bone reduction clamps (Weber clamps)
- Small serrated bone reduction clamps
- Dental picks and Freer elevators
- Laminar spreader for fibular “push screw”
- Large quadrangular ball-spike clamp for syndesmosis reduction
- Implants: Anatomically contoured periarticular fibular plates (lateral or posterolateral), one-third tubular plates; 2.0 and 2.4 plates/screws
- Long 3.5-mm (or 4.0-mm) cortical screws for syndesmosis
- Long 3.0 mm, 3.5 mm or 4.0 mm cortical, cancellous or cannulated screws for medial malleous/anterior colliculus
- Mini-fragment screws and mini-fragment plates (2.0/2.4 mm) for independent fibular lag screws and for posterior or medial malleolar comminution, depending on the fracture pattern
- Long 3.5-mm (or 4.0-mm) cortical screws for syndesmosis
- K-wires and wire driver/drill
Surgical Approaches/Positioning
- Variable and depends on the injury pattern.
- Supine with a bolster under the ipsilateral hip for most lateral malleolar, bimalleolar, and trimalleolar injuries.
- Consider no bolster for isolated medial malleolar fractures (or posteromedial approaches to posterior malleolus), provided adequate internal/external hip rotation for imaging ankle and mortise.
- Lateral or prone position facilitates access to the posterior malleolus.
- Prone position makes ORIF of lateral and medial malleoli accessible but provides a less familiar perspective.
- Lateral position may allow for reduction and fixation of the medial malleolus following fixation of the posterior and/or lateral malleolus, assuming the patient’s hip anatomy allows adequate external rotation.
- Prone position makes ORIF of lateral and medial malleoli accessible but provides a less familiar perspective.
- Posterolateral approach
- Plane between posterior border of fibula and peroneal tendons.
- May be preferable
- For concomitant access to the posterior malleolus (interval between flexor hallucis longus [FHL] and peroneal tendons), if necessary.
- Allows a separate anterolateral approach for pilon fractures.
- There is less risk of injury to the superficial peroneal nerve.
- The implant is not directly under the skin incision.
- For concomitant access to the posterior malleolus (interval between flexor hallucis longus [FHL] and peroneal tendons), if necessary.
- Plane between posterior border of fibula and peroneal tendons.
- Posteromedial approach
- Several “windows” may be used to access the posterior portion of the medial malleolus and posterior malleolus: anterior to the PT tendon or posterior to the PT/FDL tendons.
- Generally, FHL is retracted posteriorly and laterally with the posterior tibial neurovascular bundle.
- Several “windows” may be used to access the posterior portion of the medial malleolus and posterior malleolus: anterior to the PT tendon or posterior to the PT/FDL tendons.
Reduction and Fixation Tips
Fibula Fractures—Rotational Mechanism
- Most spiral fibular fractures (SER-type fracture patterns) are amenable to 2.4- or 2.7-mm lag screws (in addition to plate fixation of the fracture).
- May be placed independently, prior to lateral plate placement, or through a posterolateral plate.
- Posterior-to-anterior placement avoids soft tissue stripping anteriorly.
- May be placed independently, prior to lateral plate placement, or through a posterolateral plate.
- K-wires for provisional fixation.
- Transcutaneous K-wire placement from anterior to posterior avoids interference with posterolateral plate (Fig. 22-1). Wires are removed after plate application.
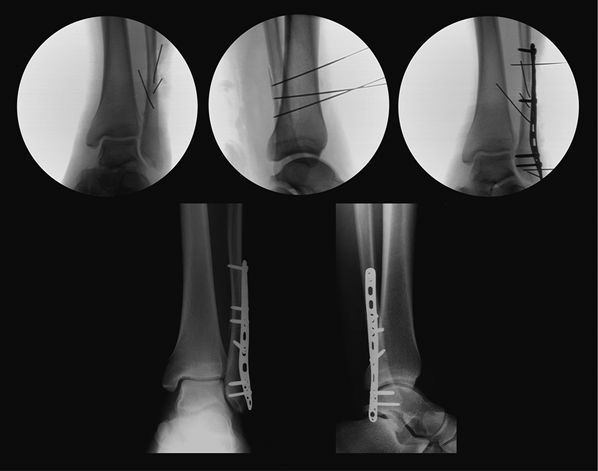
Figure 22-1. Anterior-to-posterior transcutaneous K-wires avoid interference with a posterolateral plate and posterior-to-anterior lag screw.
- Consider use of small lag screws for more proximal (Weber C) fractures.
- 2.0-, 2.4-, or 2.7-mm screws provide excellent fixation and have a small head that will not interfere with plate application (Fig. 22-2).
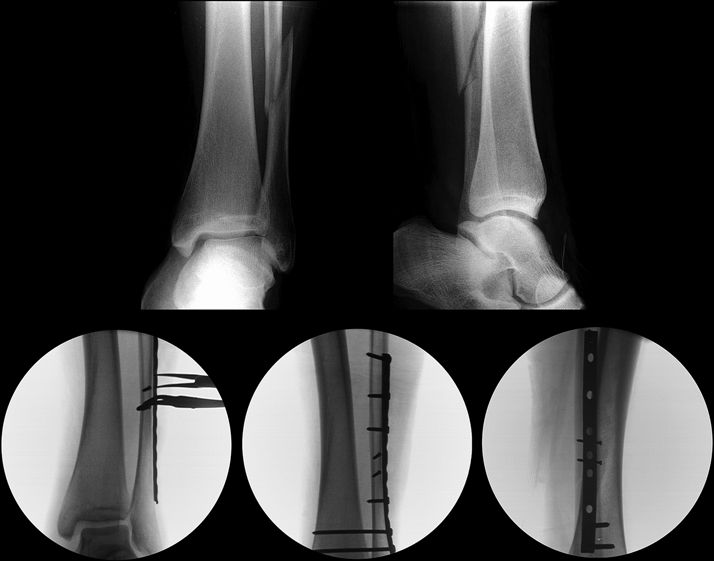
Figure 22-2. Two mini-fragment lag screws achieve excellent provisional fixation and do not impede neutralization of plate placement.
- Keep the plate posterolateral distally (Fig. 22-3).
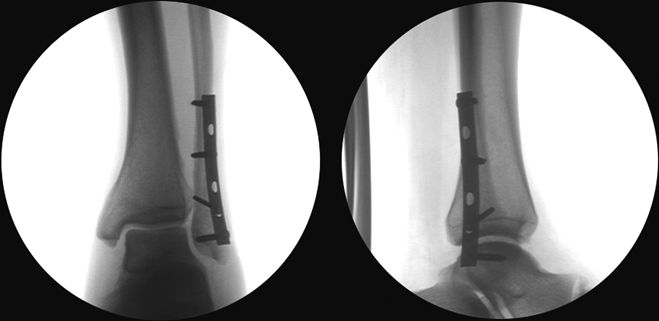
Figure 22-3. Posterolateral plating of the distal fibula is attractive for several reasons. Applied posterolaterally, the plate is mechanically suited to prevent the shortening and posterolateral translation that occur in most SER-type fractures. Additionally, the lag screw can be placed through the plate and anchored proximally in the thicker anterior cortical bone. The posterior-to-anterior screw(s) in the distal fragment also tend to be longer (24 to 30 mm), thus improving the distal fixation. This case demonstrates the use of a one-third tubular plate, a 2.7-mm lag screw, and 3.5-mm proximal and distal screws.
![]()
- Longer, posterior-to-anterior distal screws in the lateral malleolus may provide better distal fixation as they are frequently 24 to 30 mm in length.
- Often allows bicortical screw placement with screw tips exiting anteriorly, away from the articular cartilage of ankle joint.
- Antiglide plate position on fracture apex is biomechanically favorable.
- Reduced implant prominence and low frequency of hardware removal with posterior placement.
- Lag screws may be placed through the plate after antiglide and distal/proximal fixation to augment compressive fixation force at fracture.
- Use of a 2.7-mm lag screw leads to less screw head prominence and less potential for irritation of the peroneal tendons (see Fig. 22-3).
- An additional benefit of placing a 2.7-mm lag screw through the plate is the ability to replace it with a slightly larger screw if insufficient fixation is suspected.
- Permits “rescuing” the interfragmentary lag screw fixation with a slightly larger 3.5-mm lag screw (usually with a 2.7-mm head) when 2.7-mm lag fixation is inadequate.
- Use of a 2.7-mm lag screw leads to less screw head prominence and less potential for irritation of the peroneal tendons (see Fig. 22-3).
- To augment distal fixation, consider converging the tips of the distal screws.
- “Interlocking” the screws with each other can improve the fixation by allowing interference fit between the threads of the two screws (Fig. 22-4).
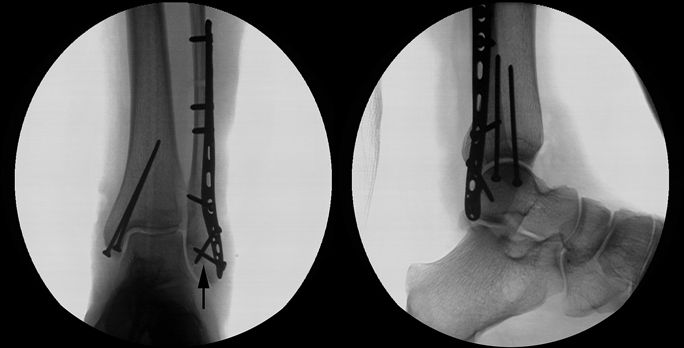
Figure 22-4. Interference fit with distal screws (left, arrow). The distal 2.7-mm screws are triangulated to improve fixation with interference between the threads of the two screws.
Fibula Fractures—Abduction Mechanism
- Transverse or short oblique fibular fractures with variable comminution are usually the hallmarks of these injuries.
- Use fragments to help determine length, alignment, and rotation of the fibula.
- Use X-rays of the contralateral ankle for comparison.
- Recreate the “dime sign.”
- Compare fibular lengths.
- Compare the fibulo-talar articulation (lateral talar facet/gutter) for symmetry.
- Reconstitute “Shenton’s Line” of the ankle mortise at the distal lateral tibio-fibular articular (Fig. 22-5).
- Use X-rays of the contralateral ankle for comparison.
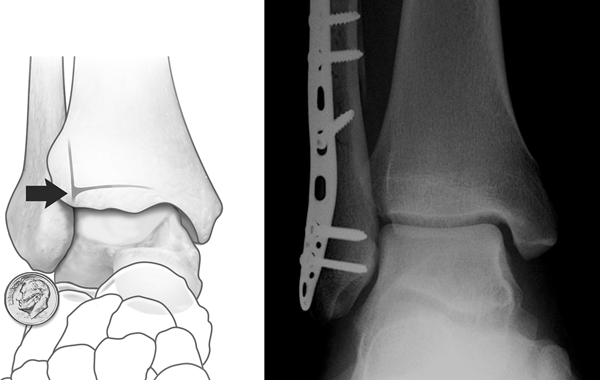
Figure 22-5. Several radiographic markers can be helpful for reconstructing the anatomic fibular length in comminuted fractures. These include the “dime sign” (seen as the dime at the distal end of the fibula) and the fibular Shenton line (arrow).
![]()
- Mini-fragment screws are useful to reconstruct the comminuted fragments.
- Stacked one-third tubular plates, or a thicker periarticular plate, can increase the stiffness of the fixation construct across comminuted segments.
- When applying a stacked plate construct, tie the two plates together at each end with a 2–O resorbable suture to make them easier to handle (Fig. 22-6).
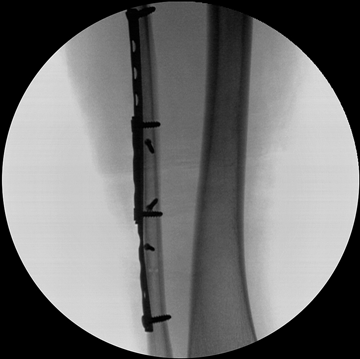
Figure 22-6. Stacking one-third tubular plates can stiffen the lateral construct and help support areas of comminution. Tying the plates together with 2–O suture(s) makes them easier to manipulate.
- Use indirect reduction technique for restoration of the fibular length.
- Stabilize the plate distally with multiple K-wires and/or screws.
- Insert a bicortical fibular screw proximal to the plate.
- Apply a laminar spreader to distract and restore length (Fig. 22-7).
- Stabilize the plate distally with multiple K-wires and/or screws.
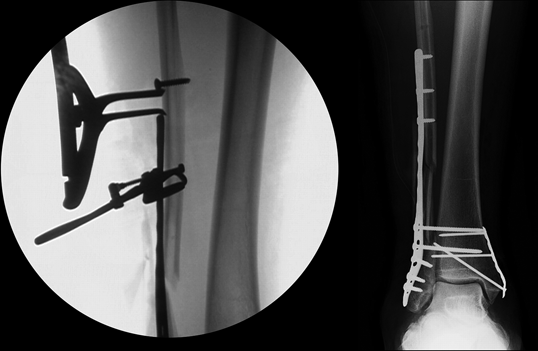
Figure 22-7. Use of a push screw with a laminar spreader to restore fibular length indirectly.
![]()
- Control the plate with a Verbrugge or serrated clamp to maintain proximal plate–bone apposition.
- These clamps permit translation of the plate along the fibular shaft, thereby permitting restoration of the fibular length.
Related posts:


Stay updated, free articles. Join our Telegram channel

Full access? Get Clinical Tree


