Section 3. Treatment and rehabilitation
Introduction148
Tissue healing151
PRICE154
Range of motion163
Muscle re-education / training167
Proprioception170
Braces and supports174
Returning to running176
Introduction
All rehabilitation programmes utilized by physiotherapists must be goal driven, but nowhere is this more important than in sports and exercise medicine, where athletes are commonly focused on one specific event. Textbooks and the internet abound with treatment recipes and ladders for the rehabilitation of specific conditions. While these can serve as a useful starting point, rehabilitation programmes must be designed for each individual athlete, as every injury is different and athletes’ body types, sporting demands and timeframes for return to sport will be very different.
The use of patient-specific goals, decided together with the individual athlete, will help formulate a programme using clinical reasoning to determine effective and time-appropriate treatment modalities.
Involving the athlete in the programme design also helps to engage them in the process and keep them motivated. Rehabilitation episodes can be frustrating, worrying and sometimes even depressing periods for athletes. A good clinician ensures that the athlete (and they themselves) remains interested and engaged by ensuring that the programme is focused, relevant and varied. Positive programmes that focus on what the athlete can do are more likely to be complied with than programmes that emphasize the negative and focus on what they can’t do.
The previous section dealt with assessment of the injured athlete. This is necessary to diagnose the athlete’s condition and establish the athlete’s reported problems, as well as identifying common findings usually associated with the pathology that must be considered when designing a rehabilitation programme.
Considering both the patient’s reported problem and known features of the pathology will allow you to establish treatment goals. These goals are focused on the outcomes you are trying to achieve as a clinician.
When rehabilitating the athlete, common goals include:
• protecting the athlete from further injury
• controlling and reducing pain and swelling
• restoring full and pain free movement to the injured area
• normalizing motor control and movement patterns, e.g. gait re-education in the lower limb, scapulo-humeral rhythm in the upper limb
• establishing effective trunk control and proximal stability for limb function
• restoring the strength, endurance and power of the injured area sufficient to allow safe and effective return to play
• restoring any proprioceptive deficits
• preventing re-injury by addressing any relevant extrinsic and intrinsic factors, e.g. equipment, biomechanics
 Once established, these treatment goals will determine the physiological processes of the patient’s system that you need to affect (stimulate and / or inhibit) in order to achieve the required clinical effect. These treatment goals are also based on the stage of tissue healing and pain mechanisms involved in the manifestation of the patient’s symptoms. The reference below has a full explanation of pain mechanisms and the relationship with patient’s symptoms.
 Butler D (ed) (2000) The Sensitive Nervous System. Noigroup Publications, Adelaide, Australia.
This is an essential stage of the clinical reasoning process as it provides the rationale behind the use of all treatment modalities including:
• Manual therapy – mobilization / manipulation / massage
• Exercise therapy – motor control / strength / endurance / power
• Taping and supports
• Electrophysical agents, e.g. TENS, ultrasound, interferential
• Acupuncture and dry needling
• Drug management and the use of injection therapy
Goals are generally divided into stages that facilitate progression of the rehabilitation programme. When considering stages of rehabilitation, the clinician needs to consider the pathophysiology of the injured and healing tissue, the existing signs and symptoms and how these relate to the stage of tissue healing and expected presentation, as well as the sporting requirements of the athlete. Criteria and assessment of return to play will be discussed in the next section.
Goals need to be reassessed regularly by reviewing the athlete’s actual versus expected progress in order to ensure treatment effectiveness. If  progress does not occur at the expected rate, both diagnosis and treatment need to be reviewed.
progress does not occur at the expected rate, both diagnosis and treatment need to be reviewed.Errors in the rehabilitation process are most common in the initial, acute phase or in the final stages leading towards return to play. Some of the most common errors are listed in Box 3.1.
Box 3.1
 For initial protection move the injured athlete from any location in which further injury may occur. In several sporting situations, such as the rugby field, sailing regatta, swimming pool or ice rink, this may be a far from straightforward exercise. It is essential that every clinician is familiar with procedures for retrieving people from the sporting environment of the competition. New clinicians should undergo an induction programme that familiarizes them with likely injury scenarios and the mechanisms for dealing with these.
 Further discussion of movement diagrams is beyond the scope of this book, but the reader is directed to Maitland G, Hengeveld E, Banks K and English K (2005) Vertebral Manipulation, 7th ed. Butterworth Heinemann, for more detailed information.
 Sahrmann S (2001) Diagnosis and Treatment of Movement Impairment Syndromes. Mosby, St. Louis.
 Kendall FP, Kendall EM, Provance PG, et al (2005) Muscles: Testing and Function, with Posture and Pain, 5th ed. Lippincott, Williams and Wilkins, Philadelphia.
 Deficits in proprioception (collection of the information exchanged between the sensory and motor systems regarding movement and the position of body parts) following injury are well documented as is evidence to show benefits of proprioceptive retraining on the prevention of reinjury. Injuries requiring surgery or immobilization tend to have greater proprioceptive deficits due to downtime and decreased use.
 As with all other aspects of rehabilitation, it is essential to have an objective measurement of proprioception to reassess progress. At the most basic level, this may be an indication of the time the athlete can maintain a stable position on one leg. A more functional and dynamic test is the Star Excursion Balance Test, described by Kinzey and Armstrong.
 Dennis DA, Komistek RD, Nadaud MC et al (2006) Evaluation of off-loading braces for treatment of unicompartmental knee arthrosis. The Journal of Arthroplasty 21 (Suppl):2–8.
 5. Comprehensive player management
 4. Returning to play
 1. Working in sport
 2. Assessment and diagnosis of the injured athlete
 Establishing Access to Technology: An Evaluation and Intervention Model to Increase the Participation of Children with Cerebral Palsy
 Fiberoptic Endoscopic Evaluation of Swallowing


 Get Clinical Tree app for offline access

Early stage
• Ongoing effusion – resulting in inhibition of muscle function and control
• Inadequate pain control – also causing poor muscle function
• Lack of isolated muscle activation – especially in the quadriceps and rotator cuff
• Use of compensatory muscle patterns – commonly seen in single leg stance and with arm elevation
• Loss of accessory joint motion limiting full range of motion
Late stage
• Lack of effusion control, especially in lower limb injuries where there is damage to joint surfaces
• Inadequate muscle strength
• Lack of focus on power component of rehabilitation
• Lack of sport specific drills – gap between clinical rehabilitation and return to training is too great
This section includes a number of case studies. These illustrate the goal driven focus of the rehabilitation process and are not designed to provide recipes for treatment. They also demonstrate the varying scenarios encountered in the field of sports and exercise medicine and the need for a multidisciplinary approach to player management.
Tissue healing
Tissue healing in most musculoskeletal injuries is generally a process of repair in which the damaged tissue is replaced by non-specific granulation tissue that eventually matures to form scar tissue.
Tim Watson has written extensively on the subject (www.electrotherapy.org). He divides the repair process into four stages and concludes that the repair process is a highly effective mechanism of tissue healing and the aim of all medical interventions should be to optimize, facilitate and support this process, rather than attempting to alter it in any capacity. Where extensive tissue damage has occurred, or in athletes where delayed responses have occurred, interventions may be appropriate to facilitate the normal process of repair, but no evidence exists to support any benefit in trying to change the body’s own efficient processes.
When designing a rehabilitation programme, the clinician should consider the stage of tissue healing that is occurring during each phase of the rehabilitation process. Fig 3.1 illustrates the stages of tissue healing for “average tissue” having sustained an “average injury” and the associated rehabilitation phases.
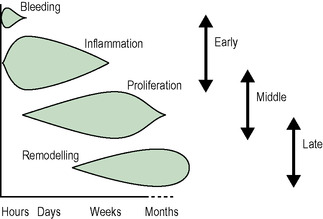 |
| Fig 3.1 Watson (2009) modified with permission. |
Bleeding phase
This happens following any tissue damage. The amount of bleeding depends on both the extent of the injury and the nature of the tissue damaged. Muscle tissue bleeds a lot and significant amounts of blood escapes within the tissues. Ligamentous tissue is far less vascularized which means there is very little bleeding. Average bleeding time is thought to be 6−8 hours post injury, but will also depend on the tissue damaged. Bleeding causes the release of various chemicals within the injured tissue which in turn stimulate the inflammatory cascade.
Inflammatory phase
Inflammation is not a bad thing. It is an essential part of the repair process because it ensures effective tissue healing. It starts within hours of the damage being sustained and in the average injury peaks at 2–3 days post injury. It then gradually subsides and concludes 2–3 weeks post injury. During the inflammatory phase, an exudate is produced that dilutes any toxins within the damaged area and forms the fibrin clot which acts as a barrier to foreign particles and debris. Certain cells released during this phase stimulate phagocytosis and tissue debridement. It is also the interaction of chemical mediators released by the inflammatory process that stimulates proliferation and ongoing repair. However, proper healing and repair require a well-regulated inflammatory response.
Occasionally, inflammation persists beyond the expected conclusion time or occurs in excess of the extent of tissue damage. Some of the reasons why a chronic inflammatory state may persist include contamination by foreign bodies or bacteria, invasion by microorganisms able to survive within large phagocytes, antigen–antibody reactions or continual irritation by mechanical stresses.
Proliferation phase
In this phase, starting 24–48 hours post injury, collagen material is produced that will form the scar tissue. This phase peaks at 2–3 weeks post injury, at which time the bulk of the scar material is produced that will eventually form the matured scar tissue. At the same time, angiogenesis (formation of new local blood vessels) occurs. This new blood flow provides nutrients and oxygen to the region, essential elements for collagen production. Both of these processes are stimulated by chemical mediators produced during the inflammatory phase. The proliferation phase continues until several months post injury, though in an ever declining role.
Remodelling phase
Scar tissue that is produced in the proliferation phase requires organizing to produce a scar that is capable of behaving in a similar way to the specific tissue it has replaced. The initial Type III collagen tissue is randomly orientated. In response to movement and stress, these tissues become orientated along the lines of stress, providing strength in specific, functional directions. At the same time, some of the Type III collagen is replaced with Type I collagen with more cross-links and greater tensile strength. This occurs during the remodelling phase which starts 1−2 weeks post injury, following the commencement of collagen production. It continues for several months post trauma, extending beyond the conclusion of the proliferation phase in order to produce a functional and organized scar.
Factors that may impede healing
• Excessive oedema
• Excessive bleeding and presence of haematoma
• Poor vascular supply
• Tissue separation
• Muscle spasm
• Athlete’s health, age, nutrition
• Use of corticosteroids / NSAIDs
• Presence of keloid / hypertrophic scars
• Presence of co-existing pathologies, e.g. diabetes
• Presence of infection
• Climate / temperature
PRICE
PRICE (Protection / Rest / Ice / Compression / Elevation) is the initial treatment modality of choice in the majority of sporting injuries. Use of the PRICE regime is thought to minimize pain and swelling and ensure a more rapid return to the playing field. As inflammation is a vital part of tissue healing and repair, it is essential to ensure that the use of a PRICE regime does not compromise this stage of the tissue healing process.
The following information is drawn from the evidence based guidelines produced by the Association of Chartered Physiotherapists in Sports Medicine (ACPSM) for the management of soft tissue injuries in the first 72 hours (www.acpsm.org). The latest version of these guidelines was published in November 2010.
Protection
Protection ensures that no further tissue damage occurs and ensures that the fibrin network and collagen tissue are not disrupted.
For initial protection move the injured athlete from any location in which further injury may occur. In several sporting situations, such as the rugby field, sailing regatta, swimming pool or ice rink, this may be a far from straightforward exercise. It is essential that every clinician is familiar with procedures for retrieving people from the sporting environment of the competition. New clinicians should undergo an induction programme that familiarizes them with likely injury scenarios and the mechanisms for dealing with these.Further protection may be provided in various ways. The use of this equipment will depend on the structure injured and the severity of the injury. Commonly used equipment includes:
• Crutches
• Slings
• Taping
• Bracing
• Splints
The nature and degree of protection will be based on the extent of the injury, the severity of pain experienced as well as the psychological profile of the athlete. Protection should be applied in the early stages post injury. Results from animal studies suggest that a moderate / Grade II injury requires 3–5 days to avoid excessive stress on healing tissues.
It is essential to ensure that the mode of protection or support is capable of accommodating any increase in oedema and that it does not totally immobilize the injured structure. Athletes need to be instructed to look for signs of excessive tightness and if these occur, to remove the bandage and contact the clinician. Indications that bandages or splints are too tight include:
• Poor venous return in response to light finger pressure over a distal region. This is referred to as a blanching response. When a finger is gently pressed against healthy tissue (often over a finger nail), the underlying skin blanches or turns white. If blood flow to the region is normal, the tissue quickly returns to it’s usual colour. The time taken for this to occur is called refill time. If blood flow is compromised, refill time is prolonged. The most effective way to determine this is to compare blanching responses and refill times between the bandaged and non bandaged limb.
• Swelling distal to the bandage or splint
• Feelings of pins and needles / numbness
• An increased level of pain
Bandages and splints commonly become too tight at night when limbs are in dependent positions and a lack of normal mobility reduces venous return from limbs.
Rest
Rest from aggravating activities is advocated in the early management of soft tissue injuries with a similar rationale to the use of protection. Previously, rest was prescribed until a return to pain-free activity was possible; however  it is now recognized that some element of movement is essential to ensure scar tissue is laid down in an organized fashion that follows the lines of tissue strain. Research has shown that immobilization results in a disorganized orientation of scar tissue.
it is now recognized that some element of movement is essential to ensure scar tissue is laid down in an organized fashion that follows the lines of tissue strain. Research has shown that immobilization results in a disorganized orientation of scar tissue.The concept of “relative rest” is considered more appropriate, especially in the athletic population who are likely to be resistant to the idea of total rest. In this case, controlled motion, within the limits of pain and avoiding undue stress on the healing tissue is permitted. The commencement of controlled movement will depend upon the grade of injury, anything from Day 1 for a minor Grade 1 injury to Day 5 for a severe Grade 3 condition.
Ice
Ice or Cryotherapy is thought to be useful in limiting the harmful effects of tissue damage. It should be recognized that although ice is widely used, research evidence regarding the physiological effects and the best methods of application is lacking. The general claims regarding the physiological effects of ice include lowering the temperature of the tissues, which results in vasoconstriction thus reducing excessive bleeding. Research evidence does not support a reduction in oedema, except when used in conjunction with compression and elevation. It is also proposed that ice causes a reduction in cellular metabolism which, together with vasoconstriction, limits the release of metabolic by-products and thereby reduces further cell death and tissue injury. Ice is also thought to reduce pain by slowing nerve conduction velocity and muscle spasm by reducing muscle spindle activity.
Although the research evidence is not conclusive, there is general agreement that the application of ice for 20−30 minutes every 2 hours is most effective in reducing pain, blood flow and metabolism. The best method of application is chipped or crushed ice, placed within a damp towel.
Clinical observation, again not supported by research evidence, suggests that care must be taken with the application of ice to avoid both superficial nerve damage and the production of an “ice burn”. An ice burn occurs when skin is damaged from excessive exposure to low temperatures. Clinical signs of an “ice burn” include pain, swelling, redness and blistering of the skin. If ice is applied in an area of limited subcutaneous fat or over a superficial nerve, the recommended time is 10 minutes. In all cases, the skin condition and patient’s pain response should be checked every 5 minutes.
Compression
Compression also results in vasoconstriction and limitation of oedema. Restricting excessive inflammatory exudate results in a reduction of the inflammatory mediators that stimulate proliferation and ultimately scar tissue formation. Excessive oedema may become chronic, may limit range of motion or act to inhibit muscle function.
Several modes of compression are available including cheap and readily available elastic bandages (adhesive and non-adhesive), neoprene supports, inflatable splints and intermittent compression wraps.
Compression should always be applied in a distal to proximal direction ensuring uniform compression throughout. The area of compression should start at a reasonable distance below the level of the injury and extend to a reasonable distance above the injury. In the cases of peripheral limbs, this is usually to the joint above the injury.
Compression structures must accommodate any increase in oedema. Immediately following application of the compressive material, distal circulation must be checked for signs of circulatory compromise and the athlete must be instructed on how to monitor for this on an ongoing basis (refer to section on Protection for further details).
Equally, compression bandages usually require reapplication within 24 hours to accommodate a resolution of swelling. In some cases, padding or gapping of the compressive material is needed to ensure adequate compression or relieve pressure on vulnerable areas. There is significant evidence to suggest that compression should be removed when the limb is elevated, but should be applied at all times when the limb is in a dependent position.
Acute ankle strapping
An inversion sprain of the ankle is one of the most common injuries that is strapped immediately post injury to control swelling and provide support.
Tape: 5 cm cohesive bandage or EAB (Elastic Adhesive Bandage)
The Ankle is positioned as close to a neutral position as possible
Use of a felt horseshoe around the lateral malleolus will prevent swelling from accumulating there (Fig 3.2a)
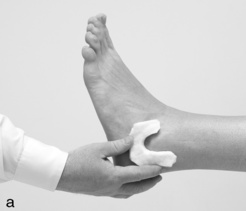
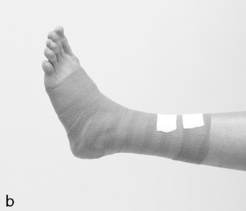
1. Starting medially above the toes, take the bandage laterally over the dorsum of the foot and encircle the distal aspect of the foot. Repeat the movement to lock the bandage in place.
2. Move proximally along the foot keeping the bandage overlapping by 50% to ensure even pressure.
3. At the level of the navicular bone, pass the bandage laterally over the heel and around the ankle in a figure of 8 movement, crossing the tape over directly above the anterior talo-fibular ligament (ATFL) or (Calcaneo-fibular ligament) CFL to provide additional support in the region of the damaged structure.
4. Repeat this manoeuvre, ensuring the bandage crosses at the level of the injured ligament each time. Also ensure that the heel is enclosed by the bandage so that fluid cannot accumulate.
5. Once the heel is enclosed and the ligament well supported, continue to enclose the lower leg, overlapping the bandage as you move proximally up the limb (Fig 3.2b).
Acute knee strapping – figure of eight wrap
When bandaging the injured knee, the temptation is simply to use a circular bandaging technique from distal to proximal over the knee joint. This form of bandaging may produce excessive compression of the region, including the patellofemoral joint, and commonly slips down the leg when the athlete moves.
A figure of 8 wrap produces effective compression, avoiding the patellar region, and remains in place very effectively.
Tape: 7.5 cm cohesive bandage or EAB
1. Start bandaging a reasonable distance below the knee, from the postero-lateral aspect of the limb and running anteriorly and medially (Fig 3.3a).
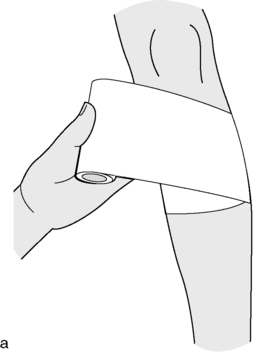
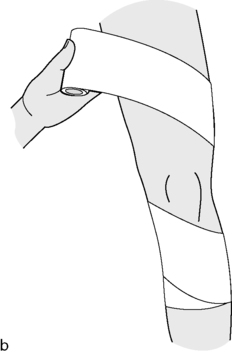
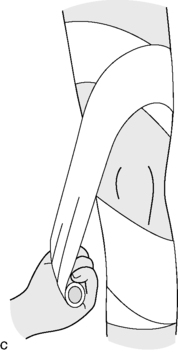
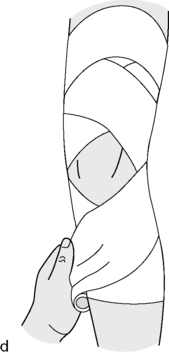
2. Complete a locking technique and then angle the bandage superiorly and medially over the medial joint line.
3. Run the bandage posteriorly and laterally behind the knee and then superiorly and medially over the anterior aspect of the femur (Fig 3.3b).
4. Continue to encircle the thigh and then bring the bandage inferiorly and medially down over the joint line staying above the patella as you do (Fig 3.3c). Run the bandage behind the knee, and then bring it anteriorly over the lateral joint line, angling it in a superior direction above the patellar and across the anterior thigh.
5. Continue around the thigh and down over the lateral joint line again, this time below the level of the patella and across the anterior shin (Fig 3.3d). This completes the full Figure of 8. Additional compression can be used as required.
Intermittent compression therapy may be of value, using a variety of devices available on the market. However, it is not practical to use these forms of devices continually, and it is suggested that some form of alternative compression is used as well.
Elevation
Elevating the injured body part above the level of the heart assists with venous return and limits excessive swelling. This notion is based on limited biological evidence, but is reasonably well supported by clinical research. As swelling can cause an increase in pressure within a body region, excessive swelling can be a source of mechanical pain and may contribute to the overall pain pattern in the patient’s presentation.
Ideally, an injured limb should be elevated above the level of the heart as much as possible and as quickly as possible, for the first 72 hours post injury.
At all times, the clinician needs to monitor the effectiveness of the PRICE regime on the individual athlete and modify accordingly.
Range of motion
One essential element of improving function is the restoration of full range of motion to a joint or region. The goal, in terms of range, is best determined by comparing the injured region with the other, uninjured side and aiming for comparable pain-free motion. While major deficiencies in range are self evident, small, but functionally important losses in range are often overlooked during the rehabilitation programme and can severly limit progression.
There are numerous techniques that the clinician can use to improve range of motion. The effective technique will be the one that targets the structures causing the limitation of movement. Factors that cause a restriction in range include:
• Swelling / oedema
• Muscle spasm / guarding
• Pain on movement
• Muscle / soft tissue tightness
• Joint stiffness – post immobilization or associated with degenerative changes
Techniques that target these factors are given below.
Swelling / oedema
• PRICE (see previous section)
• Use of electrophysical agents
Muscle spasm / guarding
• Hold / relax techniques – Muscle energy techniques
• Trigger point release
Painful movement
• Cryotherapy
• Use of electrophysical agents
• Manual mobilization techniques
• Drug management and injection therapy
Muscle / soft tissue tightness
• Massage
• Stretching
Joint stiffness
NB: It is essential to ensure the accessory motion of a joint has also been restored and not just the physiological movement, e.g. Fig 3.6.

Any increase in range must be followed by appropriate exercises to both maintain the range gained, and also to develop muscle strength and control within this newly acquired range.
Movement diagrams
In order to utilize manual techniques most effectively, every clinician should be familiar with the concept of movement diagrams. “Drawing” a “mental movement diagram” for any joint or movement pattern is necessary to select the appropriate grade and rhythm of technique. A movement diagram forces clinicians to evaluate whether they are treating pain or stiffness, if the region is highly irritable, what the limiting factor to movement is and, from there, what technique will affect these factors in the most expedient fashion.
Further discussion of movement diagrams is beyond the scope of this book, but the reader is directed to Maitland G, Hengeveld E, Banks K and English K (2005) Vertebral Manipulation, 7th ed. Butterworth Heinemann, for more detailed information.Muscle re-education / training
With the awareness of motor control problems in the manifestation of many musculoskeletal conditions, clinicians are increasingly focusing on re-education of movement patterns. Shirley Sahrmann has written an excellent text on this subject.
Sahrmann S (2001) Diagnosis and Treatment of Movement Impairment Syndromes. Mosby, St. Louis.Correct technique and isolated activity are essential for performance, but once this foundation has been laid, the clinician must ensure that exercises are prescribed to increase muscular strength, endurance and power. Exactly how and to what extent these are addressed will depend on the athlete’s sporting demands and the nature of their competitive season.
Strength
Strength refers to the amount of force a muscle is capable of producing in a single effort. It is determined by the size of the muscle fibres and the efficiency of the neural mechanisms activating the muscle.
Resistance or weight training is the most common form of strength training. For strength gains to be achieved, the muscle must be worked slightly beyond its normal physiological capabilities. This causes subtle trauma to the muscle and results in an increase in the size of the muscle fibres. This is known as the overload principle. Strength training involves high loads and a low number of repetitions. As the muscle is pushed beyond its physiological capability, adequate rest periods are required between strength training sessions. Normally only 1−2 strength sessions are performed in a week.
The Oxford Scale is used as a clinical tool for assessing and recording muscle strength. Muscle strength is rated on a scale from 0 to 5. The muscle is tested for its ability to produce movement of the associated joint in a specific direction and is determined by observation and palpation of the muscle belly and tendon.
0 – No discernible muscle action on observation or palpation of the muscle
1 – A muscle twitch is discernible, but does not result in any movement of the related joint or limb
2 – The muscle is capable of producing the appropriate full range joint movement, but only in a gravity-eliminated position
3 – The muscle is capable of producing full range movement of the joint against gravity
4 – The muscle is capable of producing the appropriate movement against some level of resistance but not to a level that the clinician judges to be normal.
5 – The muscle is capable of producing full range, non-compensatory movement against a normal level of resistance
What is “normal”?
This is a professional judgment based on what the clinician expects would be full muscle power for a particular individual. It is based on the health, age, activity level and weight of the individual. Clinicians working with teams and groups of athletes have an advantage in that they can establish baseline measurements of strength, endurance and power during screening. They can compare this data against measurements of muscle function post injury.
Kendall FP, Kendall EM, Provance PG, et al (2005) Muscles: Testing and Function, with Posture and Pain, 5th ed. Lippincott, Williams and Wilkins, Philadelphia.Endurance
Endurance refers to the ability of a muscle to undergo repeated contractions against a set resistance for a period of time. It is an important component of fatigue and commonly features as a problem in overuse injuries.
A lighter weight with a higher number of repetitions is the basis for endurance training. Baseline testing for each individual athlete is essential to establish the appropriate starting weight and the number of repetitions.
Power
Power refers to a muscle’s ability to produce high levels of force at high speeds. It is defined as the product of force and velocity. It is considered one of the most important variables in determining an athlete’s performance in cases where athletes are involved in propulsive actions, such as sprinting or throwing.
In designing rehabilitation programmes, clinicians often fail to include exercises for power development. Neglecting this aspect of function will result in an athlete returning to training and playing ill-prepared for the demands of sporting competition.
Neuromuscular components are important in power development because of the speed dimension. This suggests that power training requires repetition of specific activities at speed. Plyometric drills such as vertical jumps, hopping and bounding, speed drills like shuttle sprints and explosive drills such as kicking are all good power activities for the lower limb. In the upper limb, boxing activities and throwing or swinging weighted objects (medicine balls / bar bells with the Smith machine) are good power drills.
In rehabilitating the injured athlete, communication between the therapist, coach and strength and conditioning trainer is essential to ensure the athlete undertakes a progressively demanding programme that includes all aspects of muscle function. A combination of rehabilitation and a return to training should occur as soon as possible. This is only achievable if effective communication exists between all members of the medical and coaching staff and a detailed rehabilitation and training programme is compiled which includes, every aspect of their expected activity.
Too often, little overlap exists between rehabilitation and training, and the athlete makes the transition from the physiotherapist’s clinic to the gym environment with an excessive increase in physical demands, making the player vulnerable to overload and re-injury, or even the development of a new injury.
Proprioception
Deficits in proprioception (collection of the information exchanged between the sensory and motor systems regarding movement and the position of body parts) following injury are well documented as is evidence to show benefits of proprioceptive retraining on the prevention of reinjury. Injuries requiring surgery or immobilization tend to have greater proprioceptive deficits due to downtime and decreased use.When an athlete sustains an injury to a body region, structures relating to the somatosensory system are also damaged. As a result, kinaesthetic acuity (the ability to detect motion) and joint position sense are diminished. This leads to reduced balance and co-ordination, prolonged muscular reaction times and decreased muscle strength, making the region less capable of reacting appropriately to imposed forces – commonly referred to as “instability”. It is important to recognize that this is not osseo-ligamentous instability (though this may be present as well) but represents a functional instability.
As with all other aspects of rehabilitation, it is essential to have an objective measurement of proprioception to reassess progress. At the most basic level, this may be an indication of the time the athlete can maintain a stable position on one leg. A more functional and dynamic test is the Star Excursion Balance Test, described by Kinzey and Armstrong.Kinzey  SJ and Armstrong CW (1998) The Reliability of the Star-Excursion Test in Assessing Dynamic Balance. Journal of Orthopaedic and Sports Physical Therapy 27: 356–360.
SJ and Armstrong CW (1998) The Reliability of the Star-Excursion Test in Assessing Dynamic Balance. Journal of Orthopaedic and Sports Physical Therapy 27: 356–360.Star Excursion Balance Test procedure
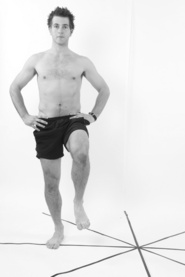
The test involves having the athlete stand and maintain their base of support on one leg while maximally reaching in different directions with the other leg along a testing grid in the form of a star as shown (Fig 3.7) The star shaped testing grid is formed by 8 lines, each 120 cm long, extending out from a common point at a 45° angle. It can be created using standard sports tape laid on a smooth, firm surface.
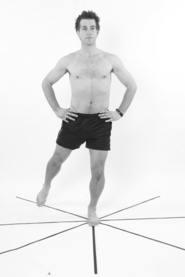
Instruct the athlete to reach as far as possible along each of the eight lines, make a light touch on the line, and return the reaching leg back to the centre, while maintaining single-leg stance with the other leg in the centre of the star. Start with the anterior direction and work in a clockwise direction around the grid. Measure the distance along each line. Three trials in each direction are commonly utilized in testing, the scores averaged and added up for each limb.
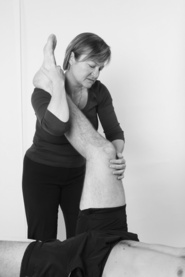
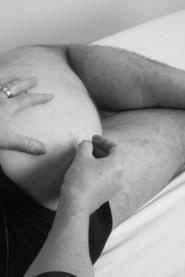
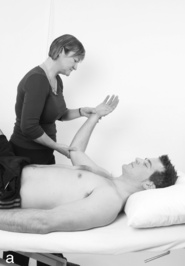
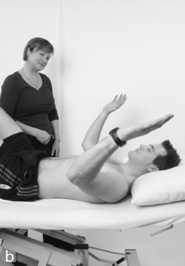
Proprioceptive tests for the upper limb are lacking in the literature. The most commonly described test is an assessment of joint position sense in which the therapist places the uninjured limb into various positions and asks the athlete to mimic these with the injured limb (Fig 3.8). Objective tests of accuracy can be taken using a goniometer to measure differences in limb position.
In the upper limb, athletes that use the upper limb in an open chain pattern such as throwing and ball sports should perform proprioceptive training that focuses on this type of action. Similarly, if the athlete is involved in closed kinetic chain activities, such as gymnastics or kayaking, proprioceptive retraining must emphasize this component of movement.
Much of the research looking at proprioceptive retraining in the lower limb has involved subjects standing on wobble boards, and this has led to a lack of thought and imagination in proprioceptive training in the clinical environment. In the upper limb, very few retraining programmes are described.
Key elements of proprioceptive exercises include:
• Uncertainty
• Reaction speeds
• Distraction − focusing on tasks other than what is occurring at the region being exercised
• Precision in task performance
• Endurance
• Co-contraction and weight bearing
• Mirror images – therapist places one limb in a position and asks the patient to replicate this with the injured limb (Fig 3.8a,b)
• Tracing tasks – following a pattern drawn on a wall / floor by the therapist using the injured limb
• Mini trampette – hopping on / hopping off
• BOSU ball – Step ups / step downs / lunges / small knee bends / push ups
• Hopscotch
• Ball work – throwing / catching / footwork
• Ladder work – increasing speed
• Dance mats
Braces and supports
Rehabilitation
The use of braces and supports during the rehabilitation stage has very different objectives to their use for return to play and function.
During rehabilitation, braces are primarily designed to protect the damaged structures from re-injury and maintain the joint or structure in a position to optimize healing. They are often designed to limit joint range in a way that allows the range to be adjusted and increased as healing and rehabilitation progress. This is usually the case after surgery, such as ACL reconstruction or shoulder rotator cuff repair. Some surgeons may also recommend the use of a brace or support following a fracture or significant sprain to the wrist or hand. In most cases, the brace is used in the initial phases of rehabilitation when the cast has been removed and the joint is not well supported by muscular control.
While application of an abduction brace is common practice by surgeons following rotator cuff repair, use of braces and supports with injuries to the knee is very variable, dependent mainly on the practices and opinion of the surgeon or sports physician in non-operative cases such as Grade 2 MCL tears. There is a lack of research evidence that bracing for the knee has a significant effect on outcome following injury or surgery.
The other common form of bracing for rehabilitation is the use of “off loading braces” in degenerative conditions such as unicompartmental osteoarthritis of the knee. Dennis et al (2006) showed that the “OAdjuster” brace by DonJoy and the “Thruster” by Bledsoe are two of the most effective braces on the market in achieving separation between the medial condyles of the tibia and femur of the knee.
Dennis DA, Komistek RD, Nadaud MC et al (2006) Evaluation of off-loading braces for treatment of unicompartmental knee arthrosis. The Journal of Arthroplasty 21 (Suppl):2–8.Function
Prophylactic braces are designed to prevent or minimize injury in the event of an accident. There is no evidence to support the use of braces or supports in this fashion.
The same style of brace is often used by athletes to support and protect previous injuries during training and competition. They are referred to as functional braces. The effects of these braces are:
• Mechanical – aiming to minimize potentially damaging movements in certain directions. The evidence for this is equivocal.
– Abduction and external rotation control – anteriorly dislocating shoulder.
– Valgus / varus and tibial rotation – post ACL reconstruction.
• Proprioceptive – provide improved awareness of joint position. This has been demonstrated within the research laboratory; however studies have not been able to replicate the high levels of force and torsion that joints would be subjected to in most sporting activities. It is therefore difficult to determine the effect of braces on proprioception and support in “real life” situations.
• Psychological – give the athlete a sense of safety and reduced injury risk.
When considering the use of a functional brace for an athlete, emphasize to the athlete that braces and supports are never intended to be used in place of a comprehensive and well designed rehabilitation programme.
Some supports for joints and limbs primarily aid compression and retain heat. They offer little in the way of joint stability or motion control, but may act to “support” the area by improving proprioception or facilitating muscle function.
These supports are often made of neoprene and are often worn by recreational athletes who have purchased the products independently from sporting stores or online. They probably offer psychological support for the athlete as well. There is no evidence that their use is either beneficial or detrimental.
Returning to running
When starting to run again after a period of inactivity the athlete is often vulnerable to breakdown and re-injury. To start a running programme, it is generally accepted that an athlete must have sufficient quadriceps and calf strength of at least 80% of the unaffected limb. Consideration must also be given to the stage of tissue healing and repair.
Little evidence exists regarding the most effective way to implement and progress a running programme. Table 3.1 shows an example of a running programme used in clinical situations for individuals returning to running after an injury, post-operatively or following an overuse injury. For the most controlled environment this should be done on a treadmill before progressing to outside and more uneven surfaces.
| Week | Exercise duration | Interval period | Interval breakdown |
|---|---|---|---|
| 1 | 30 min | 5 min | Walk 4 min Run 1 min |
| 2 | 30 min | 5 min | Walk 3 min Run 2 min |
| 3 | 30 min | 5 min | Walk 2 min Run 3 min |
| 4 | 30 min | 5 min | Walk 1 min Run 4 min |
| 5 | Run 30 min | ||
This running programme can be easily altered in terms of the number of interval periods completed or the progression from one week to the next. In our clinic, we usually advise patients to perform this programme on alternate days, interspersing it with ongoing gym-based strength rehabilitation.
Signs that progression may be too fast:
• Development of an effusion
• Development of pain / soreness – need to differentiate from soreness associated with increasing levels of exercise
• Inability to progress with other exercises – strength
Once the athlete can complete a 30-minute running session comfortably, further progressions can be achieved by increasing the distance run in the same time (speed), increasing duration or increasing the uneven nature and type of terrain. These progressions will be goal driven depending on the activities the athlete is returning to.
From this point, the athlete enters the return to play stage of their rehabilitation programme which will be dealt with in the following section.
Case studies
The following case studies are designed to show practical implementation of the principles discussed. The reader should also refer to the relevant section of the Assessment section that deals with the clinical findings for each condition.
In an ideal world, we would all work in a multidisciplinary team where specific elements of rehabilitation would each be dealt with by someone specialized in that field.
In the real world, this is rarely the case. To be more effective at those areas of rehabilitation where you feel less skilled, utilize every opportunity to observe, work and learn from other professions. A world-renowned sports physician told me he learnt most of his sport’s medicine from working with physiotherapists, and I know that I and many other physiotherapists have developed new rehabilitation skills and programmes from working alongside strength and conditioning trainers, and improved our soft tissue work working with sports massage therapists.
Case study – Severe ankle sprain
A 19-year-old female netballer sustains an inversion injury of her left ankle while playing in a club competition. She is due to play an international match in 8 weeks’ time and must report to the training camp a week prior to this. She is assessed court side and management is instigated at this point.
Presenting problems
Symptoms and signs
• Unable to weight bear on the leg – needs to be helped off the court
• Significant tenderness over the ligament and surrounding area
• Little swelling
• Limited range of motion
• Unable to assess ligamentous laxity due to pain level
Problems known to be associated with the pathology
• Loss of ligamentous integrity
• Loss of balance and proprioception
• Pain inhibition of peroneals with loss of strength and muscle bulk over time
• Loss of cardiovascular fitness
Phase 1: first 24 hours
Rehabilitation goals
1. Protect from further injury
2. Control swelling
3. Reduce pain
4. Facilitate tissue healing
< div class='tao-gold-member'>
Only gold members can continue reading. Log In or Register to continue
Related posts:
2. Assessment and diagnosis of the injured athlete
Establishing Access to Technology: An Evaluation and Intervention Model to Increase the Participation of Children with Cerebral Palsy
Fiberoptic Endoscopic Evaluation of Swallowing
Stay updated, free articles. Join our Telegram channel
Full access? Get Clinical Tree