The Biceps Tendon
The biceps tendon has long been considered a potential cause of pain in the shoulder. However, despite its long history of treatment, the diagnosis, management, and surgical treatment of disorders of the long head of the biceps (LHB) remain controversial. Because of the poor sensitivity and specificity of the majority of physical examination tests for biceps pathology, the arthroscopist must carefully evaluate the LHB tendon with a high index of clinical suspicion.
The spectrum of pathology related to the LHB may include inflammation, various degrees of degeneration, partial tearing, subluxation, and dislocation (Fig. 10.1). While the indications for debridement, tenotomy, and tenodesis are controversial, much of the treatment is tailored to the patient’s age, symptoms, associated pathology, and expectations. In the vast majority of cases, patients with subluxation, dislocation, or partial tearing >30% are treated with tenotomy or tenodesis. In addition, in patients with concomitant subscapularis tendon repair, formal treatment (i.e., by tenotomy or tenodesis) of the biceps tendon is associated with improved outcomes.
We generally perform a biceps tenodesis rather than tenotomy in patients who are <70 years of age, males, laborers, or where preservation of biceps is important. In addition, if cosmesis is a concern (e.g., bodybuilders, females with thin arms), then a biceps tenodesis is performed. We reserve biceps tenotomy for patients over the age of 70, particularly if the arm is fat enough to conceal a potential distal biceps lump. In addition, in patients where the treatment of the biceps pathology will dictate the rehabilitation process, then a biceps tenotomy may be a consideration if a prolonged rehabilitation program is undesirable.
Our preferred technique for biceps tenodesis is tendon-to-bone interference fixation with a BioComposite Tenodesis Screw (Arthrex, Inc., Naples, FL). This provides much greater fixation strength than standard suture anchor or soft tissue techniques. This technique allows maintenance of the biceps length–tension relationship while achieving strong fixation. Although the exact preferred location of tenodesis is still controversial, we generally perform the tenodesis intra-articularly near the top of the bicipital groove, unless the extent of pathology warrants a more distal tenodesis. We have not found residual anterior shoulder pain, as reported by some authors, to be a significant problem. In fact we do not think that this is a valid concern, as the biceps that is tenodesed high in the bicipital groove will not have any contractile or elastic elements within the bicipital groove and therefore cannot have any excursion of the tendon over any osteophytes that might cause inflammation (Fig. 10.2).
We generally perform a biceps tenodesis close to the footprint of the supraspinatus in patients with a concomitant supraspinatus (+/− infraspinatus) tendon tear in patients where the bicipital groove portion of the biceps tendon appears normal. In this scenario, the biceps tenodesis is performed at the periphery of the supraspinatus tendon footprint and is used for securing the biceps tendon and part of the supraspinatus tendon. In patients with intact supraspinatus tendons, the tenodesis may still be performed high in the groove where visualization is easier and the technique simpler.
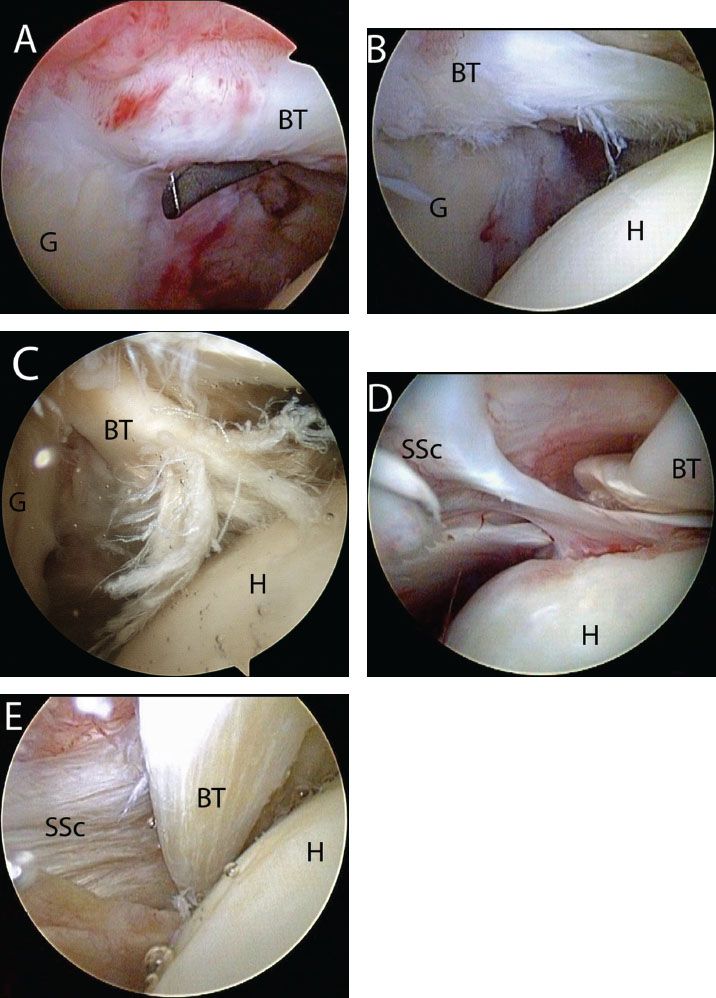
Figure 10.1 Biceps pathology. Arthroscopic view of right shoulders from a posterior viewing portal demonstrating (A) inflammation of the biceps; (B) degeneration; (C) partial tearing; (D) medial subluxation; and (E) dislocation. BT, biceps tendon; G, glenoid; H, humerus; SSc, subscapularis tendon.
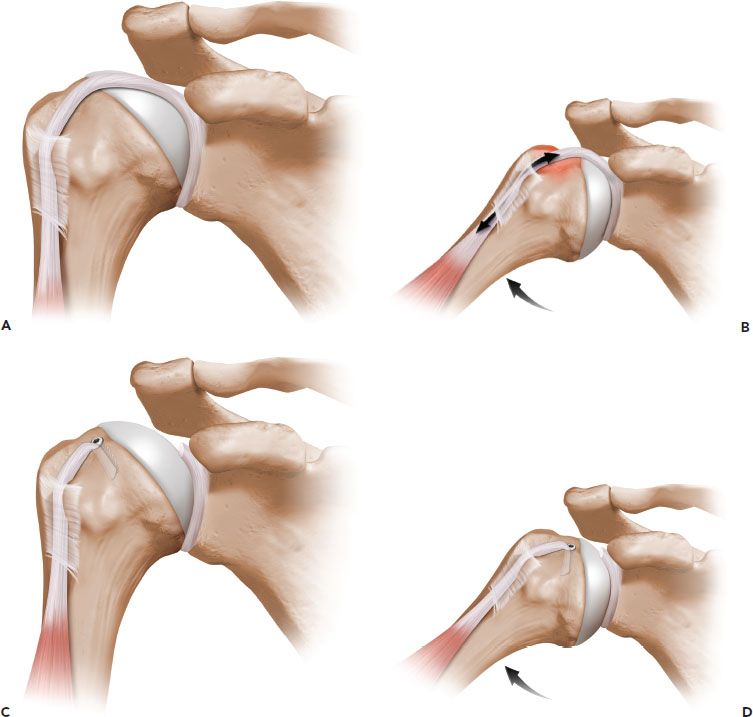
Figure 10.2 Schematic of a biceps tenodesis high in the bicipital groove. A: Prior to tenodesis, the biceps tendon crosses the glenohumeral joint. B: Movement of the glenohumeral joint results in relative motion of the biceps tendon within the bicipital groove. C: Following a biceps tenodesis high in the bicipital groove, the tendon no longer crosses the glenohumeral joint. D: Because the tendon no longer crosses the glenohumeral joint, movement of the joint does not result in any relative motion within the bicipital groove. Therefore, pain generation by movement of an inflamed tendon in the groove is eliminated.
In patients with a concomitant subscapularis tendon tear, visualization of the bicipital groove and anterior structures is facilitated by rupture of the subscapularis. In this scenario, we may perform biceps tenodesis lower in the groove near its distal extent, particularly if disease is demonstrated in the bicipital groove portion of the LHB. In small patients with limited footprint area for fixation, we sometimes medialize the tenodesis site to the superolateral aspect of the lesser tuberosity, then use the sutures from the biceps tenodesis construct to fix the superolateral subscapularis tendon to its footprint.
The Cobra technique is reserved for ruptures of the LHB tendon. In this technique, the LHB is retrieved through a distal skin incision on the arm and the tendon is retensioned and reduced back through the bicipital groove and into the shoulder. This technique is used when sufficient length and quality of the LHB tendon is present for reduction and fixation. However, in patients who have poor-quality tissue or insufficient tendon length, but desire reduction of deformity, a mini-open subpectoral biceps tenodesis is performed for tendon fixation to bone.
When performing biceps tenodesis, the major technical pitfalls are related to visualization, maintenance of the biceps tendon length–tension relationship, reduction of the tendon into the bone socket, final tensioning of the tendon, and securing fixation. Each scenario is addressed below with its specific technique.
ISOLATED BICEPS TENODESIS WITH TENODESIS SCREW FIXATION (HIGH IN THE FOOTPRINT OR GROOVE)
Biceps tenodesis performed in the anteromedial supraspinatus footprint or high in the intertubercular groove is the least difficult method of tenodesis. In this method, visualization is maximized because of the proximal location of the tenodesis. Visualization may be improved by using a 70° arthroscope or by positioning the arm in external rotation and abduction. All procedures are begun by diagnostic arthroscopy through a posterior glenohumeral portal. An anterior portal is established and the LHB tendon is evaluated (Fig. 10.3). By placing traction on the intra-articular portion and drawing the tendon into the joint, the bicipital groove portion of the biceps may be evaluated. However, with a 70° arthroscope, a significant amount of the intertubercular groove portion of the biceps (approximately 2.5 cm) can be visualized without the need to pull the biceps into the joint (Fig. 10.4). If the LHB tendon demonstrates significant intra-articular disease but minimal bicipital groove disease, then a tenodesis high in the groove may be performed, particularly in the presence of an intact supraspinatus tendon. However, even when there is mild-to-moderate degeneration of the tendon in the proximal groove, tenodesis in that area will eliminate relative motion between the tendon and the bone, and we have noted excellent clinical results in such patients.
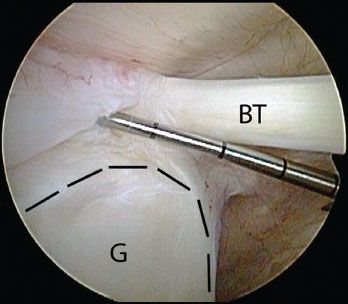
Figure 10.3 Right shoulder, posterior viewing portal. A probe introduced through an anterior portal is used to assess the biceps root. In this case, there is a displaceable biceps root. The glenoid rim is outline by dashed black lines. BT, biceps tendon; G, glenoid.
An anterosuperolateral portal is then established with an 8.25-mm clear threaded cannula (Arthrex, Inc., Naples, FL) perpendicular to the bicipital groove just as the tendon exits into the bicipital groove. Two half-racking traction stitches (#2 FiberWire; Arthrex, Inc., Naples, FL) are then placed through the biceps tendon. To place a half-racking stitch, the middle of a #2 FiberWire suture is loaded onto a Penetrator (Arthrex, Inc., Naples, FL) (Fig. 10.5). The Penetrator is inserted through the anterosuperolateral portal and is used to pass through the middle of the biceps tendon (Fig. 10.6A), advancing about 2 cm past the tendon in order to leave a loop of suture in the joint (Fig. 10.6B.). The suture is released and the Penetrator is withdrawn and passed posterior to the biceps tendon to grasp the suture loop that is retrieved out the anterosuperolateral portal (Fig. 10.6C). Extracorporeally, the free ends of the suture are threaded through the looped end to create a half-racking stitch. Pulling on the free suture limbs cinches the knot down on the biceps tendon (Fig. 10.7). Alternating traction on the suture limbs can be used to tighten the knot. A second half-racking stitch is similarly placed just distal to the first stitch (Fig. 10.8). The tendon is released from its origin at the superior labrum and retrieved into the cannula (Fig. 10.9). While maintaining traction on the biceps tendon, the cannula is pulled out of the skin, and traction is removed so that the shoulder and elbow can be flexed to relax the biceps and improve exposure (Fig. 10.10).
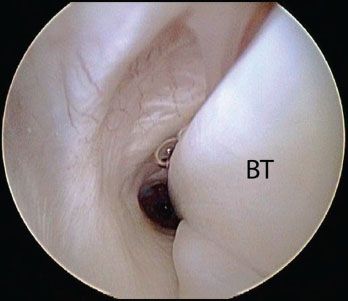
Figure 10.4 Right shoulder, posterior viewing portal. With a 70° arthroscope, a significant amount of the intertubercular groove portion of the biceps (approximately 2.5 cm) can be visualized. BT, biceps tendon
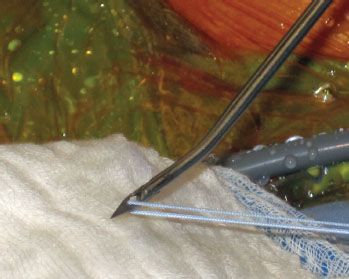
Figure 10.5 External photo demonstrates a #2 FiberWire (Arthrex, Inc., Naples, FL) that has been loaded in the middle onto a Penetrator (Arthrex, Inc., Naples, FL) in preparation for placement of a half-racking stitch in the biceps tendon.
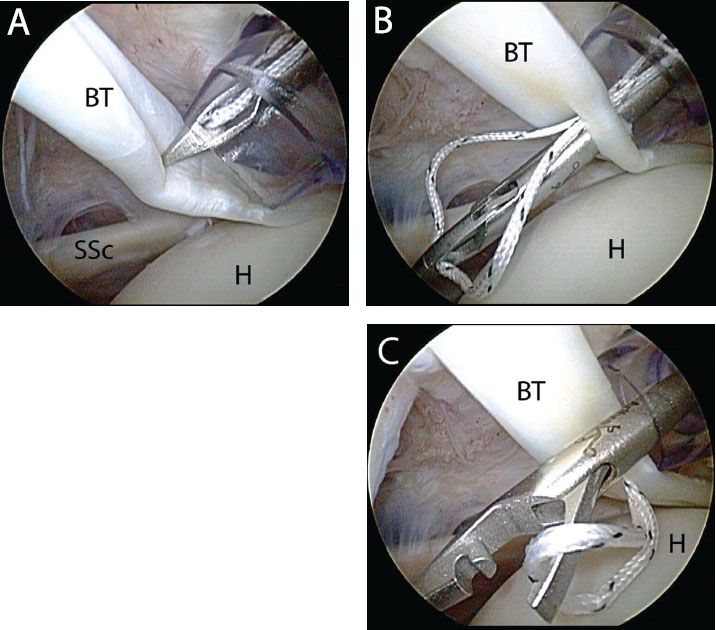
Figure 10.6 Half-racking stitch placement in the biceps prior to tenotomy in right shoulder viewed from a posterior portal. A: The middle of a #2 FiberWire suture (Arthrex, Inc., Naples, FL) has been loaded onto a Penetrator (Arthrex, Inc., Naples, FL). The Penetrator is inserted through an anterosuperolateral portal and used to pass through the center of the biceps tendon. B: The Penetrator is advanced about 2 cm beyond the biceps tendon where it will release the suture. C: Then, the Penetrator is withdrawn and passes posterior to the tendon to retrieve the suture loop. BT, biceps tendon; H, humerus; SSc, subscapularis tendon.
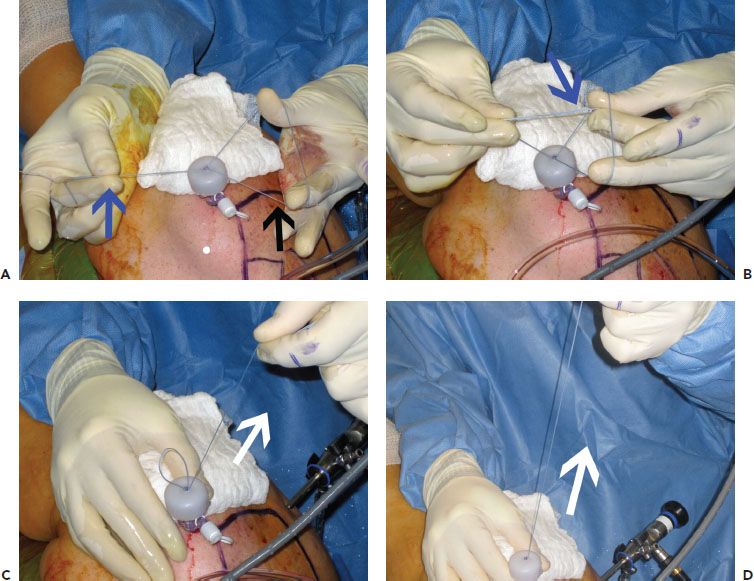
Figure 10.7 External view of steps for completing a half-racking stitch. A: The looped end of a suture (black arrow), which has been passed through the biceps tendon, and the free ends of the suture (blue arrow) are grasped. B: The free suture ends (blue arrow) are passed through the loop. C: Pulling tension (white arrow) on the free ends of the suture cinches the loop. D: Tension is applied (white arrow) until the knot rests on the biceps tendon.
Extracorporeally, a small portion of the LHB is sometimes removed based upon the amount of disease but also on the position of tenodesis. When estimating the amount of tendon to remove, it is important to remember that the intra-articular portion of the LHB tendon is approximately 2.5 cm and that the bone socket drilled is approximately 25 mm in depth to accommodate a 23-mm BioComposite Tenodesis screw. Furthermore, the whipstitch in the biceps tendon is begun about 5 mm from the end of the tendon. Therefore, if the tenodesis is performed high in the groove, we do not typically remove any tendon length.
A #2 FiberWire whipstitch is used to secure a 2- to 2.5-cm portion of the proximal end of the biceps tendon (Fig. 10.11A). It is important that the whipstitch enters and exits the tendon on the superior aspect of the biceps, approximately 5 mm from the end of the tendon, so that the driver can push the tendon into the bone socket during insertion while the anatomical orientation of the biceps is preserved. Shaping the tip like a bullet is also important for easing reduction of the tendon into the bone socket (Fig. 10.11B). One of the previously placed half-racking stitches is removed after the whipstitch has been placed. Using the thumb pad from the tenodesis driver, the tendon is sized and usually measures 7 or 8 mm (Fig. 10.11C). Then, the tendon is allowed to retract back into the shoulder. The anterosuperolateral portal is reestablished, but the sutures in the biceps are left outside the cannula.
In rare cases, the biceps tendon may be larger than 8 mm in diameter and will be too large to secure with an 8-mm tenodesis screw. In such cases, prior to placing the whipstitch, the tendon is easily downsized by sharply excising a small section of the proximal tendon for a length of about 3 cm (Fig. 10.12)
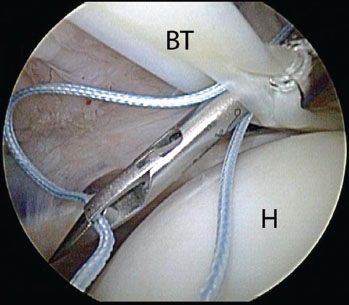
Figure 10.8 Right shoulder, posterior viewing portal, demonstrates placement of a second half-racking suture in the biceps tendon. This suture is placed just distal to the first suture for added security. BT, biceps tendon; H, humerus.
While viewing through a posterior glenohumeral portal, a guide pin is placed at the proximal aspect of the bicipital groove (Fig. 10.13A, B). Since the anterosuperolateral cannula was established with reference to the proximal aspect of the groove, the guide pin may usually be appropriately placed through this cannula and a separate portal is not required. Care is taken to ensure the guide pin is placed perpendicular to the groove.
A headed reamer of the same diameter as the tendon is then used to prepare a bone socket to a depth of 25 mm (to accommodate a 23-mm screw length plus the minor width of the tendon) (Fig. 10.13C). Generally speaking, if the tendon is between sizes, we will drill one size larger. This is because too tight a bone socket will make reduction of the tendon into the bottom of the hole extremely difficult and frustrating. Therefore, if the tendon measures approximately 6.5 mm, we will drill a 7-mm hole and place a 7-mm screw. Drilling and overstuffing the bone socket with a similar sized screw and tendon is possible due to the relatively soft cancellous bone of the proximal humerus.
Preparation of the bone socket is completed by removing soft tissue that may impede reduction of the tendon-screw unit (Fig. 10.14). The distal edge of the bone socket may also be beveled with a burr to minimize abrasion of the LHB. The sutures from the biceps whipstitch are then retrieved and passed through the cannulation of the tenodesis driver so that the tip of the screwdriver is against the biceps tendon. The screwdriver tip can be used to directly manipulate the end of the tendon (Fig. 10.15). Under direct vision, the screwdriver tip is then placed into the bottom of the bone socket, thereby reducing the tendon. Reduction of the tendon is confirmed by visualization of the whipstitch disappearing into the bone socket.
While holding the thumb pad on the screwdriver and maintaining tension on the biceps whipstitch sutures, the screw is advanced into the bone socket, securing tendon fixation to bone (Fig 10.16). The reduction of the tendon and screw depth can be confirmed by holding the screwdriver handle in place and turning the thumb pad clockwise to withdraw the screwdriver sleeve (Fig. 10.17). A suture from the whipstitch in the biceps (passing now through the center of the screw), and a suture from the retained half-racking stitch are then tied together, and repeated with the second set of sutures, so that the sutures completely encircle the screw from its inner cannulation to its outer threads (Fig. 10.18). This maximizes fixation by ensuring that the entire construct would have to fail for the tendon to lose fixation. Alternatively, the sutures from the biceps tenodesis construct may be used to repair the defect in the roof of the bicipital groove, repairing this tissue directly over the top of the biceps tenodesis.
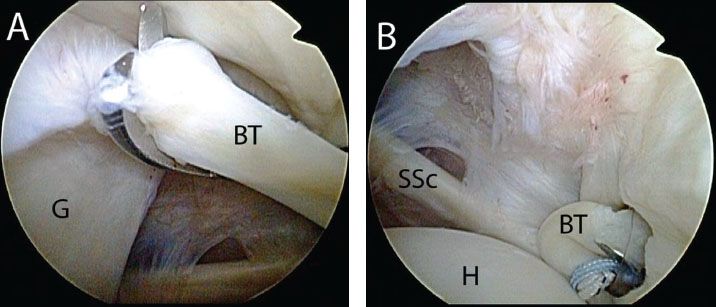
Figure 10.9 A: Right shoulder, posterior viewing portal demonstrating tenotomy of the biceps tendon, (B) followed by retrieval through the anterosuperolateral portal with a Kingfisher retriever (Arthrex, Inc., Naples, FL). BT, biceps tendon; G, glenoid; H, humerus; SSc, subscapularis tendon.
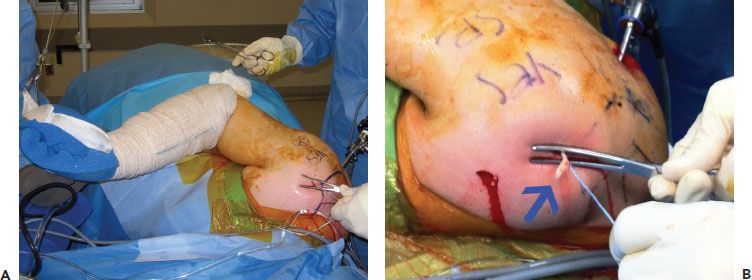
Figure 10.10 A: External view of a right shoulder. Access to the exteriorized biceps tendon is increased by removing the arm from traction and flexing the elbow. B: Pushing down on the skin with an instrument and pulling traction on the half-racking stitches also helps provide access to the biceps tendon (blue arrow) for placement of a whipstitch.
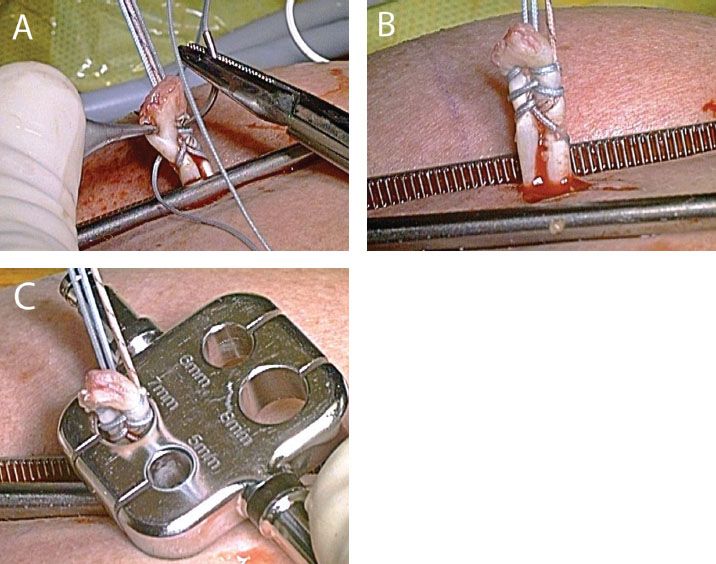
Figure 10.11 Preparation of the biceps tendon. A: A FiberWire whipstitch is placed in the biceps tendon and exits the tendon 5 mm from its proximal end. B: The leading edge of the tendon is trimmed so that it is shaped like a bullet. Note that overlapping the two rows of the whipstitch as in this case is useful when tissue quality is poor. C: The tendon is sized; in this case, a 7-mm screw will be selected.

Figure 10.12 Downsizing a large biceps tendon to accommodate an 8-mm tenodesis screw. A: In rare cases, the biceps tendon is larger than 8 mm in diameter. B,C: In such a case, the tendon can be downsized by sharply excising a thin longitudinal section of tendon. D: The tendon is then prepared with a whipstitch in the usual manner. E: After downsizing, the tendon is 8 mm in diameter and can now be secured with an 8-mm tenodesis screw.
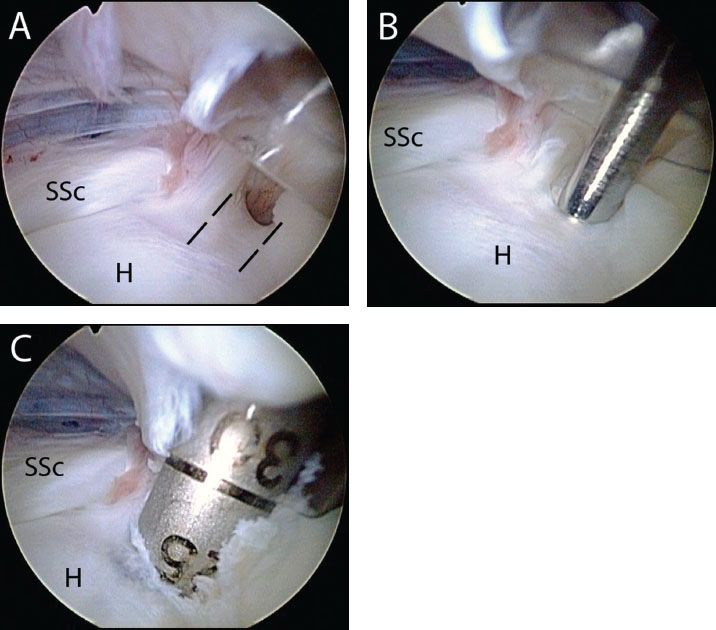
Figure 10.13 Location for biceps tenodesis in a right shoulder viewed from a posterior portal. A: The bicipital groove (dashed blacked lines) is visualized. B: A guide pin is inserted through an anterosuperolateral portal at the top of the bicipital groove. C: A reamer is then inserted over the guide pin and advanced to 25 mm to accommodate the 23-mm-long screw. H, humerus; SSc, subscapularis tendon.
Related posts:


Stay updated, free articles. Join our Telegram channel

Full access? Get Clinical Tree


