Repair of Anterior Instability without Significant Bone Loss
Anterior instability repair, or Bankart repair, is one of the most common surgeries performed by the shoulder arthroscopist. Although arthroscopic Bankart repair is commonly perceived as a technically easier procedure than arthroscopic rotator cuff repair, the construction of a secure, anatomic, effective Bankart repair is very complex. This is due to challenges in visualization and angle of approach, as well as the diverse pathology that may be encountered in instability repair. Furthermore, while most cases are effectively managed arthroscopically, it is important to evaluate each case for substantial bone loss that requires open reconstruction.
THE SETUP
Like all shoulder arthroscopies, we perform arthroscopic instability repair in the lateral decubitus position. In instability cases, the lateral decubitus position has many distinct advantages over the beach chair position. These include the ability to exert translational loads to the shoulder via traction to improve visualization and the use of the anterosuperolateral portal. This portal is created approximately 5 to 10 mm lateral to the anterolateral corner of the acromion, superior to the biceps and anterior to the supraspinatus tendon with a 45° angle of approach to the superior glenoid (Fig. 12.1). This portal is one of the major reasons patients should have arthroscopic instability surgery in the lateral decubitus position. The anterosuperolateral portal, which is used mostly as a viewing portal during arthroscopic Bankart repair, provides optimal visualization of the anterior, inferior, and posterior aspect of the glenoid, and it frees the right and/or left hands for easy and ergonomic approaches to these regions. Although a similar portal may be established in the beach chair position, the awkward stance required when visualizing through this portal makes it extremely difficult to use and minimizes its benefit.
In general, we use a three portal technique for almost all instability repairs (i.e., anterior, SLAP, or posterior repairs). These include a standard posterior portal, created 3 to 4 cm medial and 3 to 4 cm inferior to the posterolateral corner of the acromion and a low anterior portal created just above the lateral half of subscapularis tendon (Fig. 12.2). With this routine setup, the vast majority of pathologies may be identified and further portals may be created when necessary.
ACCESSORY PORTALS FOR ANTERIOR BANKART REPAIR
In some cases, access to the inferior aspect of the glenoid requires accessory portals for anchor insertion only. These portals are established to provide a 45° angle of approach to the 5 o’clock and 7 o’clock positions.
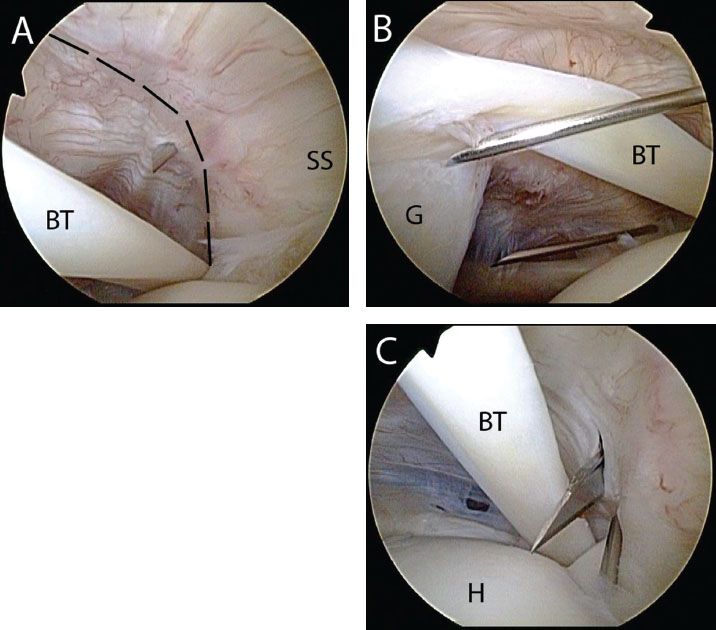
Figure 12.1 Right shoulder, posterior viewing portal, demonstrating establishment of an anterosuperolateral portal. A: A spinal needle is placed 5 to 10 mm lateral to the anterolateral acromion and enters the joint just anterior the supraspinatus (anterior ridge outlined by dashed lines). B: The portal should provide approximately a 45° angle of approach to the superior glenoid rim. A spinal needle from an anterior portal is seen in the background. C: A knife is walked down the spinal needle to incise the capsule. BT, biceps tendon; G, glenoid; H, humerus; SS, supraspinatus tendon.
5 O’clock Portal
This portal is created approximately 1 to 2 cm inferior to the standard anterior portal and is created transtendon through the subscapularis. A cannula is not required since the 5 o-clock trans-subscapularis portal is generally used for anchor insertion only. While viewing through a posterior portal, a spinal needle is used to localize the correct angle of approach transtendon through the subscapularis (Fig. 12.3). A small skin incision is created and a switching stick is inserted following the direct line of the spinal needle. The spear guide for a BioComposite SutureTak anchor is then slid over the switching stick. Alternatively, the spear guide may be “walked down” the spinal needle to enter the joint alongside the needle. With this more direct angle of approach, anchor insertion may now be performed at a less oblique angle to the anteroinferior glenoid.
Posterolateral Portal (7 O’clock)
In patients with labral tears that extend beyond the 6 o’clock position posteriorly, an anchor in the posterior inferior corner of the glenoid may be required to secure the posterior inferior labrum. However, the standard posterior portal usually does not provide the correct angle of approach to the posterior inferior glenoid. A separate low posterolateral portal or 7 o’clock portal is required that is created usually 4 to 5 cm inferior to the posterolateral corner of the acromion and approximately 4 to 5 cm lateral to the standard posterior portal. This portal is created to provide a 45° of approach to the posterior inferior glenoid and is used for anchor insertion (Fig. 12.4). The spear guide for a BioComposite SutureTak anchor is inserted using a switching stick technique as described above.
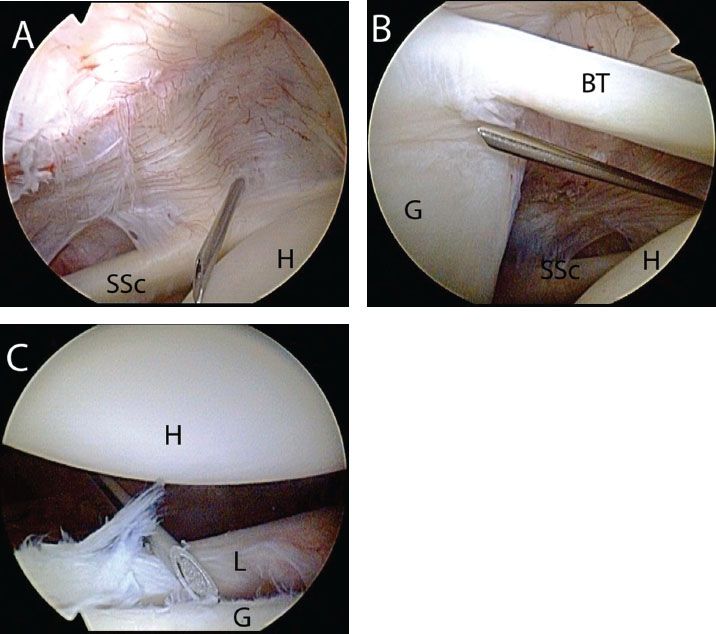
Figure 12.2 Right shoulder, posterior viewing portal demonstrating establishment of an anterior portal for Bankart repair. A: A spinal needle enters the glenohumeral joint just superior to the lateral half of the subscapularis tendon. B: The angle of approach allows access to the anterosuperior glenoid. C: This portal also provides a 45° angle of approach to the inferior glenoid for anchor placement. BT, biceps tendon; G, glenoid; H, humerus; L, labrum; SSc, subscapularis tendon.
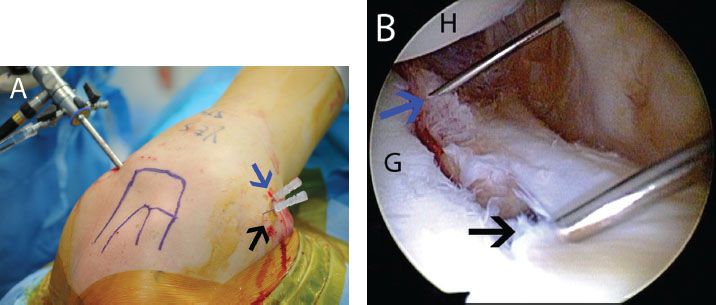
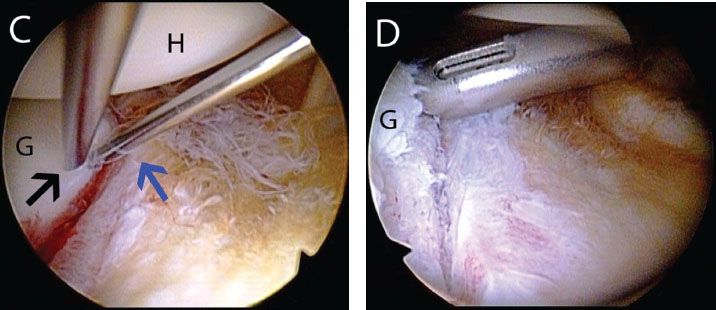
Figure 12.3 The 5 o’clock portal in a left shoulder. A: External view demonstrates spinal needle localization for a 5 o’clock portal (blue arrow) that is 1 to 2 cm inferior to our standard anterior portal (black arrow). B: Anterosuperolateral viewing portal demonstrates use of a spinal needle to determine an adequate angle of approach to the anteroinferior glenoid (blue arrow). A spinal needle from the anterior portal is seen in foreground (black arrow). C: Same shoulder demonstrates the improved angle of approach to the anteroinferior glenoid achieved with the 5 o’clock portal (blue arrow) compared to a standard anterior portal (black arrow). D: Following spinal needle localization, a spear guide can be walked down the spinal needle for anchor placement. G, glenoid; H, humerus.
MAXIMIZING VISUALIZATION
While viewing through the anterosuperolateral portal the anterior, posterior, and inferior aspects of the glenohumeral joint may be accessed. To maximize visualization and access of the anterior inferior glenohumeral joint, two techniques are commonly utilized. To provide temporary visualization and facilitate the angle of approach to the anterior inferior glenoid, an assistant standing behind the patient can provide lateral traction, abduction, and posterior translation to the glenohumeral joint. This technique will maximize the anterior inferior working space. To increase the working space inferiorly, a roll of towels or gowns may be placed in the patient’s axilla. Adduction of the arm over this roll (Fig. 12.5) places a lateral distraction force on the glenohumeral joint and increases the working space inferiorly (Fig. 12.6).
BANKART REPAIR SUTURE ANCHOR TECHNIQUE
After establishing the standard three portals for instability repair, a diagnostic arthroscopy is performed to identify all pathologies. This includes measurement of bone loss, documentation of all labral pathology, and an assessment of the rotator cuff and any cartilage damage. Standard Bankart lesions +/− SLAP lesions with minimal bone loss may be approached using a three portal technique. We establish 8.25 mm × 7 cm threaded clear cannulas (Arthrex, Inc., Naples, FL) in the anterior and anterosuperolateral portals to facilitate glenohumeral access. An 8.25 mm × 9 cm cannula is usually required for the posterior portal due to the increased distance from the skin to the glenohumeral joint posteriorly.
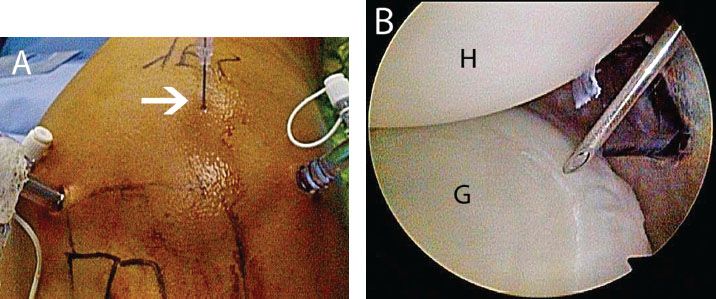
Figure 12.4 Right shoulder, demonstrating placement of the posterolateral portal. A: External view showing spinal needle placement (white arrow) for the posterolateral portal. B: Anterosuperolateral portal demonstrating that the spinal needle provides a 45° angle of approach to the posteroinferior glenoid. G, glenoid; H, humerus.
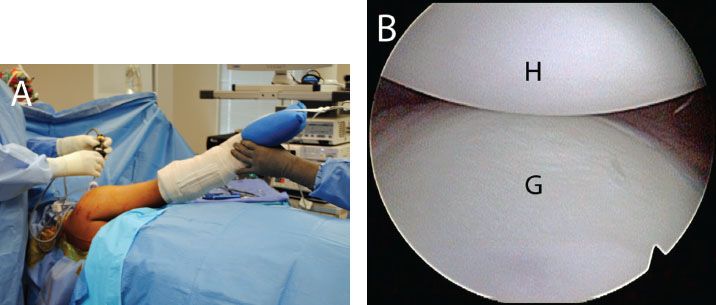
Figure 12.5 Right shoulder, anterosuperolateral viewing portal demonstrating standard view of the inferior glenoid. A: Patient positioned in the lateral decubitus position. B: View of the inferior glenoid prior to placement of an axillary bump. G, glenoid; H, humerus.
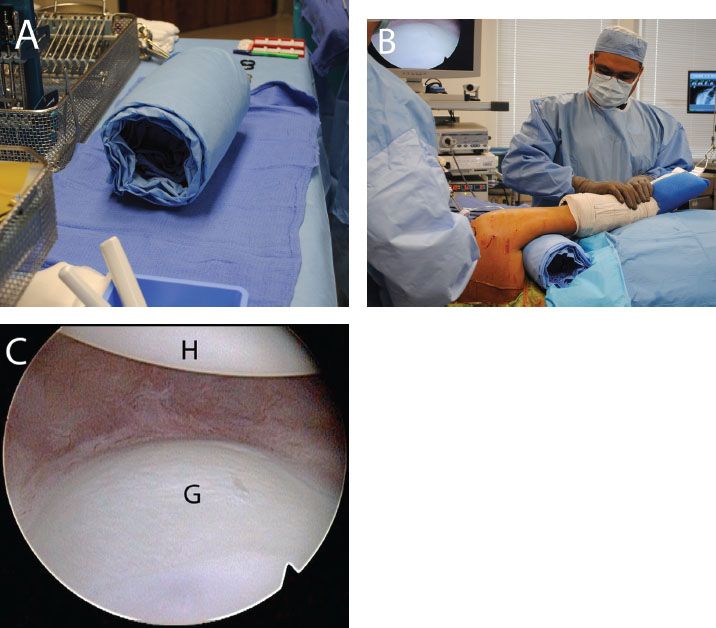
Figure 12.6 Augmenting visualization of the inferior glenoid. A: An axillary roll is created. B: The axillary roll is placed and an assistant provides distraction and a varus force to the operative arm. C: Right shoulder, anterosuperolateral viewing portal demonstrating improved visualization with the axillary roll compared to the previous visualization (Fig. 12.5). G, glenoid; H, humerus.

Figure 12.7 Right shoulder, anterosuperolateral viewing portal demonstrates a Bankart lesion. G, glenoid.
If a concomitant type II SLAP lesion is identified during instability repair, this should be repaired to augment repair of the Bankart lesion and to enhance stability of the glenohumeral joint. In general, the SLAP lesion is approached as the first stage of the procedure with bone preparation, anchor insertion, and suture passage. The reason for this is because soft tissue swelling as the case progresses will make suture passage superiorly more difficult. However, knot tying is delayed until the conclusion of the procedure. Early knot tying can prematurely constrict the glenohumeral joint, limiting the effect of traction/translation,and obstructing visualization. In atypical cases of type III or type IV SLAP repair in association with Bankart repair, one may choose to tie sutures early in the procedure to reduce the displaced bucket-handle tear and to provide a stable base for subsequent Bankart repair.
While viewing through the anterosuperolateral portal, the Bankart lesion is identified (Fig. 12.7). The extent of the lesion, displacement of the labrum, and quality of the tissue are all assessed. Using a combination of an arthroscopic elevator, arthroscopic scissors, and a shaver, the Bankart lesion is meticulously mobilized off the anterior and anteroinferior glenoid neck (Fig. 12.8A). In lesions that approach but do not extend beyond the 6 o’clock position, an arthroscopic scissor and elevator are commonly used to extend the lesion to just beyond the 6 o’clock position. This ensures adequate mobilization of the labrum and anterior inferior glenohumeral ligaments, facilitating an inferior to superior shift.
The entire anterior inferior glenoid labrum is mobilized until the underlying muscular fibers of the subscapularis are identified (Fig. 12.8B). Adequate mobilization is achieved when the glenoid labrum naturally floats to or above the level of the glenoid. This ensures that an anatomic, tension free repair of the labrum may be obtained.
Mobilization is particularly important in ALPSA lesions (anterior labroligamentous periosteal sleeve avulsion), where the anterior inferior labrum is displaced medially and is scarred along the medial neck of the glenoid (Fig. 12.9). Aggressive mobilization is required for these lesions to ensure that a tension free repair is obtained.
Once the labrum has been mobilized, the anterior glenoid neck is debrided to a bleeding bone surface. Care is taken to debride the glenoid neck, removing soft tissue without removing bone. A soft tissue shaver or burr may be used. Since the labrum is repaired back up onto the edge of the face of the glenoid, a small, thin strip of bone is exposed on the anterior glenoid rim to enhance healing. A sharp ring curette is used to create a narrow strip of bare bone on the articular surface of the glenoid rim, along the proposed bone–labrum interface (Fig. 12.10).
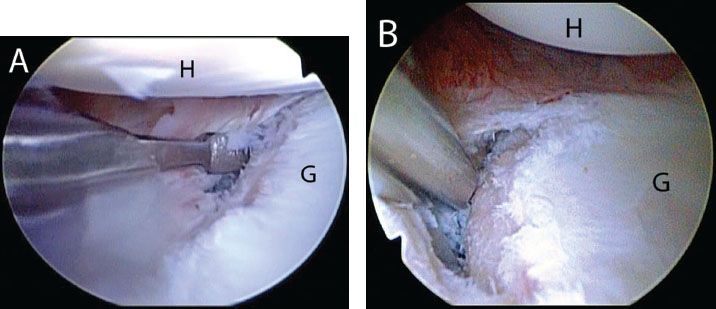
Figure 12.8 Right shoulder, anterosuperolateral portal demonstrating mobilization of a Bankart lesion. A: A 15° arthroscopic elevator is introduced through an anterior portal to mobilize the labrum. B: A shaver assists in the mobilization. Mobilization is complete when subscapularis muscle fibers are visualized medially, deep to the capsule. G, glenoid; H, humerus.
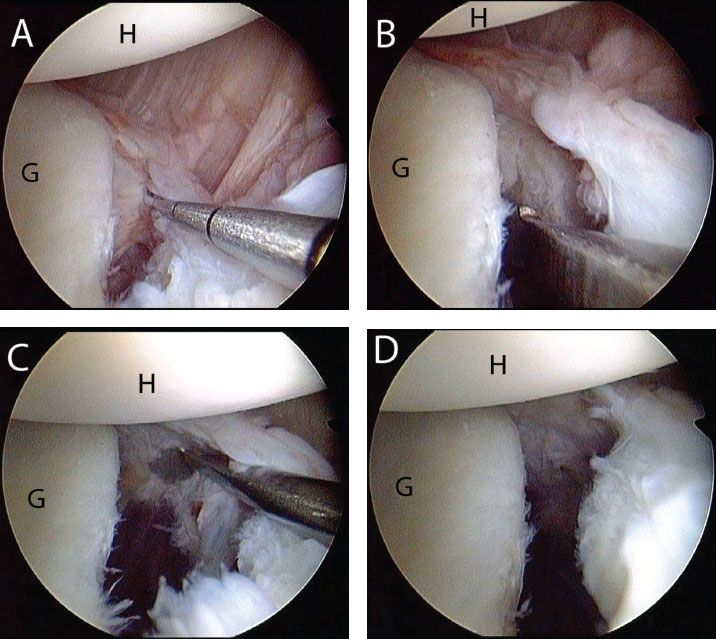
Figure 12.9 Left shoulder, anterosuperolateral viewing portal demonstrating (A) an anterior labroligamentous periosteal sleeve avulsion (ALPSA) that has resulted in a medialized labrum. B: An arthroscopic elevator introduced through an anterior portal is used to mobilize the ALPSA lesion. C: Mobilization is complete when the subscapularis muscle is visualized. D: Following complete mobilization the labrum “floats up” above the level of the glenoid. G, glenoid; H, humerus
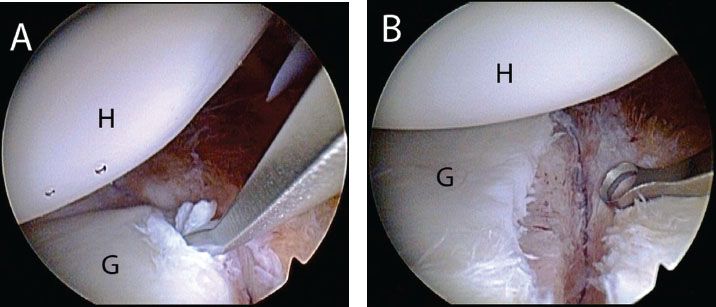
Figure 12.10 Left shoulder, anterosuperolateral viewing portal demonstrating bone bed preparation for an anterior Bankart repair. A: A ring curette is used to define a small strip of bare bone on the anterior glenoid to facilitate labrum to bone healing. B: View after complete preparation. G, glenoid; H, humerus.

Figure 12.11 Right shoulder, anterosuperolateral viewing portal demonstrating anchor placement for a Bankart repair. A: A BioComposite SutureTak Spear Guide (Arthrex, Inc., Naples, FL) is placed through the anterior portal and is seated on the glenoid. B: View after placement of a double-loaded anchor. G, glenoid; H, humerus
Anchors are then inserted just onto the face of the glenoid along the strip of prepared bare bone, starting from inferior to superior. It is important to plan and space anchors appropriately for anchor insertion. On average, we use three 3.0-mm BioComposite SutureTak anchors double loaded with No. 2 FiberWire (Arthrex, Inc., Naples, FL). All anchors are inserted so that they are at or below the midglenoid notch. When the patient’s anatomy allows, anchors may be inserted through the standard anterior portal. The BioComposite SutureTak Spear is placed just onto the articular surface and is used to lever the humeral head posteriorly to improve the angle of approach to the glenoid rim. A mallet may be used to gently tap the spear into the glenoid bone that will fix the spear onto the glenoid and prevent slippage during subsequent drilling and anchor insertion (Fig. 12.11). Without moving the spear, the bone is then drilled and the anchor is inserted through the cannulated spear.
Suture passage may be performed in one of three ways: antegrade (Scorpion; Arthrex, Inc., Naples, FL), shuttling (SutureLasso; Arthrex, Inc., Naples, FL), or retrograde (BirdBeak; Arthrex, Inc., Naples, FL) techniques. We have found that antegrade suture passage is only possible in large patients, where there is adequate room for opening the jaws of the Scorpion suture passer. It is more important, however, to place the stitch appropriately and accurately through the labrum than to use one specific technique. Of critical importance are the sutures for the most inferior anchor, which will capture the inferior axillary recess and anterior inferior glenohumeral ligament. These sutures are critical in retensioning the “hammock” and effectively shifting the capsule superiorly.
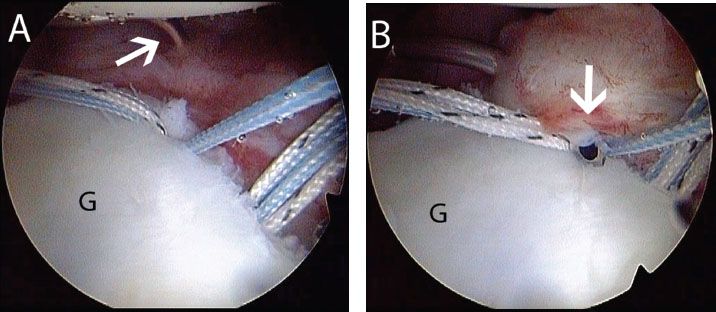
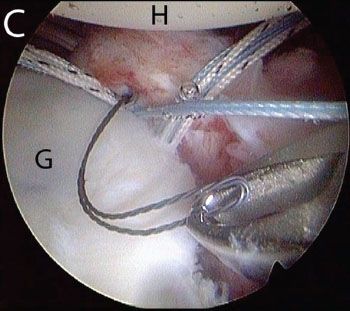
Figure 12.12 Left shoulder, anterosuperolateral portal demonstrates shuttling technique for suture passage during Bankart repair. In some cases, the most anteroinferior suture is easiest to pass from a posterior portal. A: A SutureLasso (white arrow) (Arthrex, Inc., Naples, FL) curved opposite the operative shoulder is introduced from a posterior portal. B: The SutureLasso (white arrow) is used to perform a pass through the anteroinferior capsule and labrum. C: A Nitinol loop is retrieved from an anterior portal. A blue suture has previously been retrieved through this anterior portal and will be passed through the Nitinol loop to shuttle it through the labrum and capsule. G, glenoid; H, humerus.
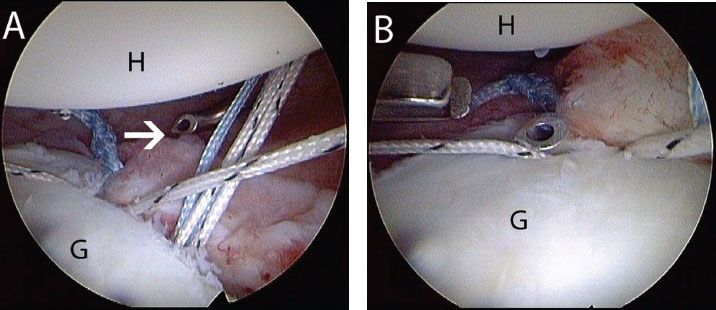
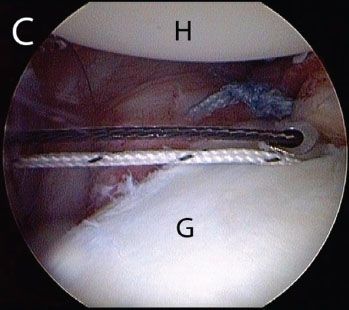
Figure 12.13 Left shoulder, anterosuperolateral viewing portal. After the most anteroinferior suture has been passed (Fig. 12.12), it is easiest to pass the remaining sutures from an anterior portal. A: A SutureLasso (white arrow) (Arthrex, Inc., Naples, FL) curved to the same side of the operative shoulder is introduced from an anterior portal. B: The SutureLasso is passed through the capsule and labrum. C: A Nitinol loop is retrieved out the posterior portal and will be used to shuttle a suture previously retrieved out this portal. G, glenoid; H, humerus.
Shuttling is our preferred technique for suture passage in most cases. Often, it is easiest to pass the most inferior stitch by shuttling from the posterior cannula with an opposite 25° Tight Curve SutureLasso (i.e., left curved for a right shoulder). Three of the four sutures are retrieved out the posterior portal and the SutureLasso, inserted through the posterior portal, penetrates the inferior capsule exiting the labrum just anteriorly and inferiorly (Fig. 12.12). The suture shuttle wire is then retrieved through the anterior portal and the suture limb remaining in this portal is shuttled out the posterior cannula. To pass the second more anterior suture, usually the standard Suture- Lasso is used (25° right angled hook for a right shoulder) through the anterior portal (Fig. 12.13). To follow the same sequence for shuttling, a suture limb is retrieved out the posterior portal prior to passing the SutureLasso. This step ensures that the sutures do not tangle as they are shuttled under the labrum and through the capsule. Alternatively, a “single-step” approach may be used by retrieving a suture and the suture shuttle wire at the same time. Retrograde instruments are usually difficult to use low in the glenohumeral joint due to the relatively acute angle of approach.
The second anchor is inserted just onto the face of the glenoid and sutures are passed in a similar fashion. When the approach is more directly in line with the cannula, usually with the third anchor from the bottom, retrograde suture passage is possible (Fig. 12.14), but may create a larger hole through the labrum when compared to a SutureLasso shuttling technique. Usually, sutures are passed approximately 1 to 1.5 cm inferior to the anchor, effectively shifting the labrum/capsule superiorly. The same sequence is repeated for each anchor. We routinely use three doubleloaded anchors for a standard Bankart repair.
In patients with standard traumatic unidirectional instability, a formal capsular plication is rarely performed anteriorly or posteriorly. While posterior capsular plication has recently been advocated by some surgeons as a method of closing the inferior capsular recess, we have found that this is rarely required when using the above technique since the inferior sutures capture the inferior axillary recess and advance them superiorly and anteriorly effectively retensioning the axillary recess.
To simplify suture management, sutures are “tied as you go” using standard knot tying techniques through the anterior portal (Fig. 12.15). Although early labrum fixation to bone can limit anchor insertion and suture passage, multiple double loaded anchors in a tight glenohumeral joint can also make suture management difficult and frustrating. As a balance, a “keep ahead” by one anchor approach may be used. That is, the inferior two anchors are inserted and sutures passed, then the first anchor sutures are tied. The third anchor is inserted and sutures passed, and the second anchor sutures are tied. The process is continued as necessary, “keeping ahead” by one anchor so that there are no more than two anchors in the joint at once that have untied sutures, and suture passage is never limited by tying of an adjacent suture (Fig. 12.16). In contrast, “tying as you go” can bind the capsule so tightly to the glenoid rim that passing the sutures through the tightly bound capsule is very difficult.

Figure 12.14 Right shoulder, anterosuperolateral viewing portal demonstrating retrograde suture passage with a BirdBeak (Arthrex, Inc., Naples, FL). This technique may be used when the portal is directly in line with the suture to be passed. G, glenoid; H, humerus.
Related posts:


Stay updated, free articles. Join our Telegram channel

Full access? Get Clinical Tree


