Total Shoulder Replacement with Intact Bone and Soft Tissue
Edward V. Craig
INDICATIONS/CONTRAINDICATIONS
The first humeral head replacement in the United States was implanted for a proximal humeral fracture in 1953. In 1971, a matching polyethylene glenoid component was used as the first total shoulder replacement. Since that time, a variety of designs have been identified for glenohumeral arthroplasty, with most being of the unconstrained variety. Implant designs exist with variable humeral head sizes and stem lengths, with or without modularity, and are matched with glenoid components of differing designs. Some systems offer choice and variability in neck-shaft angles and the degree of version adjustability. Materials may vary for humeral stem between systems. Glenoid design differences may also include degree of constraint; radius of curvature; fixation by peg, keel, or anchor peg; and whether the component is intended to be cemented, to allow ingrowth into porous metal, or come combination. However, all designs have in common the lack of constraint in the prosthetic components, allowing reattachment of the rotator cuff muscles around the implant and thus permitting the shoulder to be rehabilitated for motion and strength without mechanical blocks to motion. While any reverse shoulder arthroplasty is intended to be designed with more constraint than an anatomic arthroplasty, this
design is rarely used when there is intact soft tissue and has its optimal use with a deficient rotator cuff, or cuff deficiency equivalent, such as tuberosity nonunion or revision arthroplasty.
design is rarely used when there is intact soft tissue and has its optimal use with a deficient rotator cuff, or cuff deficiency equivalent, such as tuberosity nonunion or revision arthroplasty.
The indications for total shoulder arthroplasty are pain from an incongruous joint associated with glenohumeral arthritis and the attendant loss of function. Stiffness of the shoulder in the absence of pain is only rarely an indication for glenohumeral joint arthroplasty. However, in some arthritic conditions such as ankylosing spondylitis, which may be associated with a stiff elbow and a stiff shoulder, glenohumeral arthroplasty may be considered to improve overall function in the extremity. The single most common indication for total shoulder arthroplasty is pain that is unresponsive to nonoperative treatment such as anti-inflammatory medications and rest. In some glenohumeral arthritic conditions, it may be reasonable to consider intra-articular injections of corticosteroids or synthetic hyaluronates prior to a glenohumeral arthroplasty. However, in most patients, pain from loss of the glenohumeral joint space accompanying glenohumeral arthritis is inadequately addressed long-term with intra-articular injections, which provide short-term relief, if any at all. In some cases of early osteoarthritis, arthroscopic débridement of the joint, synovectomy, débridement of osteophytes, or loose body removal (with or without soft-tissue releases to gain increased range of motion) may be considered. It may be particularly considered in those patients who have some overlap of early arthritis and subacromial disease such as impingement, in which an arthroscopic acromioplasty may prove beneficial at the time of débridement of the arthritic joint.
Glenohumeral arthroplasty is contraindicated in a patient whose symptoms are not sufficiently disabling to warrant an operation, in a patient who has loss or paralysis of both rotator cuff and deltoid, and in a patient with active infection. Loss of the rotator cuff alone or deltoid alone may be handled with soft-tissue procedures, synthetic grafting, or muscle transfers and is not necessarily a contraindication for a nonconstrained arthroplasty of the shoulder. And, of course, a cuff-deficient shoulder is a classical indication for reverse shoulder arthroplasty. A neuropathic joint is generally considered a contraindication to a glenohumeral joint arthroplasty.
While many types of glenohumeral arthritis have intact bone in rotator cuff, including osteoarthritis, avascular necrosis, capsulorrhaphy arthropathy, dislocation arthropathy, and some cases of rheumatoid arthritis, the prototypic patient undergoing total shoulder replacement with intact soft tissues is the patient with osteoarthritis or osteonecrosis.
PREOPERATIVE PLANNING
The patient who presents with glenohumeral arthritis requiring total shoulder arthroplasty gives a characteristic history. There is usually a several-year history of gradually progressive shoulder pain. Accompanying the shoulder pain is a progressive stiffness and loss of motion, and the patient often experiences a grinding or grating within the shoulder joint that is disturbing and painful.
There are many different causes of glenohumeral joint arthritis, any of which can become sufficiently symptomatic to warrant total shoulder arthroplasty. These include primary osteoarthritis, rheumatoid arthritis, dislocation arthropathy, postcapsulorrhaphy arthropathy, posttraumatic arthritis, osteonecrosis, cuff tear arthropathy, and septic arthritis. The history and extent of disability are highly individualized and depend on the type of arthritis that is present. Patients with osteonecrosis may have a history of predisposing factors such as oral corticosteroids, alcoholic excess, or any one of a number of autoimmune diseases.
On physical examination, the patient usually has a degree of posterior joint-line tenderness that is different from that of the contralateral shoulder, unless the condition is bilateral. There is usually restricted passive range of motion. Motion of the shoulder in forward elevation, external rotation, and internal rotation is usually painful. This passive restriction of motion is usually accompanied by a sense of deep grinding or grating, typical of an incongruous glenohumeral joint with cartilage loss. The patient with primary osteoarthritis of the shoulder may have some flattening of the anterior shoulder and fullness posteriorly, because asymmetric wear of the glenoid may cause the humeral head to translate posteriorly, producing the so-called pseudosubluxation of primary osteoarthritis. When the strength of the shoulder is tested in a patient with osteoarthritis or avascular necrosis, there is usually not much noticeable weakness of external rotation strength, as the rotator cuff in these conditions is usually normal. However, when the patient is asked to contract the external rotators against resistance, there is a ratcheting type of grinding from the joint incongruity. Patients with rheumatoid arthritis may have an intact rotator cuff but some weakness on cuff testing due to the myopathy of rheumatoid arthritis, the myopathy associated with clinical steroid therapy, or rotator cuff tearing. Most patients with rheumatoid arthritis will have other joint changes, and complete examination of the shoulder may be made more difficult by ipsilateral elbow disease.
The standard radiographs requested are a true anteroposterior (AP) view of the glenohumeral joint, a scapula lateral view, and an axillary view. The AP provides a view of the extent of glenohumeral joint space narrowing, the position of the tuberosities relative to the humeral head, and the position of the humeral head relative to the acromion. In primary osteoarthritis, characteristic radiographic features include an inferior protruding osteophyte, which is, in fact, a circumferential osteophyte, and sclerosis or cystic changes in the humeral head. A supine axillary view will confirm the presence of narrowing of the joint and will indicate whether the glenoid may be worn asymmetrically. In addition, in primary osteoarthritis, there is often a radiographic subluxation of the humeral head posteriorly, because of the excessive posterior wear on the face of the glenoid. However, the true amount of asymmetry of glenoid wear may be difficult to determine by plain axillary view.
If there is a suggestion of significant asymmetric wear, or in conditions where the position of the tuberosities relative to the head may be unclear, a computed tomography (CT) scan can be useful to define the precise bony anatomy. Prior to shoulder arthroplasty, a CT scan can help preoperative planning, by identifying the degree and direction of glenoid wear, the precise center of the glenoid vault, and may prove helpful in determining whether asymmetric wear and altered version can be normalized by asymmetric glenoid preparation or whether consideration should be given to glenoid bone grafting. CT scan with 3-D reconstruction has become a routine part of my preoperative planning for shoulder arthroplasty.
Patients with primary osteoarthritis and osteonecrosis usually have an intact rotator cuff. Occasionally, there will be a rotator cuff tear that is small and easily repairable. It is not standard for me to order an arthrogram or a magnetic resonance imaging (MRI) scan in a patient who has classic radiographic findings of osteoarthritis. However, if cuff weakness or superior migration of humeral head raises doubts about cuff integrity, particularly if there is a question of its repairability, an MRI scan to assess cuff status and health of its muscles is prudent. If there has been previous trauma or prior surgery or if the clinical evaluation raises questions of neurologic status of the extremity, an electromyogram and nerve conduction velocity are performed.
SURGERY
For shoulder arthroplasty, insertion of a glenoid component requires excellent exposure. There are many steps that aid in exposure, and these steps include everything from patient positioning to proper retractor placement. The important factors in glenoid exposure include the following:
Complete muscle relaxation, often with general anesthesia
The arm prepped completely free and scapula stabilized
Complete release of subdeltoid, subacromial, and subpectoral adhesions
Complete release of subscapularis muscle
Complete excision of humeral head osteophytes
Complete humeral head excision
Complete anterior and, when necessary, inferior capsular release
Retractor placement that maximizes visualization posteriorly, superiorly, and anteriorly
Either regional anesthesia with interscalene block or general anesthesia is used for total shoulder replacement arthroplasty. In very muscular individuals, in which failure of complete pectoralis major relaxation can increase the difficulty of joint exposure, general anesthesia is preferred.
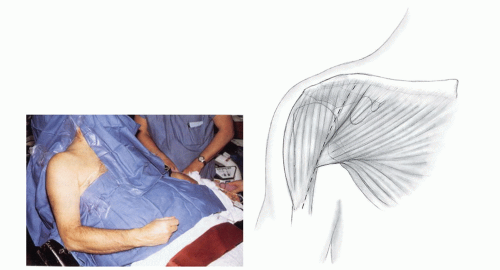
The patient is positioned in the beach-chair position with the affected arm supported on an armrest that may be moved in and out of the operating field. For work on the humeral head, cuff, and glenoid, the arm is best supported on the armrest. However, for intramedullary insertion of the prosthetic device, hyperextension of the arm off the side of the operating table is usually needed. Alternatively, a beanbag may permit molding with support of the elbow while permitting extension of the humerus for humeral shaft insertion. A towel is placed behind the scapula, the head is secured to the operating table or to a head holder, and the entire extremity is prepped. The hand is wrapped with an Ace bandage or a sterile stocking to the level of the elbow, which is then secured. The operating field is then draped with a U-drape. The topographic markings are made with a skin marker and Steri-Drape (3M Worldwide, St. Paul, MN) is applied.
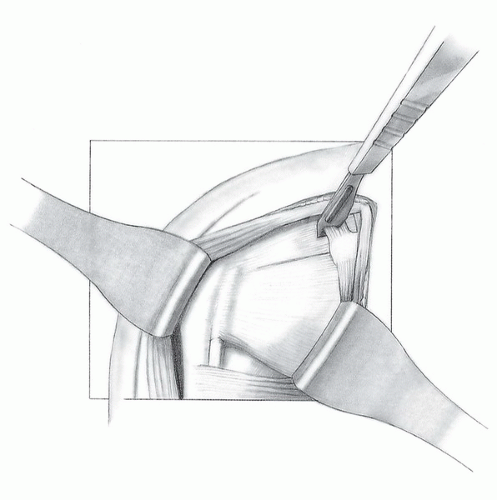
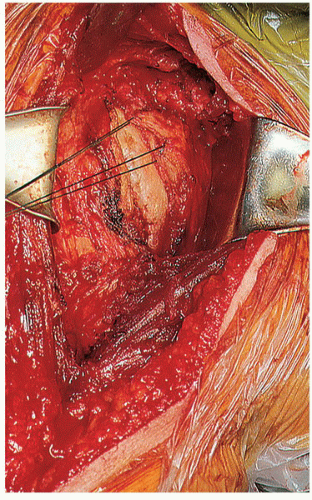
The skin incision is deltopectoral, originating at the inferior border of the clavicle, halfway between the acromioclavicular joint and the coracoid process, and extending inferiorly and laterally to the deltoid insertion, ending just lateral to the muscle belly of the biceps (Fig. 36-1). The skin and subcutaneous tissue are divided to the level of the deltoid. The deltopectoral interval is then identified, usually by the cephalic vein, which has fat overlying it, particularly a fat triangle at the level of coracoid process (Fig. 36-2). If there is difficulty identifying the deltopectoral interval, external rotation of the humerus puts the pectoralis under some tension and makes the superior fibers of the pectoralis more easily identifiable. In addition, the interval may be found in the superior aspect of the wound at the level of the coracoid process. Although the cephalic vein may be able to be preserved, it may also be ligated and excised to ensure against intraoperative avulsion. The clavipectoral fascia adjacent to the conjoined tendon is identified and incised up to the level of the coracoacromial ligament. Often, there are significant muscle fibers of the brachialis and short head of the biceps, which extend somewhat laterally to the tendinous portion of the conjoined tendon. These should be included with the conjoined tendon and retracted medially; the underlying bursa and subscapularis are then exposed (Fig. 36-3). Electrocauterization can be used to handle the branch of the thoracoacromial trunk, a troublesome bleeder in the superior aspect of the wound. The coracoacromial ligament may also be excised (Fig. 36-4). If necessary for exposure, the upper one-fourth of pectoralis tendon may be divided and the deltoid insertion along the lateral aspect of the humerus may be divided or elevated subperiosteally. This release of the deltoid distally makes it less likely that the deltoid muscle will be significantly traumatized during retraction. Care should be taken to completely free adhesions from under the deltoid, in the subacromial space, and under both pectoralis major and conjoined tendon. Retractors such as Richardson, Brown, or any one of a number of self-retaining retractors beneath both deltoid and conjoined tendon clarify the position and anatomy of the rotator cuff. At this point, the amount of passive external rotation may be tested with the arm at the side. In some patients, internal rotation contracture may severely limit external rotation. In this situation, a Z-lengthening of the subscapularis is necessary to provide external rotation. If, however, passive external rotation is 10 degrees or greater from the neutral position, the lengthening of the subscapularis is not needed. The anterior humeral circumflex vessels are cauterized as the dissection continues.
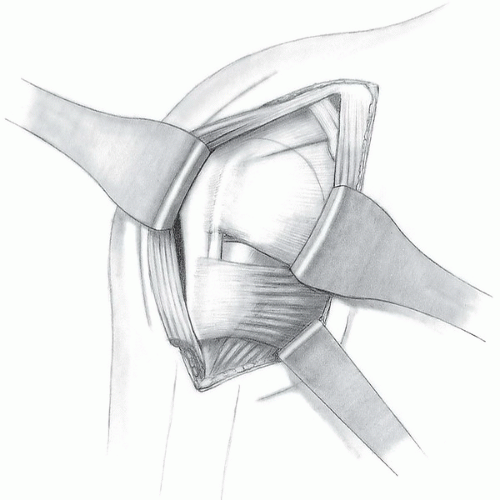 FIGURE 36-3 Medial retraction of the conjoined tendon exposes the underlying bursa and subscapularis. |
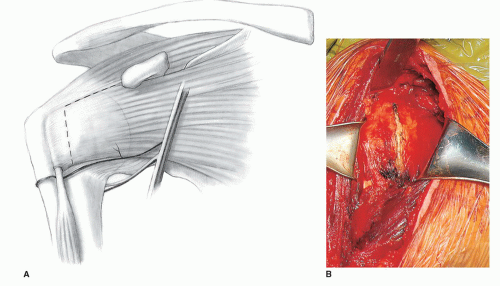 FIGURE 36-5 A,B: The subscapularis and capsule are divided in their entirety and the incision is extended toward the coracoid process, completely opening the rotator interval. |
The subscapularis and anterior capsule are then divided together from the level of the rotator interval to the most inferior border of the subscapularis insertion (Fig. 36-5). These are divided approximately 2 cm from the lesser tuberosity insertion of the subscapularis. Care must be taken when dividing the subscapularis inferiorly, so that the axillary nerve is not inadvertently injured. The axillary nerve crosses beneath the subscapularis tendon approximately 3 mm medial to the musculotendinous junction. External rotation of the humerus while the subscapularis is being divided will minimize the likelihood that the axillary nerve will be inadvertently injured. In addition, a blunt retractor beneath the subscapularis also minimizes the potential for nerve injury. Care must be taken to divide the capsule as far inferiorly as possible. This not only helps in a tight shoulder to expose the joint for dislocation of the humeral head but also permits adequate humeral retraction posteriorly for glenoid exposure. With the subscapularis divided, the rotator interval is incised medially to the level of the coracoid process, and the subscapularis muscle is tagged with stay sutures and retracted medially (Fig. 36-6). Release of the biceps tendon in the rotator improves exposure, gives more clear identification of precise cuff attachment, and minimizes later biceps tendon problems. A decision can be made whether a simple tenotomy or later tenodesis is preferable. This choice is frequently surgeon specific.
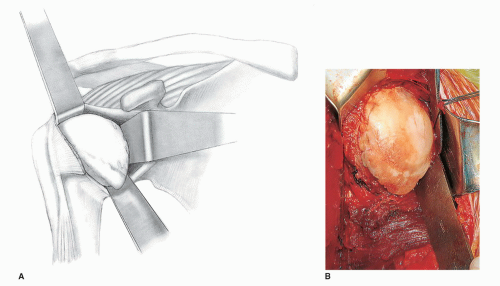
The humeral head is then dislocated by hyperextending and externally rotating the arm. It is often helpful to place a blunt retractor superiorly over the neck of the humerus, under the supraspinatus, and inferiorly under the neck of the humerus, inside the capsule. With dislocation of the humeral head and delivery into the wound, preparation is made for humeral head resection and osteotomy. Marginal osteophytes are removed (Fig. 36-7). Patients with osteoarthritis often have intra-articular loose bodies, which should be removed. In addition, during inferior capsular division, in the presence of a very large inferior osteophyte, the axillary nerve may be quite close to the inferior aspect of the humeral head and osteophyte, and caution should be used while dissecting in this area.
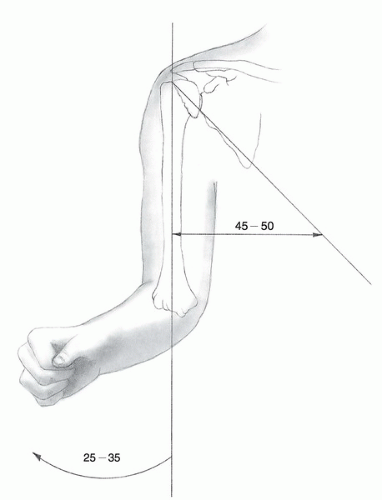
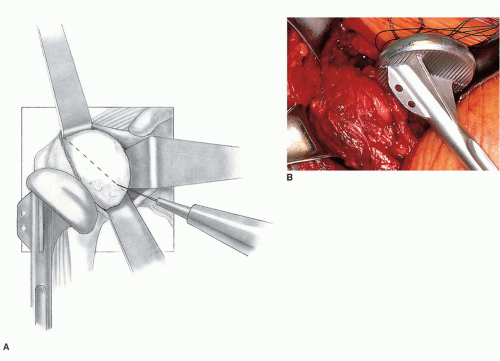
Exactly how the humeral head and neck osteotomy is performed depends on the total shoulder system being used. What follows is a description of the Biomet Comprehensive Primary Shoulder Arthroplasty System (a shoulder system in which reverse, fracture stem, and anatomic primary system are integrated). Whatever the shoulder system used, the osteotomy of the head of the humerus consists of only that portion of the head ordinarily covered with articular cartilage. The head is osteotomized in 30 degrees of retroversion, which mimics the normal amount of retroversion of the humerus. In addition, the osteotomy is at an angle of approximately 45 to 50 degrees to the shaft of the humerus (Fig. 36-8). If the osteotomy is to be made freehand, a trial prosthesis may be placed against the proximal humerus and the angle of the osteotomy outlined with a cautery (Fig. 36-9). With the elbow bent 90 degrees, the forearm in neutral rotation, the arm externally rotated 35 degrees, and the osteotomy angled directly from anterior to posterior, a retroversion cut of 30 degrees is produced.
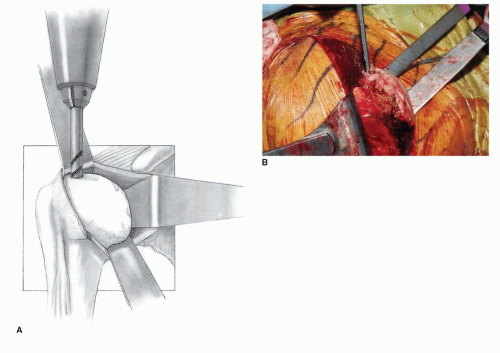
Alternatively, a humeral head resection guide may be used, and many shoulder arthroplasty systems have either an internal, intramedullary, or an external, extramedullary, guide, which helps the surgeon reproduce the neck-shaft angle, retroversion degree, and height of humeral head cut corresponding to that recommended for the specific implant being inserted. In the Comprehensive System, the resection guide is placed on the intramedullary T-handled reamer. A 1/4-in drill bit is used to make a pilot hole just posterior to the bicipital groove, approximately 1 to 1.5 cm from the greater tuberosity into the medullary canal of the humerus (Fig. 36-10). The sequential T-handled reamers are then used to prepare the humerus to the point at which resistance, or “chatter,” is felt in the shaft of the humerus (Fig. 36-11). Depth of the reamer is determined by whether one chooses to use a standard, mini, or micro stem length. In most instances, I prefer a mini stem. At this point, the humeral head resection guide is assembled directly onto the T-handled reamer. The humeral head resection guide ensures that the angle relative to the shaft of the humerus will be 45 to 50 degrees (Fig. 36-12). A retroversion guide rod inserted into the resection guide and kept parallel to the forearm ensures the appropriate amount of retroversion for the cut (Fig. 36-13). In this particular system, it is possible to make the cut in 20, 30, or 40 degrees of retroversion. The usual cut for primary osteoarthritis and osteonecrosis will be made in 30 degrees of retroversion. Less retroversion may be needed if there is a possibility of posterior instability of the implant. More retroversion may be needed in some cases of malunion following fracture.
When the humeral head resection guide is lined up appropriately, 1/8-inch drill bits are used to secure it to the shaft of the humerus, and the cutting block is used to make the appropriate angle cut and resect the appropriate amount of humerus (Figs. 36-14 and 36-15). In the Biomet Comprehensive System, an “angel wing” inserted under the cuff and fit into the cutting block assists in determining the precise cut location. One pitfall at this part of the procedure is as follows:
Incorrect Amount Resected
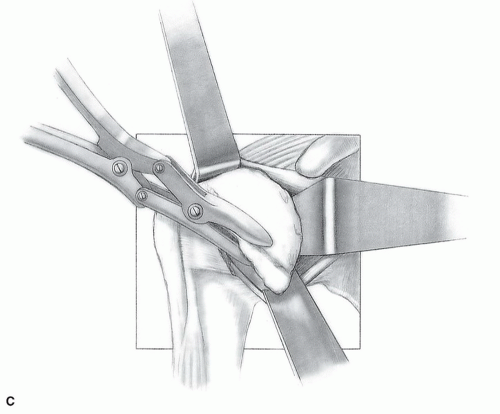
If too little humeral head is resected, there will be a ridge of bone remaining inside the joint, leading to tightness of the joint, incomplete seating of the humeral prosthesis, and difficulty in exposing the glenoid for the implantation of the glenoid component. Alternatively, if the resection of the humeral head is too extensive, the egress of the osteotomy may be either into the rotator cuff or even into the greater tuberosity, in which case fracture of the greater tuberosity results. The osteotomy cut should emerge precisely at the position where the rotator cuff inserts on the greater tuberosity (Fig. 36-16). No ridge should be able to be felt between the rotator cuff tendinous and capsular insertion and the free cut of the humeral head. The resected humeral head is then removed.
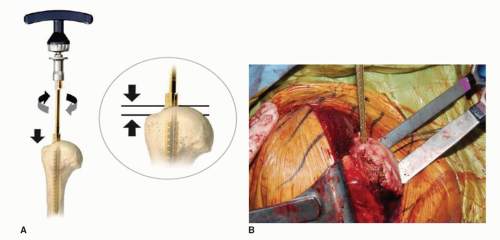 FIGURE 36-11 A,B: T-handled reamers sequentially enlarge the intramedullary canal to prepare the humeral shaft. The humerus is usually reamed to “chatter.” Vigorous endosteal reaming is unnecessary. |
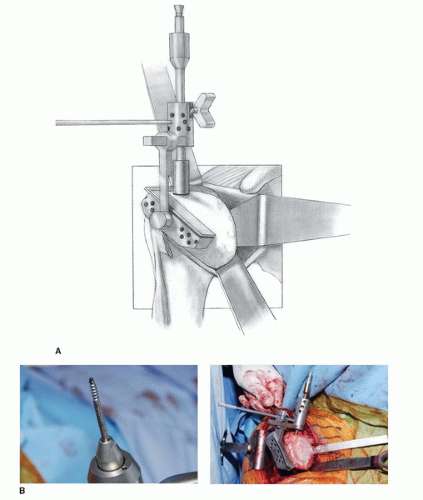 FIGURE 36-12 A: The humeral head resection guide is assembled directly onto the T-handled reamer. The holes on the cutting jig are for pin placement to secure the cutting jig to the humerus. B: A flexible rotator cuff probe or “angel wing” is placed beneath the supraspinatus to ensure the proper exit site for the osteotomy cut. This resection guide assists the surgeon in cutting at the correct neck/shaft angle, depth relative to tuberosity, and degree of retroversion.
Stay updated, free articles. Join our Telegram channel
Full access? Get Clinical Tree
 Get Clinical Tree app for offline access

|
