Introduction
The regional musculoskeletal examination (RMSE) of the knee is designed to build on the sequences and techniques taught in the SMSE and GMSE. It is intended to provide a comprehensive assessment of structure and function combined with special testing to permit you to evaluate common, important musculoskeletal problems of the knee seen in an ambulatory setting. The skills involved require practice and careful attention to technique. However, they can be learned and mastered on normal individuals.
Clinical Utility
The RMSE of the knee is clinically useful as the initial examination in individuals whose history clearly suggests an acute knee injury or an isolated knee problem. In individuals whose history is less straightforward (a seemingly local, nontraumatic knee problem with additional musculoskeletal complaints of unclear relevance), a rapid SMSE may be the most appropriate first step in physical assessment. If significant, possibly related, abnormalities are found (and the patient’s presenting knee complaint appears to be part of a more generalized musculoskeletal process), then performing a GMSE would be most appropriate.
Furthermore, the RMSE of the knee provides the foundation for learning additional, more refined diagnostic techniques through your later exposure to orthopedic surgeons, rheumatologists, physiatrists, physical therapists, and others specifically involved in the diagnosis and treatment of knee problems.
Objectives
This instructional program will enable you to identify important anatomical, functional, and pathologic relationships at the knee, including
- Important surface anatomy
- Presence of knee effusions
- Patellofemoral and tibiofemoral joints
- Anterior cruciate, medial and lateral collateral and posterior cruciate ligaments
- Meniscal cartilages
- Prepatellar and anserine bursae
Essential Concepts
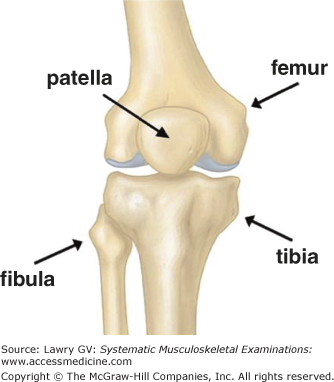
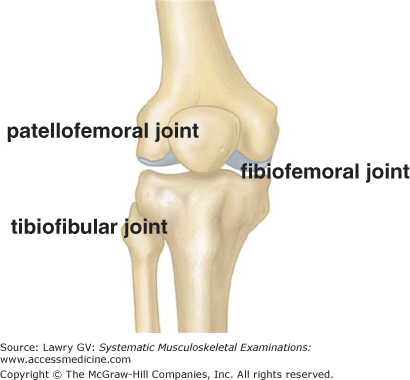
The knee joint is made up of four bones: the distal femur, proximal tibia, patella (a large, sesamoid within the quadriceps tendon), and the proximal fibula (Fig. 5–1). These bones form three articulations: the tibiofemoral joint (hinge-like), the patellofemoral joint (gliding pulley), and the tibiofibular joint (small, lateral stabilizer) (Fig. 5–2).
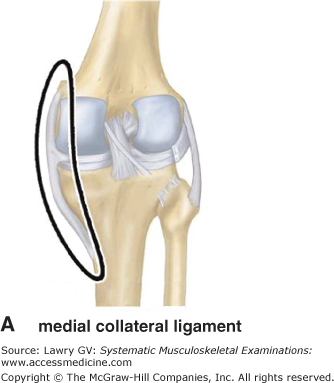
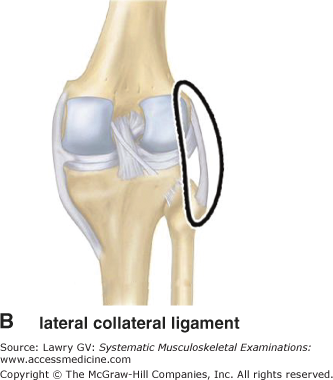
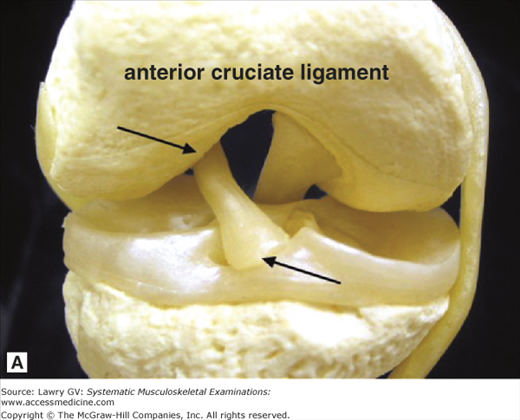
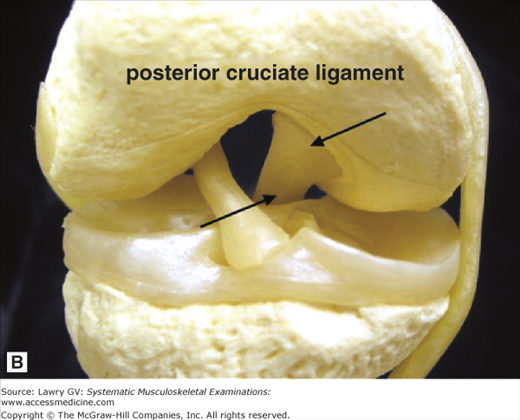
Because the knee is an inherently unstable joint, it has two external (collateral) stabilizing ligaments: the long, broad medial collateral ligament (MCL) (between the medial femoral epicondyle and the medial tibia) and the smaller diameter lateral collateral ligament (LCL) (between the lateral femoral epicondyle and the head of the fibula) (Fig. 5–3A, B). The knee also has two internal (crossing or “cruciate”) stabilizing ligaments which run centrally in the notch between the femoral condyles: the anterior cruciate ligament (ACL) (Fig. 5–4A; between the posteromedial corner of the lateral femoral condyle and the anterior tibial plateau just medial to the midline) and the posterior cruciate ligament (PCL) (Fig. 5–4B; between the anterolateral corner of the medial femoral condyle and the posterior tibial plateau just lateral to the midline).
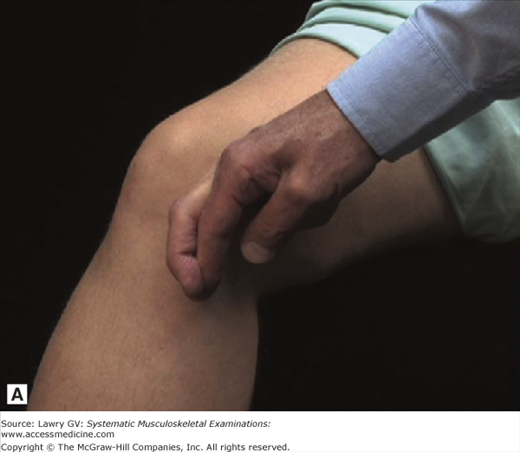
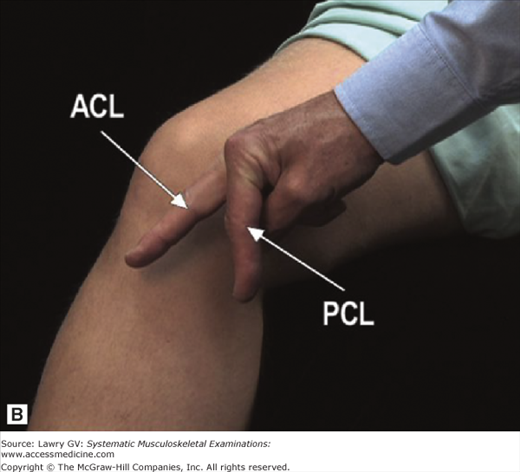
To better visualize the relationship of these two ligaments to the femur and tibia, cross your fingers and place them next to the medial aspect of the corresponding knee (right hand to right knee or left hand to left knee; Fig. 5–5A). Now, uncross your fingers. Your middle finger corresponds to the orientation of the ACL (running from the posterior femur to the anterior tibia), and your index finger corresponds to the orientation of the PCL (running from the anterior femur to the posterior tibia; Fig. 5–5B). Understanding these relationships will become important when learning physical examination techniques to stress the ligaments.
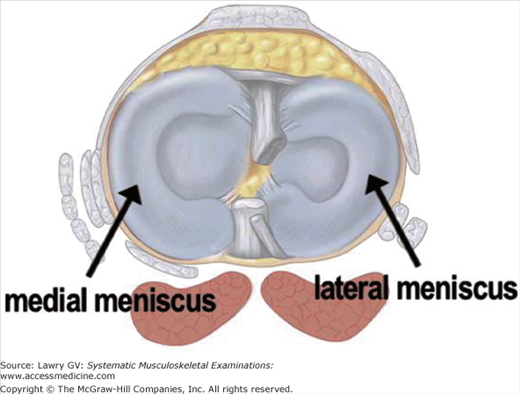
In addition, each knee has two crescent-shaped fibrocartilages, the medial and lateral menisci (Fig. 5–6). These shock-absorbing cartilages are wedge-shaped in cross section and increase the contact surface area between each femoral condyle and the tibial plateau, thereby improving weight distribution and joint stability.
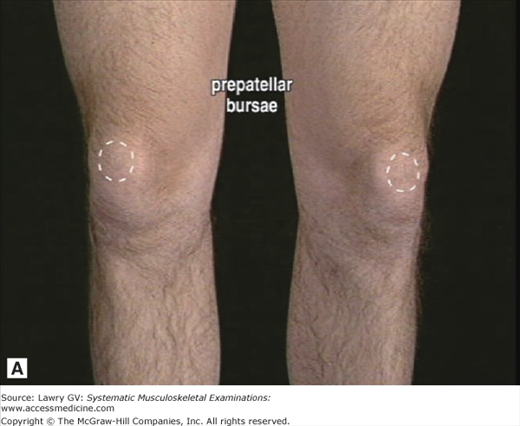
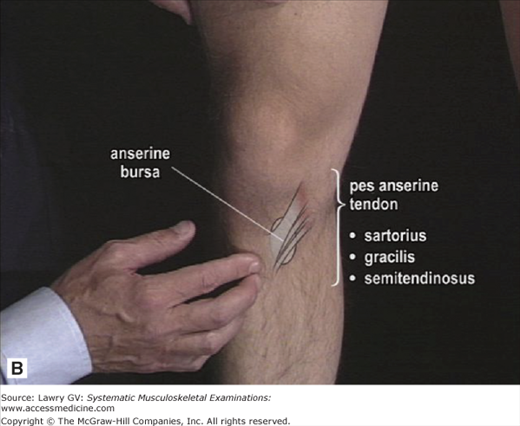
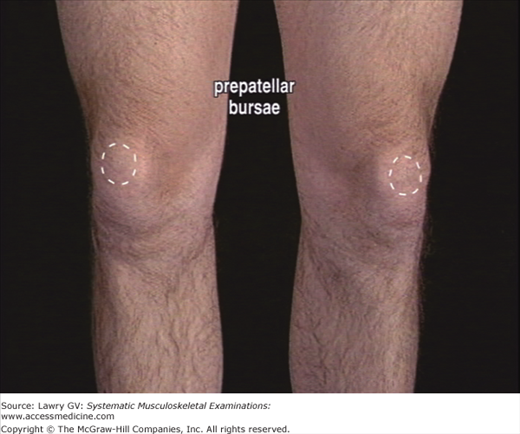
Subcutaneous and anterior to the patella lies the prepatellar bursa (Fig. 5–7A). Quite superficial and just beneath the insertion of the pes anserine tendons on the anteromedial flare of the proximal tibia lies the anserine bursa (Fig. 5–7B).
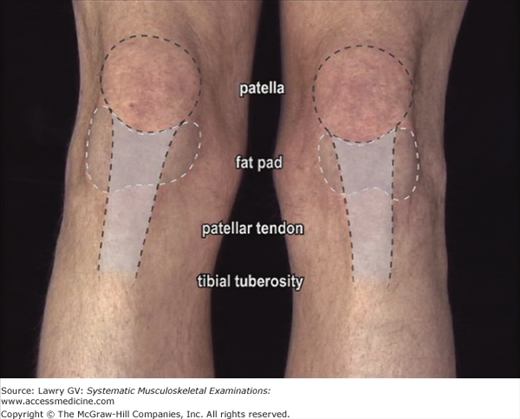
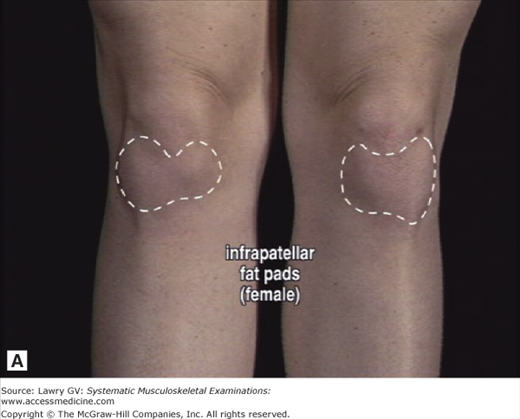
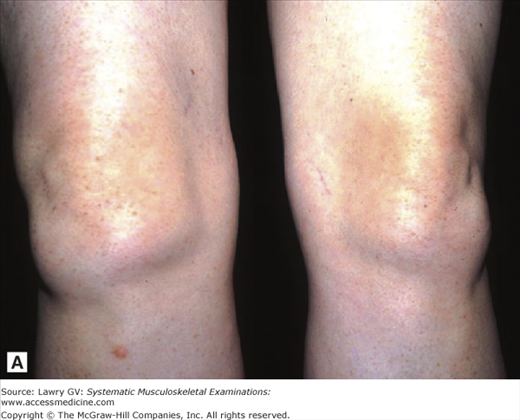
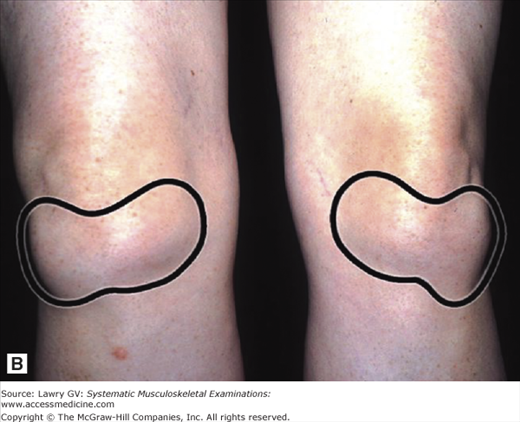
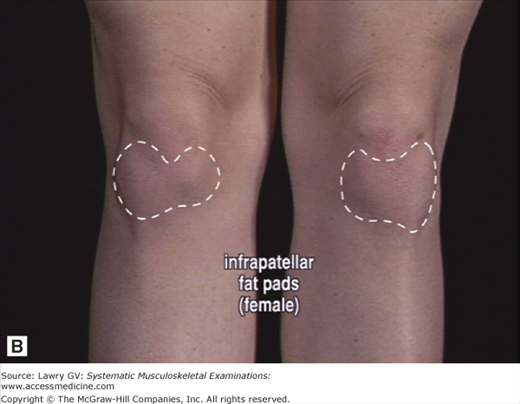
Two additional structures are very important for clinicians and are essential to understanding the surface anatomy of the knee: the infrapatellar fat pad and the suprapatellar pouch of the knee joint cavity. The infrapatellar fat pad is a wide, fatty cushion which lies anteriorly below the patella (deep to the patellar tendon, between the joint capsule and synovial membrane; Fig. 5–8). Shaped like a bow tie or thyroid gland, it cushions the anterior joint line during kneeling. The infrapatellar fat pads are usually more prominent in women than men (Fig. 5–9A, B) and can vary in size from being barely visible to very large and prominent (sometimes easily confused with a “swollen knee”; Fig. 5–10A, B). The suprapatellar pouch is a large, superior reflection of the synovial cavity which extends ∼6 cm above the patella (Fig. 5–11A).

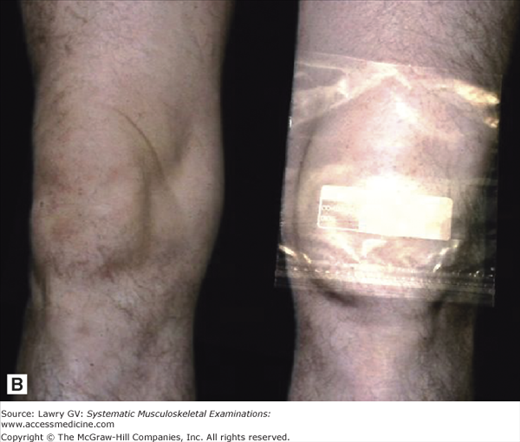
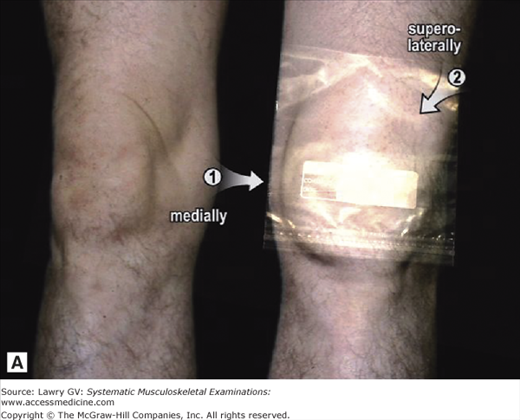
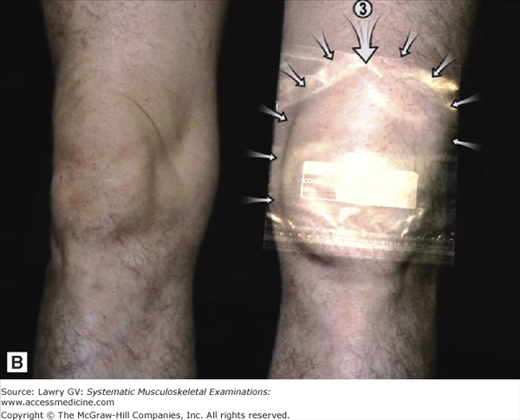
It may be helpful to think of this reflection as analogous to a thin sandwich bag tucked under the distal quadriceps muscles, in free communication with the joint (Fig. 5–11B). This “synovial sandwich bag” can become distended with synovial fluid (or blood) due to inflammation or injury of the knee. As distention increases, the suprapatellar pouch swells in a characteristic sequence and pattern which can be readily recognized by clinicians: initial loss of the normal concavity (sulcus) at the medial side of the knee followed by visible bulging superolaterally (Fig. 5–12A) and finally gross distention of the entire suprapatellar pouch (Fig. 5–12B).
The patient’s history is the essential first step in all musculoskeletal diagnosis and directs the focus of an appropriate physical examination. The musculoskeletal physical examination is used to confirm or refute diagnostic hypotheses generated by a thoughtful history.
Particularly useful background information includes age; occupation or recreational activities; a history of joint swelling, instability, or injury; or any prior knee problems.
Asking the patient to localize the area of maximal pain (anterior, medial, lateral, or posterior) may help with your preliminary differential diagnosis. An initial pain assessment can be well delineated with the use of the mnemonic OPQRST: O = Onset, P = Precipitating (and ameliorating) factors, Q = Quality, R = Radiation, S = Severity, T = Timing.
The Examination, Overview
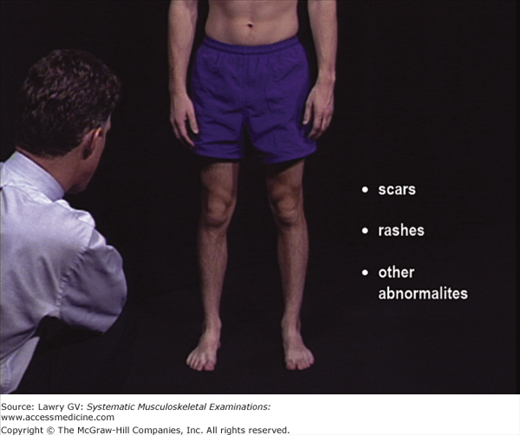
With the patient standing, observe the knees from the front. Inspect the skin. Note any deformity or malalignment. Next, ask the patient to squat. Note the location and severity of any pain.
Ask the patient to lie supine. Inspect the quadriceps muscles. Note any muscle atrophy. Next, inspect the knees. Note any obvious deformity or visible swelling. Inspect the prepatellar area. Identify the contour of the normal infrapatellar fat pads.
Next, check for any evidence of an effusion: inspect the knee medially, superolaterally, and superiorly. Check for the presence of a bulge sign (fluid wave) on both sides.
Next, assess the patellofemoral joint. Compress the patella in the femoral channel. Note any palpable crepitus or pain. Palpate the medial and lateral patellar facets and note any tenderness. Perform the “patellar apprehension test.”
Next, assess the integrity of the ACL by performing the Lachman test. Check for the normal firm “stop” provided by an intact ACL. Note any laxity or pain. Assess the MCL by bringing the knee into partial flexion. Palpate the MCL along its length and note any tenderness. Next, stress the MCL and note any laxity or pain. Assess the LCL by having the patient cross the leg. Palpate the LCL along its length and note any tenderness. Next, stress the LCL and note any laxity or pain.
Assess the integrity of the PCL by inspecting the knee from the side and checking for a “tibial sag.” Apply pressure to the anterior tibia and note any laxity or pain.
Assess the medial and lateral menisci by performing the McMurray maneuver. Note any palpable clicks and identify the location of any pain.
Next, palpate the insertion of the pes anserine tendon and underlying anserine bursa. Note any tenderness.
The Examination, Component Parts
With the patient standing, observe the knees from the front. Note any scars, rashes, or other cutaneous abnormalities. Inspect for deformity or malalignment (Fig. 5–13).
Next, ask the patient to squat down. (If squatting is anticipated to be painful, holding the patient’s hands for support during the squat may increase their confidence and cooperation.)
Ask the patient to localize any discomfort. Identifying whether the pain is primarily anterior, medial, lateral, or posterior may provide valuable initial clues to the anatomical origin of the problem (Fig. 5–14).
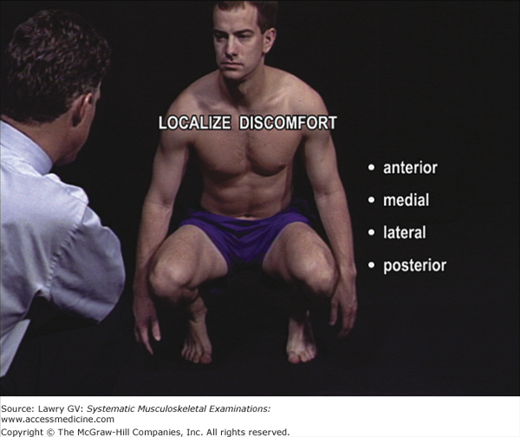
Note any symptoms as the patient returns to the standing position.
Ask the patient to lie supine. Inspect the quadriceps muscles and check for bulk and symmetry with the quadriceps relaxed and contracted. Note any muscle atrophy (Fig. 5–15).
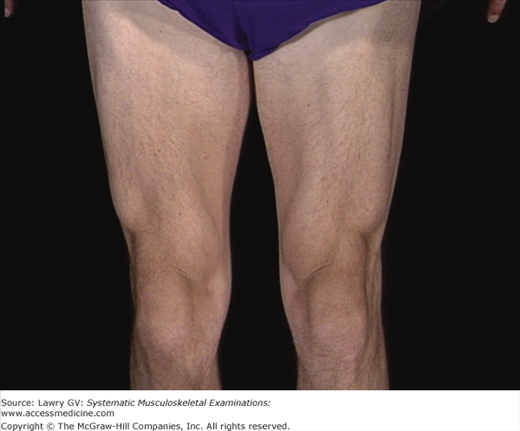
With the legs fully extended and the quadriceps muscles relaxed, inspect the knees and note any obvious deformity or visible swelling.
First, examine the prepatellar region (Fig. 5–16). Swelling of the prepatellar bursa presents as visible or palpable distension directly in front of the patella. Subcutaneous nodules (rheumatoid nodules or gouty tophi) may also be found in the prepatellar bursa and may only be apparent on careful palpation.
Next, note the soft tissue prominence below the patella on either side of the patellar tendon. This is the normal infrapatellar fat pad, usually more prominent in women (and most easily seen in full knee extension) (Fig. 5–17A, B).

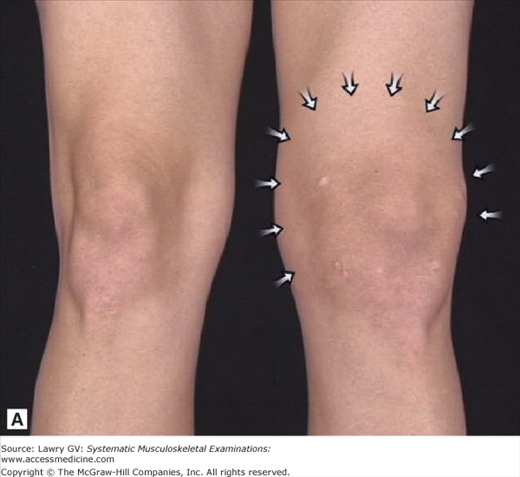
Next, inspect the knee joint for any evidence of an effusion. A small knee effusion will cause a visible bulge medially, between the medial femoral epicondyle and the medial patella (Fig. 5–18). A moderate knee effusion will cause loss of the normal concavity at the medial joint line but will also usually result in a visible bulge superolateral to the patella. Following your initial inspection of the medial knee, check the superolateral suprapatellar region of each knee for any visible swelling.

Related posts:


Stay updated, free articles. Join our Telegram channel

Full access? Get Clinical Tree


