Introduction
The general musculoskeletal examination (GMSE) is designed to build directly on the sequence and techniques taught in the screening musculoskeletal examination (SMSE). It is intended to provide a comprehensive assessment of joint inflammation through the use of palpation and will enable you to recognize the important physical finding of joint swelling, essential to diagnosing arthritis. While the skills involved are more complex than those of the SMSE, the proper techniques of joint palpation can be mastered on normal individuals.
Clinical Utility
Objectives
This instructional program will enable you to identify the location of the joint line and expected areas of visible and palpable swelling of major peripheral small and large joints. It will develop your skill in joint palpation and permit you to identify the location of clinically important bursae as well as fibromyalgia tender points. Most importantly, it will prepare you to perform a fully integrated GMSE.
Essential Concepts
The six basic categories of abnormality you will assess with the general examination include
Deformity
Visible swelling
Muscle atrophy
Tenderness, warmth, and palpable swelling (bony enlargement or synovial swelling)
Abnormalities of range of motion
Abnormalities of gait
A central axial spine, paired peripheral joints, and symmetric musculature provide the basis for essential side-to-side comparison during the musculoskeletal examination. Recognizing asymmetry is extremely important and may provide your first clue in diagnosing an abnormality.
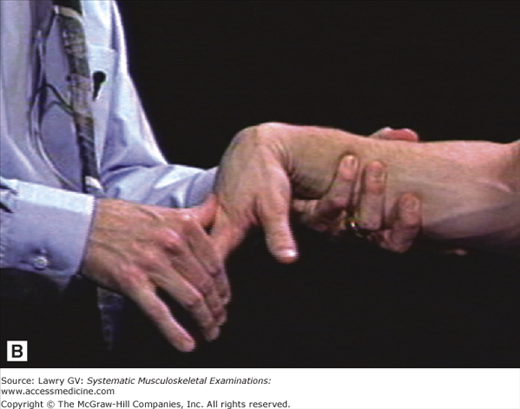
Both active and passive range of motion are used to assess joint function in the screening and general musculoskeletal examinations. The combined use of passive as well as active range of motion minimizes the need for patient instruction and this maximizes the speed and efficiency of the examination (Fig. 3–1A, B).
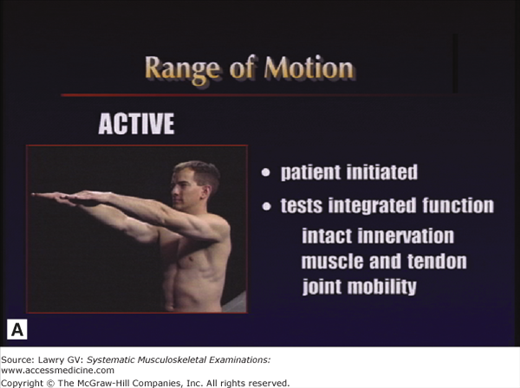
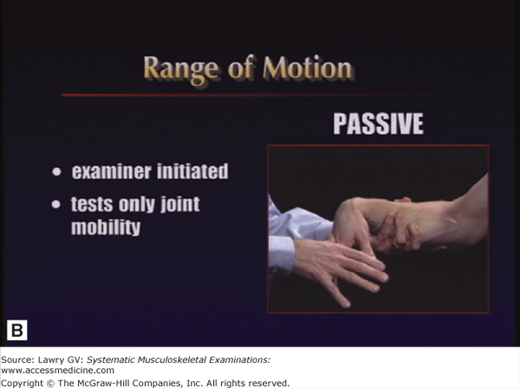
Whenever joint movement is anticipated to be painful, it is best to first observe active range of motion (patient-initiated movement) to appreciate the degree of pain and dysfunction before gently attempting passive range of motion (examiner-initiated manipulation).
An essential feature of the GMSE is the use of joint palpation to assess for the presence of objective abnormalities.
Joint tenderness alone is subjective (joint tenderness ≠ arthritis). Tenderness must be correlated with the finding of objective, visible, or palpable abnormality for a diagnosis of arthritis to be made.
Joint redness (erythema) is an objective abnormality and depends on the acuity and severity of the underlying inflammation. When present, significant erythema may suggest the possibility of infection or crystalline arthritis. The vast majority of objectively swollen, abnormal joints you will see in clinical practice will not be red.
Joint warmth (heat) is also an objective finding and depends on the acuity and severity of the underlying inflammation. Clinically important chronic inflammation is often cool to palpation.
Joint swelling is also an objective finding and is an extremely important and definitive clinical sign. Swelling due to synovial fluid (joint effusion) or swollen synovial tissue (thickened joint membrane), called synovitis, and swelling due to bony enlargement (osteophytes) are extremely important physical findings indicating the presence of arthritis.
In patients presenting with musculoskeletal pain, it is frequently important to assess for regional or widespread tenderness. Establishing the patient’s level of tenderness and pain threshold is very important in understanding the problem and establishing an appropriate diagnosis and management strategy.
Fibromyalgia is a common medical problem, reported in up to 4% of the population. The 1990 American College of Rheumatology (ACR) classification criteria for fibromyalgia include widespread musculoskeletal pain plus the presence of 11 of 18 tender points on physical examination. While these criteria have been helpful in standardizing research on fibromyalgia, they were never intended to be rigidly applied to individual patients. A spectrum of regional or widespread tenderness and pain combined with variable combinations of tender points may be seen in patients who clearly have clinical features of fibromyalgia, yet don’t meet these strict criteria (the 2010 ACR classification criteria for fibromyalgia no longer include the requirement for tender points). A history of widespread musculoskeletal pain, fatigue, paresthesias, irritable bowel symptoms, deficits in attention and memory, and disordered sleep all suggest possible fibromyalgia syndrome (Fig. 3–2).

A properly performed fibromyalgia tender point examination allows the clinician to assess the patient’s pain threshold in a variety of locations in a standardized manner. Individuals with fibromyalgia may not only be tender at these discrete sites, but may also have widespread tenderness throughout the body. Women characteristically have more tender points on examination than men (Fig. 3–3).

Finding remarkable tender points in the absence of objective swelling on GMSE is further confirmation that a clinically important generalized pain problem is present, suggesting a diagnosis of fibromyalgia rather than arthritis.
With this background, you are now ready to learn the integrated GMSE.
The Examination, Overview
With the patient seated comfortably and appropriately undressed, begin the examination of the upper extremities. Inspect for deformity, visible swelling, or muscle atrophy; palpate for joint swelling; and assess range of motion.
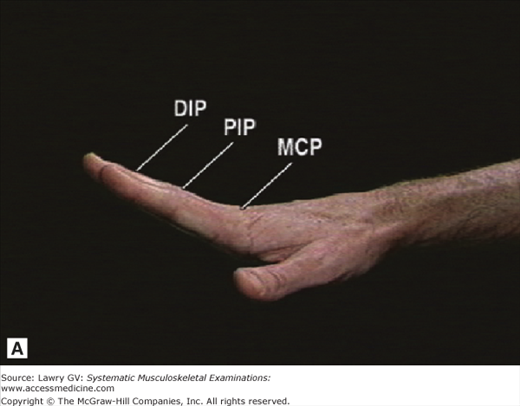
Instruct the patient to open both hands. Observe the dorsal and palmar surfaces and the intrinsic muscles. Assess finger extension by asking the patient to spread the fingers. Next, assess finger flexion by having the patient make a fist. Inspect both fists during pronation and supination of the forearms. Palpate the DIP (distal interphalangeal) joints, followed by the PIP (proximal interphalangeal) joints, followed by the MCP (metacarpophalangeal) joints of both hands. Palpate the thumb, IP (interphalangeal), MCP, and first CMC (carpometacarpal) joints. Inspect and palpate, then extend and flex each wrist. Inspect and palpate the olecranon region of each elbow. Palpate the elbow at the lateral joint line, then flex and extend each elbow. Inspect and palpate the sternoclavicular (SC) and acromioclavicular (AC) joints. Inspect the deltoid muscles and deltopectoral groove. Observe shoulder flexion by asking the patient to bring the arms forward and raise them overhead. Observe shoulder internal rotation (IR) by having the patient place both hands behind the back. Then, observe shoulder external rotation (ER) by having the patient place both hands behind the head.
Now ask the patient to lie down for the examination of the lower extremities. Inspect for deformity, visible swelling, or muscle atrophy; palpate for joint swelling; and assess range of motion. Palpate the greater trochanters. Assess hip flexion by grasping the heel and moving the thigh up toward the chest. Return the hip to 90° of flexion while holding the knee at 90° of flexion. Now, move the ankle medially to assess hip external rotation (ER) and move the ankle laterally to assess hip internal rotation (IR). Inspect the quadriceps muscles. Inspect the knees. Look for the presence of a joint effusion by checking for a “bulge sign” (or “fluid wave”) at each knee. Compress the patella to check for pain or crepitus at the patellofemoral joint. Flex and extend each knee.
Inspect the ankles. Check dorsiflexion, plantar flexion, and subtalar motion at each ankle. Palpate the posterior calcaneus (Achilles insertion) and plantar calcaneus (plantar fascia insertion) at each heel. Inspect the midfoot, forefoot, and toes. Palpate MTP (metatarsophalangeal) joints 5 through 2 of each foot. Next, palpate the IP and MTP joints of each great toe. Inspect the PIP and DIP joints of the toes. Inspect the sole of each foot.
Now ask the patient to stand. Observe the patient from behind while weight bearing. Note the alignment of the knees. Inspect the calf muscles. Note the alignment of the heels and feet.
Now with the patient standing, begin the examination of the spine. Inspect for deformity or abnormal range of motion. Inspect the cervical spine. Assess neck flexion by instructing the patient to place his chin on the chest. Assess neck extension by asking the patient to look up at the ceiling. Observe right and left rotation by asking the patient to place his chin on each shoulder. Assess lateral flexion (lateral bending) by asking the patient to incline his ear toward each shoulder.
Now, while observing the patient from behind, inspect the thoracolumbar spine. Note any resting asymmetry or deformity and inspect for the normal resting lumbar lordosis. Observe lumbar flexion by instructing the patient to bend forward at the waist. Assess lumbar extension by having the patient bend backward. Assess thoracolumbar lateral flexion (lateral bending) by asking the patient to bend to the right and to the left.
Finally, observe the patient’s gait. Check for any limp, uneven rhythm, or asymmetry. Observe the swing and stance phases.
The Examination, Component Parts
To begin the examination, the patient should be comfortable, yet appropriately undressed. This usually includes undershorts with or without a gown in men and underwear with a gown in woman. Adjusting the gown whenever necessary to permit full visualization of each region is very important.
Failure to visualize musculoskeletal structures during the examination because of inadequate exposure represents one of the most common errors made by examiners at all levels of training.
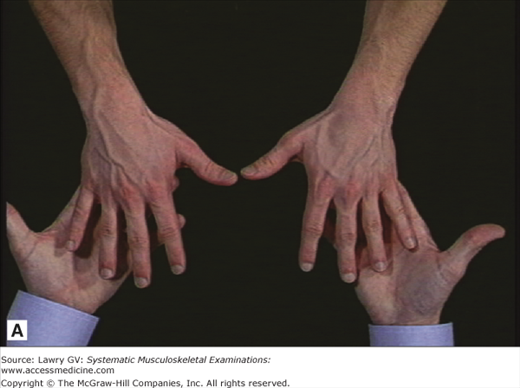
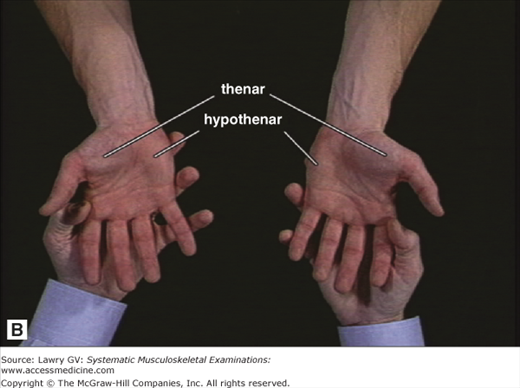
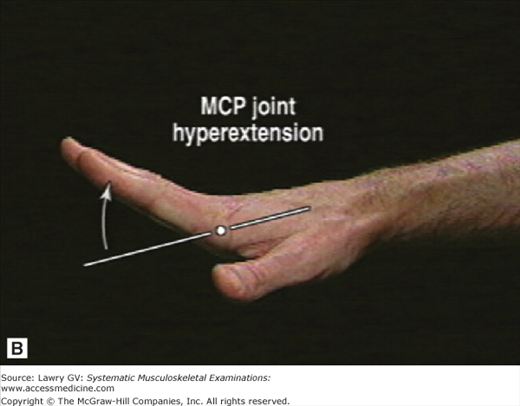
Begin the examination with the upper extremities. Instruct the patient to open both hands. Inspect the dorsal surface for any obvious deformity or visible swelling (Fig. 3–4A). Inspect the palmar surface and note any atrophy of the thenar or hypothenar eminences (Fig. 3–4B). Turn the hands over once again with the palms down. Next, rapidly assess integrated hand function: check finger extension by asking patient to spread the fingers. Note whether each finger’s DIP, PIP, and MCP joints extend fully (Fig. 3–5A). Extension of the MCP joints beyond neutral is normal (Fig. 3–5B).
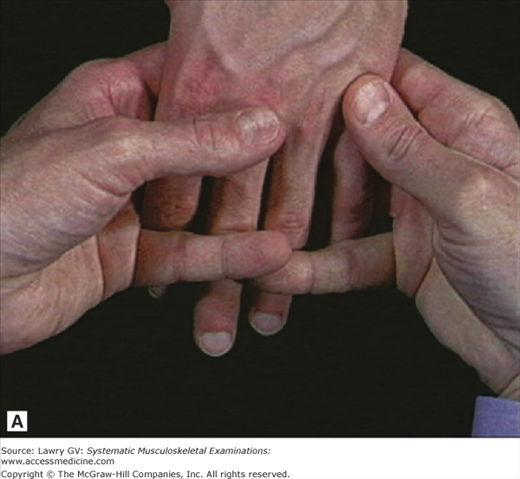
Assess finger flexion by observing the patient make a fist with each hand. Inspect the dorsal surface of each fist. Then, ask the patient to turn both fists over while you inspect the palmar surface to see that the tips of digits 2 to 5 are buried in the palm at the level of the distal palmar crease. Having the patient actively expose both surfaces of each fist allows you also to assess pronation and supination of the forearms.
(Note: A systematic approach to palpating the finger joints is important. We suggest starting with digit 5, then 4, 3, and 2 of one hand followed by digit 5, then 4, 3, and 2 of the other, with thumbs assessed subsequently. This will facilitate side-to-side comparison in an orderly sequence.)
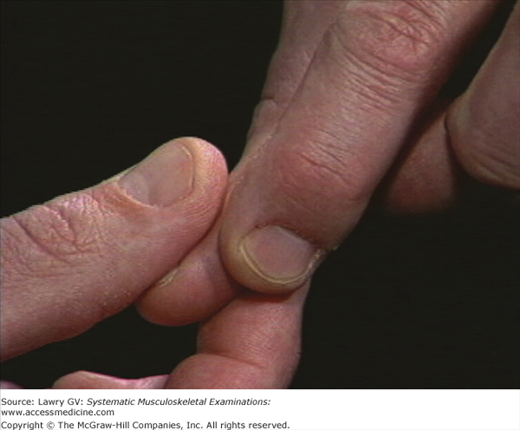
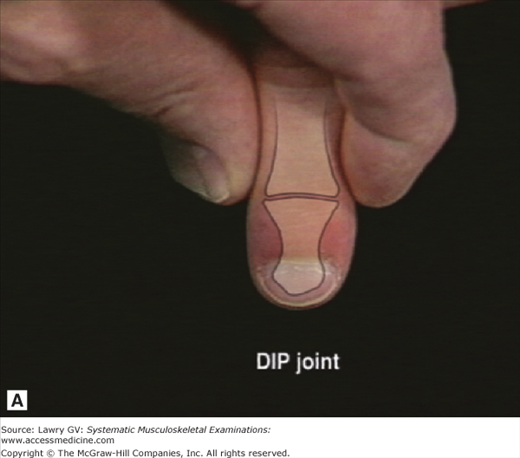
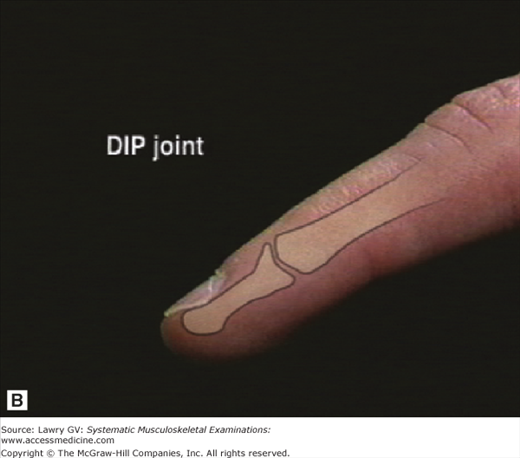
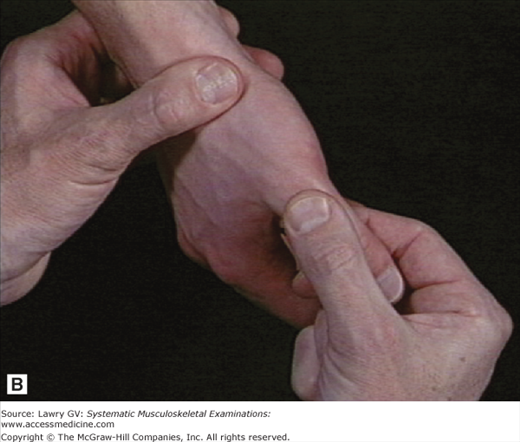
Palpate the DIP joints of digits 5 through 2 of each hand (Fig. 3–6). Place the thumb of your dominant hand on the dorsal surface and the index finger of your dominant hand on the palmar surface of the DIP joint. Next, bring your nondominant hand over the dorsal surface of the patient’s hand and simultaneously compress the medial and lateral margins of the DIP joint between your nondominant thumb and index finger (Fig. 3–7). Applying firm but gentle pressure with one thumb and index finger will compress any swollen synovial membrane or synovial fluid toward the opposite joint margin where your other thumb and index finger can feel the distention. Applying gentle pressure in an alternating fashion allows subjective assessment of whether or not the joint is tender and objective assessment of whether bony (osteophytic) or synovial swelling (synovitis) is present. Although the DIP joint line itself cannot be felt, the normal joint is nontender with minimal skin and subcutaneous tissue present between your examining fingers and normal bony margins (Fig. 3–8A, B).

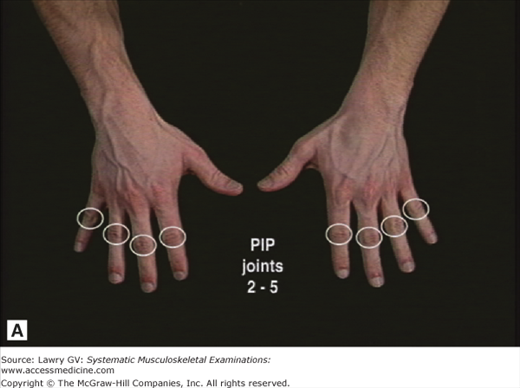
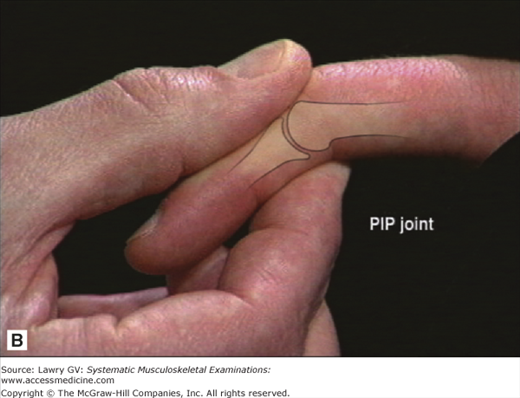
Now palpate the PIP joints of digits 5 through 2 of each hand. The technique for palpating the PIP joints is identical to that used in assessing the DIP joints (Fig. 3–9A, B).
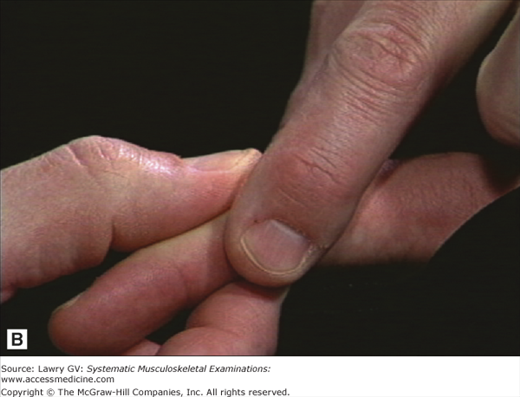
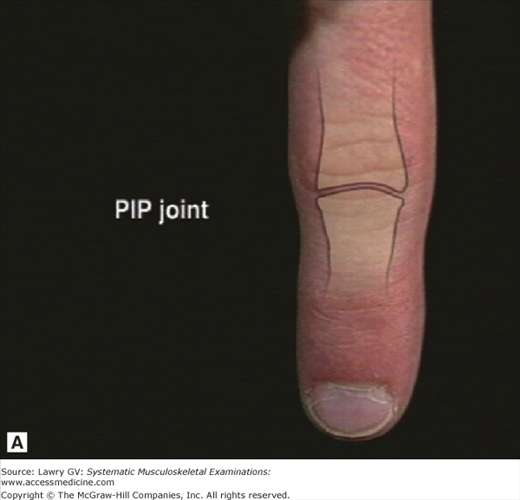
Note that the joint line of the PIP joints (unlike the DIP joints) is usually palpable. The normal PIP joint line can be felt as a narrow, distinct depression running perpendicular to the axis of the finger (Fig. 3–10A). Palpating the joint in partial flexion helps open the joint space beneath your palpating thumb (Fig. 3–10B). Remember, the distal member of each finger joint swings under the proximal member; therefore, the joint line at each interphalangeal joint is more distal than you might initially think.
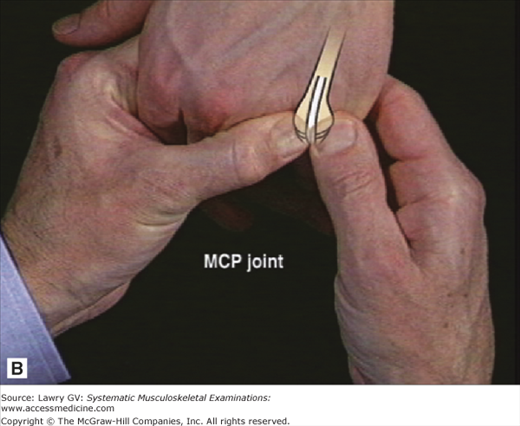
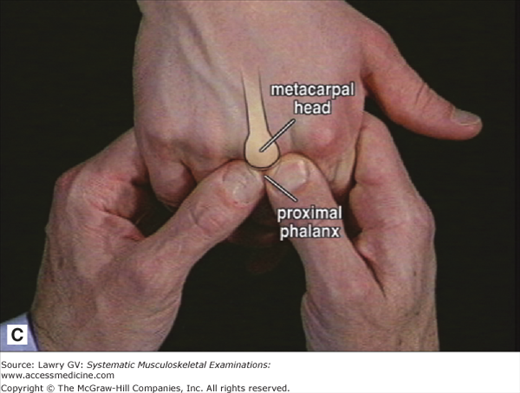
Next palpate the MCP joints of digits 5 through 2 of each hand. Like the DIP and PIP joints, the MCP joints are best palpated in flexion. The patient’s hand should be relaxed with the palm down. Support the patient’s palm with your second through fourth fingers while using your fifth fingers to keep the patient’s fingers in flexion (Fig. 3–11A). Use your thumbs to palpate the anterior joint line on either side of the extensor tendon (Fig. 3–11B). Small oscillating movements of your palpating thumbs perpendicular to the joint line will allow you to appreciate the normal definition of the metacarpal head and anterior surface of the plateau of the proximal phalanx (Fig. 3–11C).
Now, examine each thumb. Take the patient’s hands in your hands to make a side-to-side comparison. Inspect for visible swelling or deformity. Palpate the IP (interphalangeal) joint using your nondominant thumb and index finger for lateral compression and your dominant thumb and index finger in the dorsal and palmar position. (Like the DIP joints of digits 2 through 5, it is not possible to normally feel the joint line of the thumb IP joint.) Next, grasp the patient’s thumb with your second through fourth fingers while you gently flex the MCP joint (Fig. 3–12A). This will open the joint space, permitting you to readily palpate the MCP joint line with your thumb (Fig. 3–12B).

Next palpate the first carpometacarpal (first CMC) joint, where the thumb articulates with the wrist at the trapezium (Fig. 3–13A). Place your nondominant thumb directly over the anatomic snuff box at the base of the patient’s thumb (Fig. 3–13B). Use your other hand to gently but firmly rotate the patient’s first metacarpal on the trapezium. Note any discomfort or palpable crepitus. (Palpation of the first CMC joint line itself is difficult, but this technique effectively allows assessment of whether pain or crepitus is present.)

Abnormalities at the DIP, PIP, and MCP joints include visible swelling or deformity, palpable synovial membrane swelling, and/or joint fluid accumulation (both called “synovitis”) and palpable hard tissue swelling (bony proliferation or osteophyte formation). All are objective findings of abnormality and provide important diagnostic information.
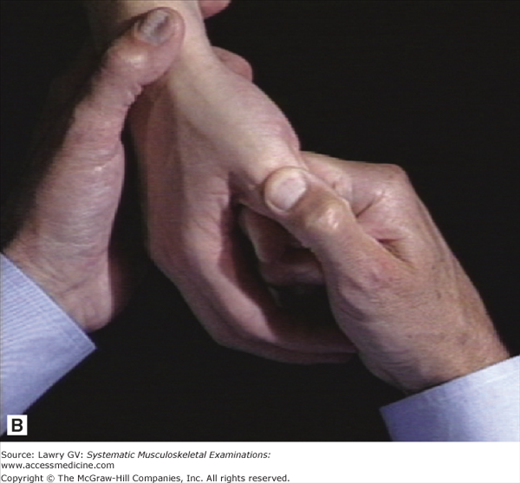
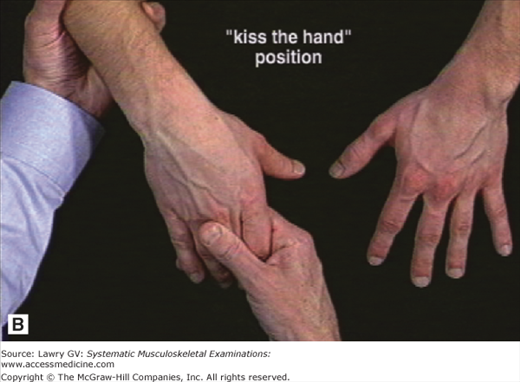
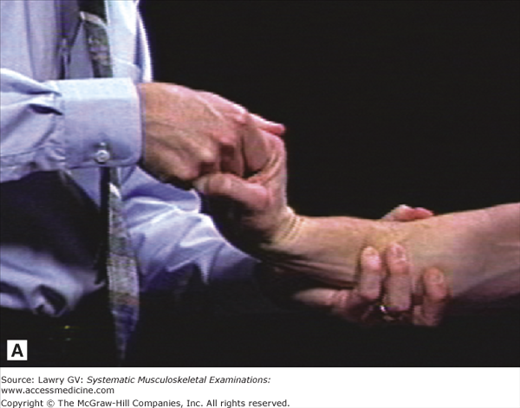
Next inspect the wrists looking for deformity or visible swelling. Palpate the wrist dorsally by placing both thumbs along the joint line while supporting the patient’s palm with the remaining fingers of your hands (Fig. 3–14A). Gently rocking the patient’s wrist passively in small arcs of flexion and extension allows palpation of the dorsal surface under your examining thumbs. Synovial swelling and tenosynovitis suspected visually can be confirmed by palpation using this technique. Now, extend and flex each wrist. Take the patient’s hand in your dominant hand, as though you were going to “kiss the hand” (Fig. 3–14B). This allows you to comfortably move the patient’s hand into full extension using pressure with your index finger against the distal palm (against the patient’s second to fifth metacarpal heads) and avoids unnecessarily squeezing the patient’s fingers (Fig. 3–15A). Next, downward pressure with your thumb on the patient’s second or third metacarpal allows you to bring the wrist gently into full flexion (Fig. 3–15B). Full wrist extension and flexion should be symmetrical and bring the hand nearly perpendicular to the forearm on each side.

Following your examination of the wrist, assume a loose “handshake” position with the patient while you examine the elbows (Fig. 3–16A). Inspect for any obvious swelling or deformity. Next, slide your other hand along the forearm to the olecranon surface. Note any subcutaneous nodules or palpable swelling of the olecranon bursa (Fig. 3–16B). Swelling of the olecranon bursa presents itself as visible and/or palpable distention directly overlying the olecranon. Next, identify the normal small depression present between the olecranon and the lateral epicondyle, especially visible during full extension (Fig. 3–17A, B
Related posts:


Stay updated, free articles. Join our Telegram channel

Full access? Get Clinical Tree


