Techniques for Revision Arthroplasty: Management of Bone and Soft Tissue Loss
Nady Hamid
Leesa M. Galatz
INTRODUCTION
Management of a failed shoulder arthroplasty can be a perplexing problem for both the patient and the surgeon. Unlike primary shoulder arthroplasty, revision reconstruction is far less predictable and carries a significantly higher risk of complications.10,13,20,63,67 There are many aspects to consider when treating a patient with a failed arthroplasty. First, an evaluation must be done in a systematic fashion. Elucidating a clear etiology for failure is critical and will dictate the strategy for revision surgery. Once revision surgery is undertaken, there are numerous pitfalls the surgeon must avoid. Surgical exposure is often very difficult and can lead to intraoperative complications. Implant removal can also be frustrating and time-consuming. Management of bone and soft tissue defects can be very challenging and leave few options for the surgeon. Postoperatively, close monitoring is required as these patients are typically elderly and are prone to hospital-related complications.
In the past, revision shoulder arthroplasty was a relatively uncommon procedure performed by a small subset of shoulder surgeons. Recently, however, shoulder arthroplasty has become much more routine and is performed by a broader range of orthopedic surgeons. A recent epidemiological survey found that upper extremity arthroplasty volume was increasing as fast or faster than hip and knee arthroplasty.19 They also found that the revision burden for shoulder arthroplasty will substantially increase over the next 5 years. Therefore, it is important for the surgeon to have a complete understanding of the concepts of revision shoulder arthroplasty. The goal of this chapter is to discuss all the critical aspects of revision shoulder arthroplasty, with particular focus on the techniques of exposure, revision implantation, and management of bone and soft tissue loss.
EVALUATION
Successful management of a failed shoulder arthroplasty begins with a thorough evaluation. Only after the patient has been interviewed and examined, a diagnosis can be made. Often,
the radiographic findings do not convey the entire clinical picture and targeted interview questions can be very helpful in deciphering the underlying mode of failure. A complete patient evaluation entails patient interview, physical examination, imaging studies, and laboratory values.
the radiographic findings do not convey the entire clinical picture and targeted interview questions can be very helpful in deciphering the underlying mode of failure. A complete patient evaluation entails patient interview, physical examination, imaging studies, and laboratory values.
Patient Complaints
The most common complaint associated with a failed shoulder arthroplasty is pain. There are many causes for pain after shoulder arthroplasty, including infection, stiffness, loose implants, implant malposition, instability, implant wear, and progressive arthritis. Pain is a nonspecific indicator of failure, but there are many aspects of this complaint that can be explored and may lead to the specific mode of failure. Patients can experience pain at rest, with activity, or during sleep. The quality and severity of the pain should be determined. Mild or moderate pain may be treated conservatively, whereas severe pain that disturbs sleep patterns and requires narcotics may justify revision arthroplasty. The location of pain can also be a helpful information. For example, patients with pain after a reverse shoulder arthroplasty (RSA) may complain of pain posteriorly over the scapula which may stem from a postoperative fracture of the scapular spine. Pain located over the deltoid and radiating down the lateral arm is typical for rotator cuff disease after arthroplasty. Anterior shoulder pain can be caused by subscapularis dysfunction and deep shoulder pain can be seen with progressive glenoid arthrosis.
The chronology of pain will vary depending on the mode of failure. Pain that begins immediately postoperatively and does not improve can be seen with implant malposition and “overstuffing” the joint with a large humeral head component that does not reproduce the proximal humeral anatomy (Fig. 24-1). Implant malposition can lead to mechanical irritation of the rotator cuff and will cause pain soon after surgery as the patient begins rehabilitation. Nerve injury should also be considered in a patient with pain immediately following arthroplasty. This can be caused by excessive retraction, residual block effects, or direct injury. Typically, nerve injury will be accompanied by loss of function or dysesthesias. Pain that begins after a painfree interval is worrisome for infection. Infection can occur any time after joint replacement, but acute infections caused by highly virulent organisms (Staphylococcus and Gram-negative organisms) usually present 1 to 6 weeks postoperatively. Pain is usually acute in onset, constant, and not improved with rest. Infection caused by slow growing organisms (Propionibacterium acnes), however, can present more insidiously. Any patient that presents with pain after shoulder arthroplasty should be considered for infection and further work-up is often necessary to rule out infection as a mode of failure. A patient that presents with pain after a long, symptom-free interval is a very common scenario. This can be caused by implant loosening, especially on the glenoid side. Humeral component aseptic loosening is uncommon and rarely is associated with pain.70 Deterioration of soft tissues, most notably the rotator cuff, can also cause late pain after shoulder arthroplasty.
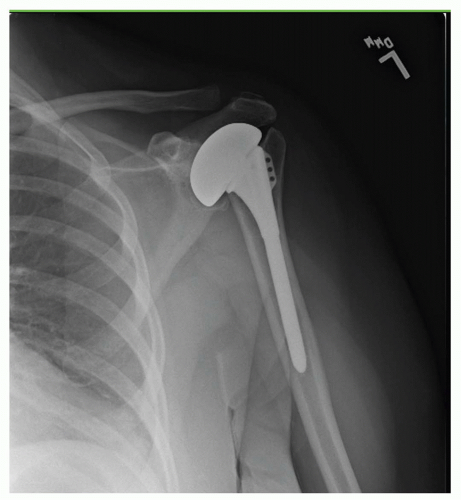 FIGURE 24-1. In this patent, nonanatomic replacement of the humeral head led to early postoperative pain, rotator cuff dysfunction, and accelerated glenoid arthrosis. |
Another common complaint after failed shoulder arthroplasty is stiffness. Hasan et al. found that 74% of patients presenting because of dissatisfaction with the result of their shoulder arthroplasty had stiffness.30 On average, these patients could perform only 2 of 12 shoulder functions in the Simple Shoulder Test.6 Stiffness should be assessed by both asking patients about their ability to perform daily activities and by physical examination of passive shoulder range of motion.
Patients may also complain of weakness. Loss of strength that occurs immediately postoperatively may be due to iatrogenic nerve injury, postoperative brachial plexopathy, muscle injury, or disruption of muscle repair. More commonly, weakness is due to poor rehabilitation or rotator cuff dysfunction.
Physical Examination
The physical examination of the patient with a failed arthroplasty should be performed similar to the examination for any other shoulder disorder: visual inspection, range of motion, strength testing, and palpation. Visual inspection should be performed with both shoulders completely exposed. Any gross muscle atrophy or surgical incisions should be noted. Particular attention should be given to the muscle contour of the supraspinatus and infraspinatus and atrophy seen in this area is indicative of a chronic rotator cuff tear. Also, anterior deltoid dehiscence can be seen after open rotator cuff repairs or superior approaches to the shoulder. The shoulder should be inspected for signs of infection, including warmth, erythema, and draining sinuses. Range of motion should then be assessed both actively and passively. A clear difference in active and passive motion may be seen after nerve injury or in the presence of rotator cuff dysfunction. During attempted active forward elevation, superior escape can be seen when the humeral prosthesis protrudes anterosuperiorly through the coracoacromial arch. Strength testing should be focused on the rotator cuff and deltoid. In particular, the teres minor function can be assessed with the hornblower test and its integrity has been shown to have a significant impact on clinical outcome after RSA.66 Supraspinatus and infraspinatus strength is critical if
revision unconstrained arthroplasty is being contemplated. The subscapularis can be assessed with the belly-press test, belly-off sign, bear hug test, or lift-off test.5 Bartsch et al. found the belly-off sign to have the highest overall accuracy. However, all of these provocative maneuvers can be misleading when performed after shoulder arthroplasty. In patients with significant internal rotation stiffness, these tests will have false-positive results. Moreover, Armstrong et al. found that clinical assessment of the subscapularis with the abdominal compression test led to a sensitivity of 25%, specificity of 73%, positive predictive value of 13%, and negative predictive value of 86% when ultrasound evaluation was used as the gold standard.4 The authors concluded that the abdominal compression test was unreliable at detecting subscapularis tears after total shoulder arthroplasty (TSA). Deltoid function and strength is an absolute requirement if RSA surgery is being considered. Anterior deltoid dehiscence can be seen after failed open rotator cuff repair or arthroplasty where the anterior deltoid was taken down for exposure. Lastly, directed palpation can help find the anatomical area causing pain. It is important to consider other areas of the shoulder girdle that may be contributing to the patient’s symptoms, including the acromioclavicular joint and the biceps tendon. Also, other musculoskeletal causes of pain should not be overlooked, most notably cervical spine disease.
revision unconstrained arthroplasty is being contemplated. The subscapularis can be assessed with the belly-press test, belly-off sign, bear hug test, or lift-off test.5 Bartsch et al. found the belly-off sign to have the highest overall accuracy. However, all of these provocative maneuvers can be misleading when performed after shoulder arthroplasty. In patients with significant internal rotation stiffness, these tests will have false-positive results. Moreover, Armstrong et al. found that clinical assessment of the subscapularis with the abdominal compression test led to a sensitivity of 25%, specificity of 73%, positive predictive value of 13%, and negative predictive value of 86% when ultrasound evaluation was used as the gold standard.4 The authors concluded that the abdominal compression test was unreliable at detecting subscapularis tears after total shoulder arthroplasty (TSA). Deltoid function and strength is an absolute requirement if RSA surgery is being considered. Anterior deltoid dehiscence can be seen after failed open rotator cuff repair or arthroplasty where the anterior deltoid was taken down for exposure. Lastly, directed palpation can help find the anatomical area causing pain. It is important to consider other areas of the shoulder girdle that may be contributing to the patient’s symptoms, including the acromioclavicular joint and the biceps tendon. Also, other musculoskeletal causes of pain should not be overlooked, most notably cervical spine disease.
Imaging Studies
Diagnostic workup begins with a plain radiographic series of the shoulder. The prosthesis should be critically assessed for implant positioning and loosening. In regard to implant positioning for unconstrained arthroplasty, the components should reproduce the anatomy of the humerus and glenoid. Proximal humeral anatomy has significant variability and the surgeon now has many choices for humeral head replacement.54,55 This can lead to improper sizing and positioning of the humeral head component, and plain radiographs provide the best method of assessing these relationships. Plain films can also indicate the presence of a functioning rotator cuff. Superior migration of the humeral component is indicative of posterosuperior rotator cuff dysfunction and anterior subluxation can result from subscapularis dysfunction. Implant loosening can also be assessed with plain radiographs. In general, a 2-mm radiolucent line at the periphery of a component is considered pathologic and consistent with loosening.56 However, the best way to assess component loosening is to compare successive radiographs for shift in component position.12 Torchia et al., in a long-term radiographic analysis of shoulder arthroplasties, found that 44% of glenoid components had radiographic evidence of loosening and this was associated with pain. Humeral loosening was seen in 49% of patients, but no association with pain was found.70 Gross loosening of both components should alert the surgeon of possible infectious etiology.
The use of scintigraphy with technetium-99m or indium-111 oxine-labeled white cells has been investigated in evaluating the painful shoulder arthroplasty. Sperling et al. reported sensitivity of only 45% with technetium-99m and 77% with indium-111 scans when evaluating patients with known sepsis.68 The role of these diagnostic tools remains unclear. We have found that these tests are rarely indicated as infection can be readily diagnosed with plain radiographs, laboratory values, and aspiration.
Advanced imaging can be very useful in evaluating the painful arthroplasty and is often necessary when preparing for revision arthroplasty. Computed tomography (CT) scans are best utilized to assess implant positioning and version of humeral and glenoid components. CT with 3D reconstructions is the study of choice to assess glenoid bone stock and version (Fig. 24-2). Magnetic resonance imaging (MRI) is useful in assessing rotator cuff dysfunction. Sperling et al. reported a novel MRI technique utilizing fast spin-echo sequencing to detect rotator cuff tears in patients with painful shoulder arthroplasties undergoing revision surgery.69 MRI correctly predicted the presence of fullthickness rotator cuff tears in 10 of 11 shoulders, and correctly predicted the absence of a tear in 8 of 10 shoulders. The authors concluded that MRI is a useful tool for evaluating for suspected rotator cuff tears after arthroplasty.
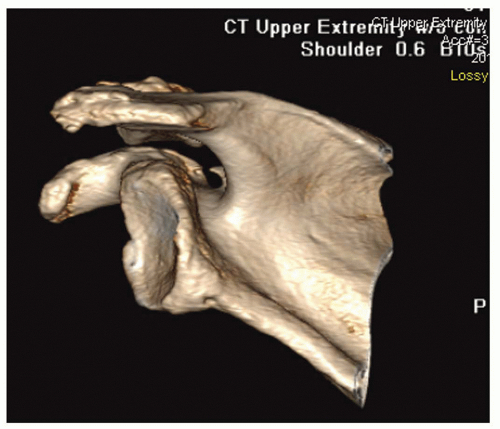 FIGURE 24-2. Three-dimensional reconstruction is the most accurate method to assess glenoid bone morphology. |
Another imaging study that has recently gained popularity in the evaluation of failed arthroplasty is ultrasound. Ultrasound offers a noninvasive method to visualize the soft tissue structures of the shoulder. It can visualize rotator cuff disease, bursal edema, biceps disorders, and fluid collections or abscesses. A major advantage of ultrasound over CT or MRI is the ability to visualize the shoulder without image distortion from indwelling metallic components. Several reports have shown its utility in assessing subscapularis integrity after TSA.4,36,65 A major drawback of ultrasound is its dependency on experienced personnel. Also, ultrasound is a dynamic imaging technique that requires range of motion of the shoulder during the procedure, thus it may be difficult to perform in a patient with shoulder stiffness. As surgeons and radiologists become more familiar with the technique, the role of ultrasound in evaluating the painful shoulder arthroplasty will continue to evolve.
Adjunct Testing
There are other tests and procedures that can be considered during the evaluation of a failed shoulder arthroplasty. Prior to embarking on revision shoulder arthroplasty, infection should be considered. Infection workup should be performed in any painful shoulder arthroplasty that does not have an obvious cause of failure. Implant loosening should alert the surgeon of possible indolent infection. The evaluation for infection
typically begins with blood work, including white blood cell count, erythrocyte sedimentation rate, and C-reactive protein. If these values are abnormal, or if infection is still being considered, glenohumeral joint aspiration should be performed and sent for culture. The shoulder joint is susceptible to slowgrowing, indolent infections such as P. acnes. Therefore, steps should be taken to maximize the yield of culture specimens. Levine and Evans showed that specimens inoculated in a blood culture bottles were more accurate at diagnosing infection than tissue or swab samples.40 Also, cultures should be monitored for growth for at least 2 weeks, as P. acnes infections have been shown to grow very slowly on conventional culture media.68
typically begins with blood work, including white blood cell count, erythrocyte sedimentation rate, and C-reactive protein. If these values are abnormal, or if infection is still being considered, glenohumeral joint aspiration should be performed and sent for culture. The shoulder joint is susceptible to slowgrowing, indolent infections such as P. acnes. Therefore, steps should be taken to maximize the yield of culture specimens. Levine and Evans showed that specimens inoculated in a blood culture bottles were more accurate at diagnosing infection than tissue or swab samples.40 Also, cultures should be monitored for growth for at least 2 weeks, as P. acnes infections have been shown to grow very slowly on conventional culture media.68
Another procedure that may prove beneficial is diagnostic injection. A well placed corticosteroid injection may provide invaluable information to the surgeon and confirm the site of suspected pathology. Rotator cuff dysfunction or tendinitis may respond favorably to a subacromial corticosteroid injection and intra-articular pathology such as glenoid arthrosis may respond well to a glenohumeral injection. Corticosteroid injections should not be performed if infection is still be considered as a possible mode of failure.
INDICATIONS
Modes of Failure
Before a patient undergoes revision arthroplasty, a clear diagnosis and mode of failure must be found. Table 25.1 of 2nd edition and Figure 24-3 highlight the common modes of failure of shoulder arthroplasty. Hasan et al. analyzed 139 patients
that presented with a failed shoulder arthroplasty. Seventy-four percent of shoulders were stiff, 25% were unstable, and 59% of TSAs had evidence of a loose glenoid. Implant malposition was considered the mode of failure in 23% of patients. In patients with hemiarthroplasties, 42% had glenoid erosion. In patients that presented after arthroplasty for trauma, 43% had tuberosity nonunion. This report highlighted the notion that the mode of failure is frequently related to surgeon-related factors.
that presented with a failed shoulder arthroplasty. Seventy-four percent of shoulders were stiff, 25% were unstable, and 59% of TSAs had evidence of a loose glenoid. Implant malposition was considered the mode of failure in 23% of patients. In patients with hemiarthroplasties, 42% had glenoid erosion. In patients that presented after arthroplasty for trauma, 43% had tuberosity nonunion. This report highlighted the notion that the mode of failure is frequently related to surgeon-related factors.
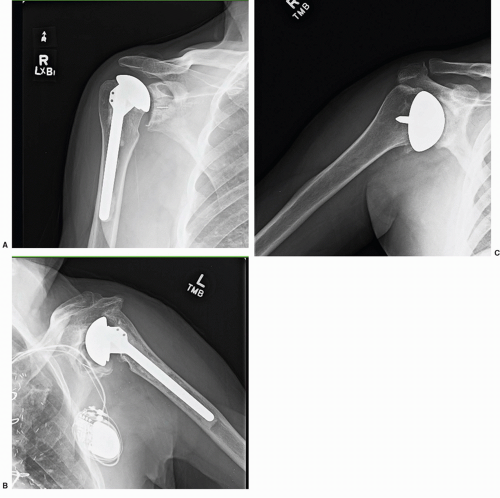 FIGURE 24-3. Common modes of failure: rotator cuff dysfunction (A), glenoid loosening (B), and glenoid arthrosis (C). |
The cause of failure is not only important for treatment decisions, but is also associated with prognosis and successfulness of revision surgery. Dines et al. conducted a retrospective review of 78 shoulders that underwent revision arthroplasty.20 The shoulders were grouped based on mode of failure and functional outcomes were compared. The authors found that revisions performed for osseous or component-related complications yielded better results that those performed for soft-tissue deficiency. In general, they found that the results of revision for glenoid arthrosis and periprosthetic fracture were far better than those for tuberosity malunion and rotator cuff dysfunction. These factors should be carefully considered when the surgeon and patient are contemplating revision surgery.
Indications for Revision
The primary indication for revision shoulder arthroplasty is pain. Patients typically request revision surgery when the severity of the pain prevents them from performing their daily activities, disturbs sleep patterns, or requires daily use of narcotics. Another common indication for revision surgery is dysfunction and patients typically have a combination of both pain and dysfunction. There are many patients with shoulder replacements that have mild to moderate pain and do not wish to pursue revision surgery. The patient and physician must have a frank discussion regarding the patient’s symptoms and only chose to undergo revision surgery if the amount of pain or dysfunction justifies such a procedure. If the pain and dysfunction are severe enough to consider revision surgery, an identifiable cause of failure must be found and be amenable to surgical correction. The difficulty and complexity of the surgery should also be considered. For example, a patient with glenoid arthrosis with an otherwise well-functioning hemiarthroplasty can be converted to a TSA with an acceptable amount of risk. However, a patient requiring a massive proximal humeral reconstruction and glenoid bone grafting should proceed much more cautiously as this procedure carries much more risk and is more unpredictable in its outcome. Also, when discussing the risks and potential benefits of surgery with the patient, realistic goals should be emphasized. For instance, a patient with tuberosity malunion and nonanatomic hemiarthroplasty contemplating revision to a reverse prosthesis should not consider revision arthroplasty as an opportunity to become symptom-free. Frequently, revision arthroplasty is undergone to improve pain and dysfunction with the acceptance that complete recovery is unattainable. This should be clearly conveyed to the patient preoperatively so that the physician and patient have similar goals of treatment.
Alternatives to Revision Arthroplasty
When discussing revision arthroplasty with a patient, all reasonable alternative treatments should be considered. Continued conservative treatment is always an option. In most cases of failed arthroplasty, there is no urgency to perform revision. The one exception is that of progressive bone loss. It is not uncommon to see rapidly worsening glenoid bone loss in the setting of hemiarthroplasty with glenoid arthrosis, especially in patients with inflammatory arthritis. In this scenario, consideration should be given to early intervention if revision is felt to be inevitable. Depending on the mode of failure, arthroscopy can sometimes be considered as an alternative to revision arthroplasty. Some authors have reported successful treatment of rotator cuff tears, impingement syndrome, and capsular fibrosis with arthroscopic techniques.31,72 Arthroscopy can also be used to further investigate the painful shoulder arthroplasty without an identifiable mode of failure. Bonutti et al. found arthroscopy to be valuable in the assessment of glenoid loosening.11 O’Driscoll described the technique of arthroscopic removal of a loose glenoid component and found this procedure to provide reasonable clinical improvement.52 We have found that arthroscopy is also very useful in the evaluation of a painful shoulder arthroplasty that is suspicious for occult infection. It provides a method to obtain synovial tissue for culture and pathology, which can more reliably confirm or exclude an indolent infection.
PREOPERATIVE PLANNING
Both the patient and surgeon need to be prepared for surgery. From the patient perspective, revision surgery can cause a significant strain on the body. The patient’s overall medical condition should be carefully assessed and medical optimization is crucial in preventing postoperative complications. All anti-coagulant medications should be held for approximately 1 week prior to surgery and access to matched blood products intraoperatively is recommended. Body positioning should be carefully considered, especially in patients with a history of stroke as full beach-chair position can lead to a decrease in cerebral perfusion.21,53 Revision surgery can be unpredictable with regard to estimated blood loss and procedure length. Therefore, Foley catheter placement is recommended and possibly arterial line placement. In patients with a cardiac history, postoperative telemetry monitoring and cardiac markers should be considered.
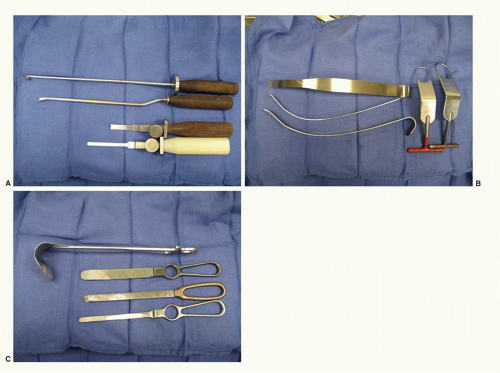
From the surgeon’s perspective, preoperative planning and anticipating pitfalls is crucial for a successful outcome. Preoperative imaging must be closely investigated prior to surgery. Full-length humeral plain films and advanced imaging (CT or MRI) are sometimes necessary. Specific attention should be paid to the condition of the rotator cuff and constrained implant instrumentation should be available if the integrity of the rotator cuff or tuberosities is in question. Also, bone deficiencies need to be identified preoperatively. In cases of severe bone loss, allograft material must be readily available and occasionally iliac rest bone graft is preferable for glenoid bone loss. With regard to revision equipment, a variety of deep shoulder retractors is helpful in the revision setting (Fig. 24-4). A plan for implant removal is also necessary. Humeral stem removal can be very difficult, especially with well-fixed ingrowth stems. An oscillating saw, cerclage cables, and implant-specific extraction tools should all be available in the operating room. Also, power cement extraction tools and small, flexible osteotomes are necessary for removal of
well-fixed cemented stems. Long humeral stems are occasionally needed to bypass a periprosthetic fracture or area of segmental bone loss. Diaphyseal diameter should be measured and occasionally humeral stems have to be shortened with a cutting wheel-saw due to narrowing of the intramedullary canal. Custom implants are sometimes necessary and adequate time should be allotted for implant manufacturing. Ultimately, a well-executed revision arthroplasty is the result of a thorough and thoughtful preoperative plan.
well-fixed cemented stems. Long humeral stems are occasionally needed to bypass a periprosthetic fracture or area of segmental bone loss. Diaphyseal diameter should be measured and occasionally humeral stems have to be shortened with a cutting wheel-saw due to narrowing of the intramedullary canal. Custom implants are sometimes necessary and adequate time should be allotted for implant manufacturing. Ultimately, a well-executed revision arthroplasty is the result of a thorough and thoughtful preoperative plan.
SURGICAL EXPOSURE
Revision shoulder arthroplasty is typically performed under both general and regional anesthesia. Placement of an interscalene nerve block preoperatively has been shown to decrease the amount of narcotics administered intraoperatively and postoperatively and is associated with a low complication rate.7 The patient is positioned in the beach-chair position with the cervical spine immobilized in neutral and all bony prominences are well padded. The patient is brought to the edge of the table and the medial border of the scapula should be incorporated into the sterile field, especially if a posterior exposure is anticipated. It is important to ensure that the operative arm can be fully adducted as this will be necessary during humeral exposure. The sterile field is made very wide to allow for extensile exposure if necessary. Prior to beginning the procedure, a final assessment is made to ensure all necessary equipment, blood products, and implants are available.
In the revision setting, there can be multiple previous surgical incisions. Typically, there is a scar from a previous deltopectoral approach that can be incorporated into the surgical incision. If however, there are no incisions on the anterior aspect of the shoulder or it is felt that they are too far from the typical incision, a new incision can be made. The shoulder girdle has excellent vascularity and wound healing complications in this area are rare. We prefer to leave at least a 4 cm bridge between parallel incisions if possible. The ideal skin incision for revision arthroplasty is from 2 cm proximal to the coracoid tip extending distally to the deltoid insertion. This will allow for extension of the exposure to an anterolateral approach to the humerus if necessary. We prefer to keep the incision well away from the axilla for contamination concerns.
The deltopectoral approach is used for virtually all revision arthroplasty exposures. The anterosuperior approach has also been described for the difficult revision exposure, where the anterior deltoid is taken off the acromion and clavicle. Foruria et al. reported the utilization of this approach in nearly 40% of revision arthroplasty cases.24 They found no complications related to deltoid detachment. We seldom find this approach necessary, but if the anterior deltoid appears to be failing during exposure this approach may be beneficial. With
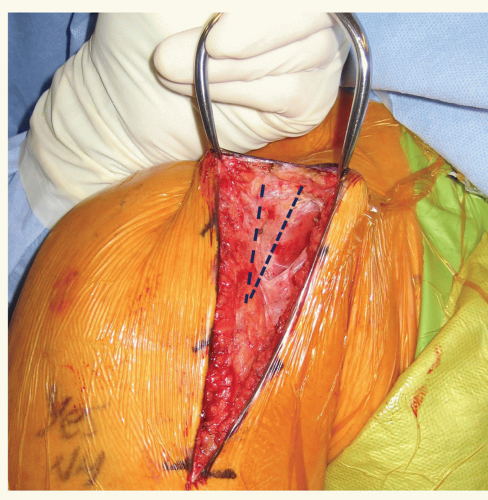
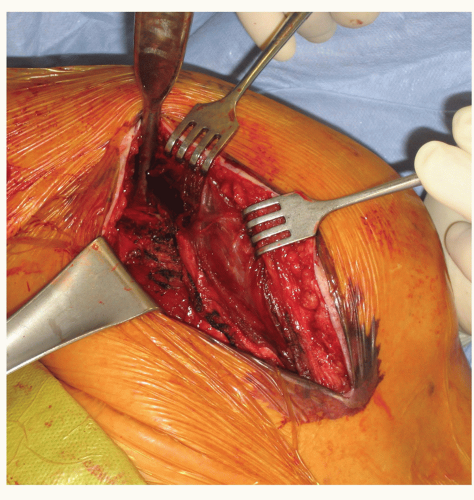
the deltopectoral approach, the interval is found most reliably by identifying the area devoid of muscle attachment on the anterior aspect of the clavicle at the proximal extent of the incision. This typically appears as a triangle as the deltoid and pectoral muscles converge distally (Fig. 24-5). The cephalic vein can be found in this interval. The coracoid process is helpful in localizing this area, especially in the revision setting. The deltoid typically drapes medially over the coracoid for approximately 2 cm. Once the interval is identified, the cephalic vein is dissected and retracted laterally with the deltoid. In an anatomical study with retrograde latex injection of the cephalic vein, Radkowski et al. found more lateral branches of the vein and recommended lateral retraction during the deltopectoral approach.59 Sometimes there is significant scarring in this area and frequently the vein has been injured during previous surgical exposures. In these cases, we prefer to identify the interval proximally at the clavicular origin of these two muscles. The pectoralis insertion is then released. The width of the pectoral insertion has been shown to be 5.7 cm (4.8 to 6.5 cm) and the superior 3 cm can be released for improved exposure.39 If pectoral muscle transfer is a consideration, care should be taken to preserve as much tendon length as possible. The subdeltoid space is then developed. This is considerably more difficult in the revision setting and frequently requires meticulous dissection through extensive scar tissue. The deltoid is usually adhered to the underlying subdeltoid bursal tissue and bone. Care should be taken during this step to avoid injury to the posterior humeral circumflex artery and axillary nerve as they course around the arm on the undersurface of the deltoid. The subdeltoid space is most easily found distally and dissection is carried proximally (Fig. 24-6). Once the subdeltoid space has been developed, it is extended proximally to the subacromial space. Care should be taken to avoid injury to the underlying rotator cuff, if present. The importance of releasing the subacromial and subdeltoid space cannot be overstated; the surgeon should be able to easily pass a finger from the subdeltoid to subacromial space without intervening scar tissue. This exposure will allow for later deltoid retractor placement and humeral exposure.
the deltopectoral approach, the interval is found most reliably by identifying the area devoid of muscle attachment on the anterior aspect of the clavicle at the proximal extent of the incision. This typically appears as a triangle as the deltoid and pectoral muscles converge distally (Fig. 24-5). The cephalic vein can be found in this interval. The coracoid process is helpful in localizing this area, especially in the revision setting. The deltoid typically drapes medially over the coracoid for approximately 2 cm. Once the interval is identified, the cephalic vein is dissected and retracted laterally with the deltoid. In an anatomical study with retrograde latex injection of the cephalic vein, Radkowski et al. found more lateral branches of the vein and recommended lateral retraction during the deltopectoral approach.59 Sometimes there is significant scarring in this area and frequently the vein has been injured during previous surgical exposures. In these cases, we prefer to identify the interval proximally at the clavicular origin of these two muscles. The pectoralis insertion is then released. The width of the pectoral insertion has been shown to be 5.7 cm (4.8 to 6.5 cm) and the superior 3 cm can be released for improved exposure.39 If pectoral muscle transfer is a consideration, care should be taken to preserve as much tendon length as possible. The subdeltoid space is then developed. This is considerably more difficult in the revision setting and frequently requires meticulous dissection through extensive scar tissue. The deltoid is usually adhered to the underlying subdeltoid bursal tissue and bone. Care should be taken during this step to avoid injury to the posterior humeral circumflex artery and axillary nerve as they course around the arm on the undersurface of the deltoid. The subdeltoid space is most easily found distally and dissection is carried proximally (Fig. 24-6). Once the subdeltoid space has been developed, it is extended proximally to the subacromial space. Care should be taken to avoid injury to the underlying rotator cuff, if present. The importance of releasing the subacromial and subdeltoid space cannot be overstated; the surgeon should be able to easily pass a finger from the subdeltoid to subacromial space without intervening scar tissue. This exposure will allow for later deltoid retractor placement and humeral exposure.
The deep exposure begins with releasing the clavipectoral fascia, and a portion of the coracoacromial ligament can be released for additional exposure. The conjoint tendon is then released and retracted medially. The conjoint tendon can be scarred and adhered in a more lateral position and the lateral extent of the strap muscles should be clearly identified prior to medial retraction. Also, the conjoint tendon can have dense scarring to the underlying subscapularis. Identifying the proper plane of dissection can be difficult, but is crucial for axillary nerve localization (Fig. 24-7). The subscapularis can now be clearly visualized (if present). The anterior circumflex vessels, which course on the lower border of the subscapularis can be coagulated. The axillary nerve must now be localized. It can be found in the plane between the conjoint tendon and subscapularis at the lower border of the subscapularis. In the revision setting, this area can have scar tissue that prevents easy palpation of the nerve. Patience and careful dissection should be used to clearly palpate the nerve as its location will need to be known prior to capsular release and glenoid exposure. Identification of the biceps tendon (if intact) and bicipital groove will help identify the greater and lesser tuberosities and the rotator interval. The subscapularis is then released either by tenotomy or lesser
tuberosity osteotomy. In most revision cases, a lesser tuberosity osteotomy is not feasible and a tenotomy is performed. In order to dislocate the humerus and to gain adequate exposure of the glenoid, a capsular release directly off the humerus is performed. The arm is brought into progressive adduction, external rotation, and flexion to visualize the capsular insertion on the medial humeral calcar. The release should be taken down to the level of the latissimus tendon insertion. Care should be taken to stay directly on bone during this release as the axillary nerve can be scarred in close proximity to the capsule. If necessary, the release can be taken posteriorly until the teres minor insertion. The proximal humerus can now be dislocated anteriorly and special retractors are used to maintain exposure (Fig. 24-4C). Particular care should be taken not to aggressively externally rotate the arm before a proper release has been performed as this can lead to a spiral periprosthetic humeral fracture in these osteoporotic patients. Once the humerus has been dislocated and adequate exposure has been established, attention can then be turned to humeral component removal.
tuberosity osteotomy. In most revision cases, a lesser tuberosity osteotomy is not feasible and a tenotomy is performed. In order to dislocate the humerus and to gain adequate exposure of the glenoid, a capsular release directly off the humerus is performed. The arm is brought into progressive adduction, external rotation, and flexion to visualize the capsular insertion on the medial humeral calcar. The release should be taken down to the level of the latissimus tendon insertion. Care should be taken to stay directly on bone during this release as the axillary nerve can be scarred in close proximity to the capsule. If necessary, the release can be taken posteriorly until the teres minor insertion. The proximal humerus can now be dislocated anteriorly and special retractors are used to maintain exposure (Fig. 24-4C). Particular care should be taken not to aggressively externally rotate the arm before a proper release has been performed as this can lead to a spiral periprosthetic humeral fracture in these osteoporotic patients. Once the humerus has been dislocated and adequate exposure has been established, attention can then be turned to humeral component removal.
Stay updated, free articles. Join our Telegram channel

Full access? Get Clinical Tree


