Minimally Invasive Fixation of Fractures of the Distal Femur
Hobie Summers
INDICATIONS
Minimally invasive techniques for the fixation of distal femur fractures have evolved over time as a result of a better understanding of these fractures as well as improvements in the implants available for fixation. Distal femur fractures represent an interesting diversity of complexity and decision making with regards to surgical approach, reduction techniques, and fixation strategies. In general, simple fracture patterns are well treated with direct, open, anatomic reduction and compression. Minimally invasive techniques may be attractive, yet counterproductive for simple fracture patterns in the metadiaphyseal region, or in simple B-type articular fractures. Multifragmentary fractures of the metadiaphyseal region, on the other hand, have a higher nonunion rate with direct, anatomic reduction techniques and are more amenable to indirect reduction with bridge plating techniques. The development of locked plating has further expanded our ability to treat some fractures of the distal femur with minimally invasive techniques. The best indications for minimally invasive techniques for fixation of distal femur fractures include the following.
Multifragmentary metadiaphyseal supracondylar fractures
Periprosthetic fractures around total knee and hip arthroplasties
Pediatric distal femur fractures
Contraindications for minimally invasive techniques include the following.
Simple fracture patterns in the supracondylar region that are more amenable to direct visualization, anatomic reduction, and compression.
B-type articular fractures
So how do intra-articular fractures fit into minimally invasive techniques? Intra-articular fractures must be treated with an open approach to provide an anatomic reduction and compressive fixation of the articular surface. This may then be followed by percutaneous application of a plate to realign the articular block to the shaft. Locked plates are frequently used for minimally invasive fixation of the distal femur, although traditional implants may be used in this fashion as well.
PATIENT POSITIONING
The patient should be positioned on a radiolucent table to allow for appropriate intraoperative imaging. The image intensifier should come into the field from the opposite side of the table so that it may be used during the procedure. Tourniquets are rarely used as they typically get in the way and blood loss should be minimal with careful dissection. A “sloppy” lateral position will work well for the majority of cases. A one-blanket bump is placed under the operative hip and shoulder to internally rotate the limb. This makes imaging on the AP significantly easier by not constantly fighting the tendency toward external rotation. It also raises the hip to assist with imaging on the lateral x-ray by getting the operative femur above the normal side. Sterile bolsters may be used (10, 12, or 14 towels wrapped together) to elevate the distal segment. This allows for improved lateral
imaging as well as providing assistance with overcoming the pull of the gastroc on the distal fragment. The upper extremity may be placed across the chest and secured with sufficient padding.
imaging as well as providing assistance with overcoming the pull of the gastroc on the distal fragment. The upper extremity may be placed across the chest and secured with sufficient padding.
SURGICAL APPROACHES
The surgical approach for minimally invasive fixation of the distal femur will depend upon the amount of work that needs to be done to achieve an anatomic reduction of the joint. The direct lateral approach is sufficient for extra-articular fractures, and those with a simple intercondylar split. This approach avoids incising the quadriceps tendon and spares the vastus lateralis. The incision is made from Gerdy’s tubercle, which is palpable over the lateral proximal tibia, and directly over the mid-lateral portion of the distal femur. After incising the subcutaneous tissue, the tensor fascia is incised in-line with the skin incision. The vastus lateralis is then easily elevated from the posterior intermuscular septum, and all periosteum and muscle attachment to the femur are left attached. The capsular attachment of the suprapatellar pouch should be left attached to the articular fragment to maintain its blood supply. The capsule may be incised in-line with the skin incision to enter the joint and visualize the lateral aspect of the distal femur. If there is no intercondylar fracture line, the capsule may be elevated to just visualize the vermilion border of the articular lateral condyle. If an intercondylar split is present and visualization of the distal articular surface is necessary, the tensor fascia is split slightly anterior to Gerdy’s tubercle, as is the capsule. The capsule is incised along the lateral border of the patellar tendon so the articular surface may be better visualized. If necessary, the skin incision may curve closer to the tibial tuberosity, rather than Gerdy’s tubercle. This allows easier dissection close to the patellar tendon and retraction of the patella medially to visualize the joint surface.
In C3 fracture patterns, articular reconstruction requires a lateral parapatellar approach. When significant comminution or coronal plane fractures are present, the lateral parapatellar approach will make the reconstruction significantly easier, and still allow for subcutaneous application of a plate for fixation to the proximal segment. The lateral parapatellar approach may be performed through a midline or a (lateral) paramedian incision. After incising the skin, the deep portion of the approach hugs the lateral aspect of the patella and incising the lateral portion of the quad tendon and muscle is performed in a full thickness manner for later repair. This allows the surgeon to enter the joint more anteriorly and medially, making intercondylar and medial access easier. The capsule is dissected from the lateral condyle, once inside the joint, for plate application in its appropriate position. Again, the soft tissue attachment to the condylar fragments should not be dissected from the bone. This blood supply to the condyle should be preserved.
Occasionally, a small medial approach may be necessary to deal with coronal plane fractures on the medial side of the joint, or in rare cases where the medial condyle is comminuted. A medial parapatellar arthrotomy can be carefully performed in conjunction with the standard, direct lateral incision in these rare cases. Being cautious to leave a sufficient skin bridge between the medial and lateral incisions is paramount to avoid wound problems. Keeping the incisions only as long as they absolutely need to be is likewise helpful.
It should be noted that in cases of simple fracture patterns, B-type articular or simple supracondylar, a direct lateral approach can be performed nicely without devascularizing the bone. The same skin incision for a direct lateral approach to the distal femur may be extended along the lateral femoral shaft. The vastus lateralis is elevated from the posterior intermuscular septum while perforating vessels are carefully cauterized. A Cobb elevator is used to gently release the vastus from the septum as well as from the periosteum from the lateral aspect of the shaft. The periosteum and anterior musculature is not detached. This maintains the vascularity to the femur while providing a “working window” to visualize the lateral aspect of the fracture line. Reduction forceps may be passed without further soft tissue stripping to afford an anatomic reduction for simple fracture patterns.
REDUCTION TECHNIQUES
For simple extra-articular fracture patterns, the dissection just described may be used for anatomic reduction and compressive fixation. While this may not be minimally invasive in terms of skin incision, it is soft tissue sparing by not stripping the bone of its vascularity. Having a nice “working window” with soft tissues minimally dissected from the septum and periosteum, anatomic reduction of simple fracture patterns can be performed in a biologically friendly manner. Large pointed reduction forceps may be placed around muscle to maintain the bone’s vascularity and anatomic reduction can be performed. This is typically followed by lag screw fixation and/or compression plating. Independent lag screws may be placed followed by neutralization plating, or compression plating using an articulated tension device may be performed, followed by lag screw application through the plate when appropriate (Fig. 12.1 with x-rays).
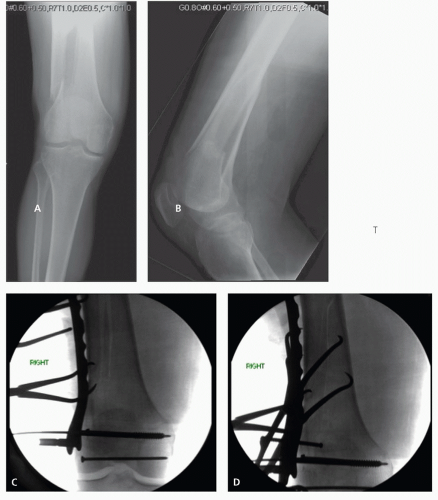 Figure 12.1 A and B: AP and lateral radiographs of a 43-C1 injury. Note the simple articular and simple metadiaphyseal components. C through G: Fluoroscopic images showing the intraoperative steps for anatomic reduction and absolute stability for this simple fracture pattern. C: Demonstrates articular reduction and fixation followed by appropriate plate positioning to the distal fragment. D and E: Demonstrate clamp application on AP and lateral images with the plate well positioned. F: Shows the use on the articulated tension device. G: Illustrates lag screw application after compression with the plate has been completed. H: Limited open exposure for a simple fracture pattern with respect for the soft tissues was performed to achieve an anatomic reduction and compressive fixation. I and J: The completed anatomic reconstruction through a limited exposure. (continued) |
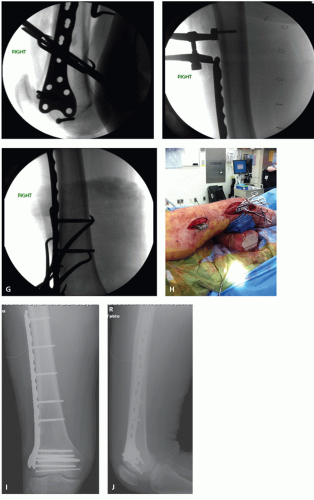 Figure 12.1 (Continued) |
For comminuted extra-articular fractures, bridge plating may be performed in a minimally invasive fashion. The key to reduction is restoring length, alignment, and rotation. Multiple reduction aids are available and knowledge in their appropriate use is the key. Some simple patterns may reduce with simple manual traction over soft, sterile towel bumps. It is not uncommon to have medial comminution with a simple fracture line laterally. Once brought out to length, the lateral cortex may reduce quite nicely to maintain length. This “lateral read” may be visible or palpable through the lateral approach at its most proximal extent. When obtaining length proves difficult, first make sure the patient is adequately paralyzed by anesthesia to reduce muscle tone necessary for reduction. A femoral distractor or external fixator may be used to help achieve length as well. Schantz pins are placed from anterior to posterior in the femoral shaft and proximal tibia to keep them out of the way for plate application. After restoring length, carefully evaluate the lateral fluoroscopic imaging, as the pull of the gastroc on the distal fragment tends to cause an extension deformity. A bolster placed under the apex of the metaphyseal spike of the distal fragment may be very useful in controlling this deformity. When the distal fragment will not reduce with closed/positioning means, a carefully inserted Schantz pin in the distal fragment will provide excellent control to reduce this fragment. The Schantz pin may be placed through a small stab incision from anterior to posterior, and should be placed outside the articular surface (just proximal to it) in the metaphyseal portion of the distal fragment. Flexion/extension control is excellent with this single pin and the fragment may be reduced. Once the articular segment is appropriately aligned with the more proximal shaft, definitive fixation may be completed. A laterally based locked plate is most commonly used for fractures with metadiaphyseal comminution. When using locked implants, the reduction of the fracture should be performed prior to plate application. The plate is inserted in a submuscular fashion, deep to the vastus lateralis, and extraperiosteally along the femoral shaft. The position of the plate is carefully evaluated on AP and lateral fluoroscopic images, keeping in mind the recommended position for the implant selected. Once the implant is correctly positioned, k-wires may be used to provisionally keep the plate in position until it has been fixed to the bone. Fixation typically begins with the distal fragment and many implant manufacturers have designed a central screw that should be positioned parallel to the articular surface on the AP image. It is critical to understand the implant you are using so that deformity is not induced by incorrect application of the implant. Only after the implant is perfectly positioned and attached to the distal fragment can one move on to proximal fixation.
Related posts:


Stay updated, free articles. Join our Telegram channel

Full access? Get Clinical Tree


