Knee
History
If acute
Mechanism of injury: e.g. twisting or in contact.
Degree of pain and disability: able to weight bear/continue.
Audible ‘pop’ or ‘crack’ at time of injury.
Swelling: site and speed of onset—e.g. immediate or the next day.
Site of symptoms.
Symptoms since: pain, giving way, instability, or locking.
Referral of pain.
Past injury history.
If insidious
Specific location of pain.
Aggravating factors: e.g. stairs or sitting for long periods.
Night pain.
Associated crepitus or clicking.
Locking, swelling, or giving way.
Past injury history.
Past medical history.
Any other joints affected.
Examination
Inspection
The knee consists of two joints (see Figs. 22.1 and 22.2):
Tibio-femoral.
Patello-femoral.
In standing
Look for evidence of asymmetry or biomechanical abnormality, e.g.:
Leg length.
Scoliosis: symmetry of body creases.
Squinting patellae or malalignment.
Weight held equally through both lower limbs.
Muscle wasting: especially quadriceps.
Scars or bruising.
Loss of contour around patella, suggestive of effusion.
Hyper-recurvatum of knees.
Pronation/supination of feet.
Swelling in popliteal fossa.
Functional tests
Whilst standing, functional tests such as squatting, lunging, hopping, stepping, or eccentric exercises can be assessed in an attempt to reproduce symptoms.
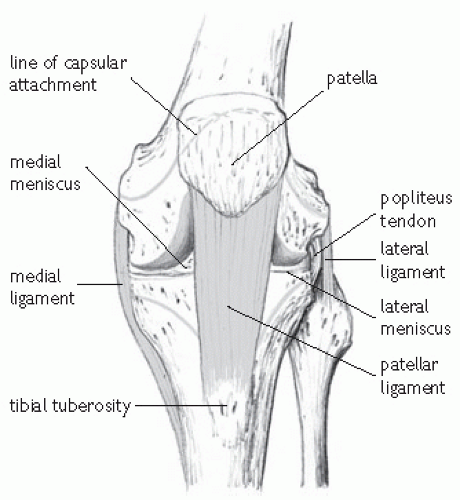 Fig. 22.1 Knee joint: anterior view showing capsule attachments and ligaments. Reproduced with permission from MacKinnon P and Morris J. (2005). Oxford Textbook of Functional Anatomy, Vol. 1. Oxford University Press, Oxford. © 2005. |
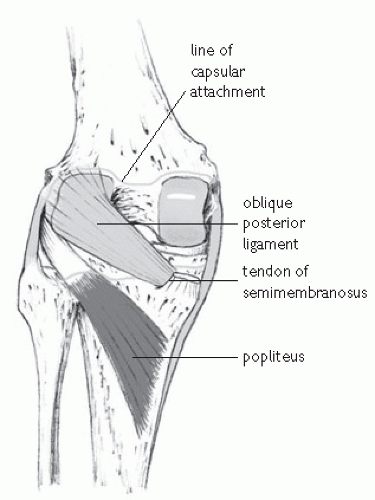 Fig. 22.2 Knee joint: posterior view showing oblique posterior ligament and attachment of popliteus. Reproduced with permission from MacKinnon P and Morris J. (2005). Oxford Textbook of Functional Anatomy, Vol. 1. Oxford University Press, Oxford. © 2005. |
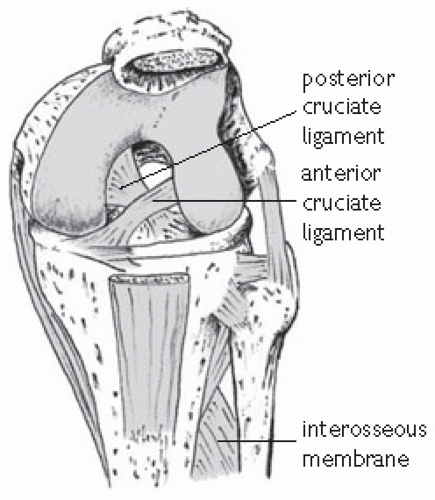 Fig. 22.3 Cruciate ligaments, anterior view. Reproduced with permission from MacKinnon P and Morris J. (2005). Oxford Textbook of Functional Anatomy, Vol. 1. Oxford University Press, Oxford. © 2005. |
Palpation
In supine
Assess for evidence of effusion, using fluid shift technique.
Patella: assess position, angulation, freedom of movement, retropatellar crepitus, discomfort, and apprehension.
Medial and lateral retinaculum for tenderness.
Quadriceps muscles, tendon, and patellar tendon for tenderness or thickening.
Tibial tubercle, check for swelling and any posterior sag compared with the other side.
Fat pad.
Medial and lateral tibio-femoral joint lines.
Medial and lateral collateral ligaments.
Lateral femoral condyle, including ilio-tibial band.
Head of fibula and superior tibio-fibular joint.
In prone
Hamstrings.
Popliteal fossa for evidence of cyst.
Medial head of gastrocnemius.
Active and passive movements
Range of active movements should be -5° to 140° (i.e. hyperextension to full flexion).
Apply gentle pressure at the end of range of active movement to assess joint ‘end-feel’ and passive joint movement. Note any hardness or unnatural springiness, as well as any discomfort.
Assess hamstring flexibility at 90° of hip and knee flexion.
Assess the subject’s hip joints and straight leg raise to eliminate any possibility of referred pain, particularly in adolescents, where slipped upper femoral epiphysis should always be considered.
If hyper-recurvatum of the knees is noted in standing or excessive hyperextension in supine, consider checking for more generalized hypermobility syndrome.
Resisted movements
Check for pain and/or weakness on resisted knee extension (rectus femoris and quadriceps).
Check for pain and/or weakness on resisted knee flexion (hamstrings).
Special tests
Medial and lateral collateral ligaments
Resist inward (medial) and outward (lateral) movements at the knee.
Ligaments are taut in full knee extension and are best assessed by valgus and varus forces applied by the examiner whilst the leg is supported in approximately 30° of knee flexion.
Ligament injury grading
Grade 1 pain felt on stressing ligament, but no laxity.
Grade 2 (partial tear) pain and some laxity at site of injury, but a solid ‘end-feel’ at the limit of range.
Grade 3 (complete tear) pain and laxity with no ‘end-feel’ at limit of range of movement. Clinically it may be difficult to distinguish between grades 2 and 3 due to pain-induced muscle spasm.
Anterior and posterior cruciate ligaments (see Fig. 22.3)
The anterior cruciate ligament (ACL)
Prevents the tibia from extending forward from the femur and helps control pivoting movements.
Often injured in twisting or hyperextension movements.
The posterior cruciate ligament (PCL)
Less commonly injured than the ACL.
Limits backward movement of the tibia on the femur.
Anterior and posterior draw tests
Subject sits with knees bent at 90°.
Posterior sag is excluded by examiner inspecting tibial tubercle from the side, to check for any loss of prominence, which may suggest a lax PCL.
The examiner sits on the foot of the subject on the side to be tested. The hamstrings must be relaxed to allow the ACL to be stressed.
Gentle traction is applied to the tibia forward (to assess ACL, called the anterior draw test). The tibia can then be gently pushed backwards (to assess the PCL, posterior draw test).
Laxity and ‘end-feel’ are again important factors.
If indicated, the posterior draw test can be repeated with the foot externally rotated. This will test for any evidence of posterolateral corner disruption.
Lachman’s test
A useful test as a positive result is less reliant upon the subject not having any hamstring contraction as at the time of the draw tests.
The subject sits on the couch and the examiner holds the thigh firmly, and flexes the knee to approximately 15°. The tibia can then be drawn forward or backward to assess cruciate integrity.
Many sports people have well-developed quadriceps musculature. If the examiner finds that Lachman’s test is difficult to perform because of this, then the examiner’s knee can be placed under the thigh of the subject to support the knee in 15° flexion and allow the tibia to be drawn to and fro.
Pivot shift test
The knee is held in full extension and the tibia internally rotated.
As the knee is flexed, a valgus force is applied to the joint.
This tests for a deficient ACL.
A positive test will reveal a ‘clunk’ as the lateral femoral condyle (dislocated in internal rotation in an ACL deficient knee) relocates.
Menisci
Medial and lateral meniscal injury will often be suspected from the history. There are several methods of meniscal assessment.
McMurray’s test
A flexion-rotation test, with the knee being flexed fully and extended, whilst internal and external rotation pressure is placed upon it.
Positive tests are obtained with pain and/or palpable internal ‘clinking’ felt by the examiner’s hand on the joint line.
Ilio-tibial band
Can be assessed for tightness.
Ober’s test
The subject lies on their side with the lower leg flexed at the hip. The upper leg is then extended at the hip with the examiner’s hand resting on the pelvis to keep that neutral. The examiner then adducts the extended hip and the subject’s knee should comfortably reach the couch. If the ITB is tight, the pelvis will move out of neutral or the knee will extend before it reaches the couch.
Tightness of the ITB can be confirmed on modified Thomas’ test when the relaxed leg falls into external rotation at the hip.
ITB friction syndrome can be diagnosed by pressure from the examiner’s thumb over the subject’s lateral femoral condyle, while the knee is repeatedly flexed and extended from 0 to 30°.
Investigation of knee injuries
Plain X-ray
Acute
To exclude fractures:
Tibial plateau.
Patellar stress.
ACL avulsion.
Osteochondral.
Skyline views can be obtained to assess the retro-patellar surface.
Non-acute
Osteoarthritis (weight-bearing).
MRI scan
If suspected:
Meniscal pathology.
Articular cartilage damage.
Patellar tendinpathy.
‘Bone bruising’ may be seen on MRI scans after significant knee injuries. Findings are sub-chondral bone oedema in the affected part.
Ultrasound
Invaluable to assess patellar tendon pathology, particularly if degeneration (shows as areas of hypoechogenicity) or tear is suspected.
Also useful to assess popliteal cysts or bursitis.
Arthroscopy
Still sometimes used to confirm a clinical diagnosis, but less so since the advent of MRI.
Medial collateral ligament
History and examination
MCL is a strong band of tissue on medial aspect of knee.
Resists valgus strain.
Often injured in football, rugby, and skiing.
Mechanism of injury: any forceful movement of the lower leg outward at the knee or a hard blow to the outside of the lower thigh, which causes the knee to buckle.
MCL is closely associated with the medial meniscus and the two structures are often injured in combination.
Any forceful rotational element, in addition to a valgus strain can rupture MCL, medial meniscus, and anterior cruciate—a severe injury described as O’Donoghue’s Triad.
Symptoms include pain, mild to moderate swelling on the medial aspect of the knee, joint effusion (not immediate) and feeling of instability (like a ‘wobbly’ table leg).
Injuries to MCL are graded 1 to 3 according to severity (see ‘Knee examination’, p. 626).
Rehabilitation after medial collateral ligament sprain (grade 2)
Time to return to function: 4-8 weeks.
Protection stage (up to 4 weeks)
Up to 4 weeks of protected weight-bearing may be advised depending on clinical severity. This is often undertaken with the knee supported in a brace at approximately 30° of flexion.
Care must be taken to minimize quadriceps inhibition/weakening/atrophy during this stage.
Static hamstring stretching: this is usually most comfortable in 10—15° knee flexion and is important to minimize the degree of secondary hamstring tightness.
Ice, compression, and elevation can be of benefit in the acute phases.
Electrotherapeutic modalities may be of the use in the acute and sub-acute stages, e.g. low level laser therapy and electrical stimulation.
Post protection: days 1-7
Key aims
Increase ROM through knee flexion and extension.
Address any quadriceps inhibition/weakening/atrophy.
Encourage heel-toe gait pattern with full knee extension.
Mobility/stretching
Heel slides: athlete flexes and extends the knee joint though the full pain free ROM.
Static hamstring stretching should be continued through this phase if needed.
Strengthening/recruitment
Static quadriceps training: with the knee straight tighten the quadriceps muscle. Simultaneous ankle dorsiflexion/gluteal tightening may aid quadriceps recruitment during this exercise.
Straight leg raise: keeping the knee straight, lift the injured leg so that the heel is approximately 30cm from the ground
Inner range quads: with a small ball under the knee, the athlete moves his/her knee into full extension.
Neuromuscular training/gait re-education
Weight transfers: athlete stands on both feet, but with weight predominantly on the uninjured side. Within the limits of pain, slowly transfer weight on to the injured side. This should progress, until it is comfortable to stand solely on the injured foot.
Walking with a controlled heel-toe gait pattern is encouraged.
Hydrotherapy/pool rehabilitation will be useful in the majority of cases: the buoyancy of the water reduces the impact on the joints, and provides a better environment to restore normal movement patterns during rehabilitation. Hydrotherapy exercises include:
Biofeedback
EMG biofeedback may be useful, particularly in cases of extreme quadriceps inhibition. Surface electrodes placed over the muscle (usually the vastus medialis) provide the patient with real time feedback on muscle activity during rehabilitative exercises.
Before moving onto the middle stages of rehabilitation the athlete must have achieved:
Good quadriceps recruitment with minimal to no inhibition.
Ability to comfortably transfer weight onto the injured side.
Full knee extension.
Post protection: weeks 2-3
Mobility/strengthening/neuromuscular exercises
Single leg standing/balance
Standing on the injured side, the athlete tries to balance. At the start, the athlete is allowed to touch the ground with the uninjured side to regain balance when needed. As balance improves, they should be challenged to balance for a long as possible without touching the ground. This exercise can be progressed further by balancing with eyes closed or by balancing when undertaking additional physical tasks, e.g. an upper body movement which should progress from basic movements (bicep curl) to multijoint diagonal movement patterns.
Once the athlete is able to stand comfortably on one leg with his/her eyes closed, more advanced balance training can begin. A series of progressions should be undertaken using labile surfaces, visual stimuli, and skilled tasks. Progressions should also advance from double to single leg support.
Athlete balances on the injured side, while throwing and catching a ball. Sports specific considerations could involve: varying the type of throw, e.g. underarm, overhead, side pass, chest pass; varying the direction of the pass received, e.g. in front, from side, overhead; varying the type of ball, e.g. tennis ball, medicine ball.
Further progressions should be undertaken by balancing on dynamic surfaces, e.g. mini trampoline (rebounder), wobble board, balance pad/cushion, folded towel.
Strengthening
Mini squats: ensuring an equal distribution of weight, the athlete should perform a 50% squat (to 45° knee flexion).
Drop squats: as for a mini squat, except the speed is increased whilst maintaining control.
Single leg squats.
Lunges.
All these exercises can be progressed by increasing the demand on the neuromuscular system, e.g. the athlete must perform a single leg squat on a dynamic surface.
Cardiovascular
Bike/cross trainer/upper body ergometer.
Post protection: weeks 3-6
Related posts:


Stay updated, free articles. Join our Telegram channel

Full access? Get Clinical Tree


