Injection Techniques for Joints and Bursa
Paul A. Lotke
Aspirations and/or injections of the joints and bursa are valuable tools for the treatment and diagnosis of problems related to bone and joint inflammation. The ability to remove synovial fluid, inspect it, and send the specimen to the laboratory analysis or culture helps the primary care physician to understand the underlying problem regarding the joint. The visual inspection of the fluid itself is a valuable tool. Bloody fluid indicates significant trauma or coagulopathy, cloudy fluid creates suspicion of infection or inflammatory arthritis, and clear yellow viscous fluid is usually associated with some transitory inflammation of a joint or bursa.
Intraarticular/intrabursal injections of cortisone preparation have been used for decades and can be very effective in giving prompt relief to inflamed joints, bursa, ligaments, or tendons. The agents are absorbed slowly, in general do not effect systemic cortisone levels, and have an excellent safety record. This section reviews how to inject various parts of the body. Although the author describes his technique for injection, there are other approaches that are equally effective.
Sterile technique must be carefully observed. The tip of the needle and the skin insertion site must remain sterile. The skin is sterilized with an alcohol sponge, rubbing and cleansing the skin. Tincture of iodine or iodophor solution is applied as the final preparation. Gloves are not used unless protection is a concern. A physician may unknowingly contaminate sterile gloves and think that they are still sterile. Without gloves, instinct tells us to stay away from the critical areas, and they remain well prepped and sterile.
In the joints to be aspirated, remove most of the fluid first and then leave the needle in place, change the syringe to one with a cortisone preparation, and inject it into the space. It is not attempted to remove all of the fluid completely from a bursa or joint space, as it collapses and the needle may displace into the soft tissues. Failures of injections are frequently related to failure to enter or remain in the appropriate space. Avoid superficial injections, as they may go into the subcutaneous space and cause skin atrophy. When injecting the cortisone preparation, there should be no resistance in the flow from the syringe. If there is, the tip of the needle may be embedded into tendon or cartilage and should be redrawn slightly or redirected.
The size of the syringe and needle depends on the site to be aspirated. If injecting a tendon sheath in the hand, a 0.2 cc of cortisone in a 1-cc syringe with a 25-gauge needle should be used. On the other hand, if aspirating a swollen knee, an 18-gauge needle on a 60-cc syringe with 1 cc of cortisone preparation could be used.
LOWER EXTREMITY
Knee
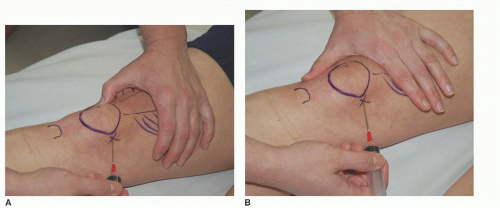
The knee is one of the most frequently aspirated joints. It is easy to inject, especially if there is fluid within the joint. Generally, the clinician can enter from the medial side with the knee fully extended. The author chooses a midpatellar location, 1 to 2 cm medial to the inner border of the patella. The needle should be aimed to slide beneath the patella into the joint. The position of the needle can be confirmed by rocking it slightly under the patella without pain. Advantages of a medial approach are the lack of fat and a thin synovium in this area. The angle of medial patella facet facilitates entry. With minimal fluid in the joint, the patella is tilted to allow easier entry (Fig. 67-1A). If there is fluid in the joint, the suprapatellar pouch can be compressed, which raises the patella and makes entry into the knee easier (Fig. 67-1B).
Prepatellar Bursitis (Housemaid’s Knee)
Prepatellar bursitis presents as swellings over the anterior aspect of the patella or tibial tubercle. The swellings can be easily aspirated by directing a needle through healthy skin on the edge of the bursa.
Popliteal Cysts
Popliteal cysts can be aspirated or injected relatively safely since they can be readily palpitated, especially with the patient lying prone with the knee extended. Direct entry is usually possible (Fig. 67-2).
Ankle
It is easiest to enter the ankle joint from the anteromedial site. Choose a soft depressed spot about 1 cm above and lateral to the medial malleolus. The author directs the needle posteriorly and slightly lateral (Fig. 67-3).
 FIGURE 67-1. Knee joint. A: Tilted. B: Compressed.
Stay updated, free articles. Join our Telegram channel
Full access? Get Clinical Tree
 Get Clinical Tree app for offline access

|


