Arthroscopy: Complications of Rotator Cuff Repair
Samer S. Hasan
Gary M. Gartsman
INTRODUCTION
All-arthroscopic rotator cuff repair is being performed by an ever-increasing number of orthopaedic surgeons. Although there is not as yet long-term follow-up, intermediate-term follow-up has demonstrated excellent results comparable to those attained following traditional open rotator cuff repair in terms of patient satisfaction, comfort, and function (1, 2, 3, 4, 5, 6, 7).
There are several advantages of an arthroscopic rotator cuff repair: it allows concurrent evaluation and treatment of intra-articular pathology, which is frequently present (8) and can affect outcome (3); it provides exceptional visualization of rotator cuff tear geometry, which may be superior to that afforded by open methods (9,10); and it facilitates precise soft-tissue releases to mobilize the rotator cuff and to allow for a tension-free repair (11,12). Furthermore, an arthroscopic repair avoids deltoid detachment and consequently the devastating complication of deltoid dehiscence (11). The mini-open repair, performed through a small deltoid split, also avoids deltoid detachment, but it has been associated with an increased incidence of postsurgical stiffness (13,14) that may relate to excessive deltoid retraction, which is avoided by an arthroscopic repair. Lastly, the small incisions are often more cosmetically acceptable to the patient, and the immediate postoperative pain is often considerably less than that experienced following open repair.
Many complications of arthroscopic rotator cuff repair are similar to those that follow open rotator cuff repair, such as postoperative stiffness and recurrent rotator cuff tear. However, the management and prevention of these problems is somewhat different when the surgery is performed arthroscopically. Other complications, such as those related to fluid extravasation or to the management of sutures within a cannula, are unique to arthroscopic techniques.
Complications of surgery are typically divided into those that arise from intraoperative errors and those that develop postoperatively. Intraoperative complications of arthroscopic rotator cuff repair include errors in assessment of tear geometry and reparability and in suture management. Postoperative complications include stiffness, retear, or infection. It is critical to note, however, that avoiding complications following arthroscopic rotator cuff repair begins prior to surgery.
PREOPERATIVE COMPLICATIONS
A careful history and physical examination are important in establishing the diagnosis of a rotator cuff tear and in excluding conditions, such as adhesive capsulitis, that may confound the diagnosis and impact treatment. Although it may be tempting to concurrently treat both adhesive capsulitis and rotator cuff tear, especially arthroscopically, it is generally best to treat the adhesive capsulitis and to delay the rotator cuff repair. Ancillary imaging, such as magnetic resonance imaging (MRI) or ultrasound, should be aimed at confirming, not establishing, the appropriate diagnosis. Plain radiographs and magnetic resonance imaging can
also be used to gauge reparability. Upward migration of the humeral head on an anteroposterior radiograph with the arm internally rotated (15) and observations of fatty muscle changes by magnetic resonance imaging (16,17) are poor prognostic indicators of tendon reparability or of integrity following repair.
also be used to gauge reparability. Upward migration of the humeral head on an anteroposterior radiograph with the arm internally rotated (15) and observations of fatty muscle changes by magnetic resonance imaging (16,17) are poor prognostic indicators of tendon reparability or of integrity following repair.
Another preoperative complication arises from the use of an arthroscopic repair by a surgeon uncomfortable with the technique. A durable repair is as dependent on the ability to perform an adequate bursectomy, evaluate tendon geometry, and assess reparability as it is on the ability to pass suture through tendon or tie knots arthroscopically. A less experienced surgeon can avoid those pitfalls and complications specific to arthroscopic repair by avoiding the technique altogether until sufficient experience has been gained.
Because an arthroscopic rotator cuff repair is characterized by a rather steep learning curve, a critical number of rotator cuff repairs is needed to justify the transition to arthroscopic repair and to gain mastery of the technique. Surgeons who do not perform an adequate number of shoulder procedures and who cannot justify undergoing the appropriate technical transition should continue to perform rotator cuff repair using the traditional open or mini-open techniques. It is useful to remember that although a number of shoulder surgeons currently repair all rotator cuff tears arthroscopically, many prefer to repair complete subscapularis tears, certain recurrent tears, or tears involving two or more tendons using open techniques.
The surgeon contemplating arthroscopic rotator cuff repair should be facile with shoulder arthroscopy, including subacromial bursoscopy, and be able to sequentially execute all the steps in the repair (3,9,10,18, 19, 20, 21). There are no rules concerning who should perform an arthroscopic repair, but two useful guidelines for the surgeon contemplating the transition to arthroscopic rotator cuff repair are the ability to perform a diagnostic arthroscopy and subacromial decompression in 30 minutes or less and the surgical experience of 20 to 30 rotator cuff repairs annually (10).
The transition to arthroscopic rotator cuff repair is a gradual process that requires practice and demands patience. The steps in an arthroscopic repair should be mastered outside the operating room by practicing arthroscopic knot-tying on a knot-tying board and by gaining familiarity with the instruments needed to insert suture anchors and to pass suture. The shoulder arthroscopy model (Aptic Superbones, Vashon, WA) is a commercially available model of the shoulder that can aid in the transition (Fig. 13-1). The model consists of a felt rotator cuff and a plastic glenohumeral joint encased in a sturdy plastic shell that replicates shoulder surface anatomy. Courses specific to arthroscopic shoulder surgery are also an invaluable resource, especially for the surgeon who has had little formal training on arthroscopic rotator cuff repair. These courses, organized by the American Academy of Orthopaedic Surgeons and by various specialty societies, institutions, and vendors, often provide an opportunity to perform repairs on cadaveric shoulders in a wet laboratory setting (10).
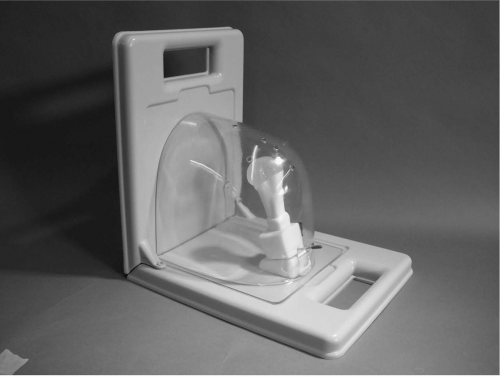 Figure 13-1 Shoulder arthroscopy model. |
Ultimately, the transition to an all-arthroscopic rotator cuff repair is made incrementally, with the surgeon performing arthroscopically an increasing number of steps to a mini-open repair. Initially, the rotator cuff footprint can be decorticated and the suture anchors inserted arthroscopically. Later, some or all of the sutures can be passed, and the knots can be tied under direct visualization, until finally all that remains is an open inspection of the completed arthroscopic repair (10,13,22,23).
INTRAOPERATIVE COMPLICATIONS
If problems that are encountered during arthroscopic rotator cuff repair, especially during the transition to this technique, can be identified and corrected in the course of the operation, they do not affect the outcome; hence, they are not complications. However, failure to address them affects the ability to carry out the repair and adversely impacts the quality of the repair.
Subacromial Decompression
Complications related to arthroscopic subacromial decompression are reviewed elsewhere. However, it is important to point out that an inadequate subacromial bursectomy will interfere with tendon visualization and lead to difficulty in passive suturing and in tying knots. Although a complete bursectomy is not necessary, the bursectomy should be sufficient to enable clear visualization of all the steps of an arthroscopic rotator cuff repair from the various portals. Debridement of bursal tissue within the lateral gutter should not proceed beyond the bursal reflection (3 to 5 cm distally) to avoid axillary nerve injury (24,25).
An acromioplasty is not essential to arthroscopic rotator cuff repair, and neither author believes an acromioplasty is needed for visualization during rotator cuff repair (10). Moreover, the senior author has recently published a randomized study of arthroscopic rotator cuff repair with and without acromioplasty that showed that there was no difference in outcome at 1-year follow-up (26). Proper portal placement is more important than acromioplasty to optimize visualization and to facilitate the passage of sutures and instruments within the subacromial space (Fig. 13-2). The posterior portal used for viewing should be positioned somewhat superior and lateral to the traditional portal placement in the “soft spot” so that it affords “a room with a view” of the subacromial space (Fig. 13-3) (10).
If the surgeon elects to perform an acromioplasty with rotator cuff repair, it should be executed correctly (27,28), either before or following the rotator cuff repair. An inadequate or incorrectly performed acromioplasty may impair visualization and may also contribute to postoperative complications. A roughened, irregular undersurface may produce abrasion of the bursal surface of the rotator cuff, and excessive bleeding from the exposed cancellous bone may produce subacromial adhesions and stiffness postoperatively.
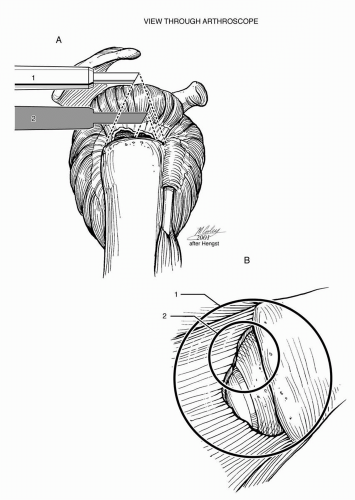 Figure 13-2 Placement of the arthroscope superiorly within the subacromial space (A) provides a “room with a view” (B). |
Tendon Releases
Adequate articular- and bursal-sided releases are essential for proper tendon mobilization and for affecting a tension-free repair. Scarring between the superior and posterior labrum and articular surface of the rotator cuff can be released bluntly or sharply using basket forceps or electrocautery (Fig. 13-4). Within the subacromial space, posterior adhesions are generally thin and amenable to blunt release, such as with a blunt trocar. Use of a motorized shaver is discouraged because bleeding posteromedially can be difficult to control (20). Anteriorly, the coracohumeral ligament is often thickened and scarred, which contributes to retraction of the distal supraspinatus (Fig. 13-5A) (29). Sharp release of the coracohumeral ligament and related bursal adhesions using electrocautery or a shaver is often necessary to mobilize adequately the torn tendon (Fig. 13-5B).
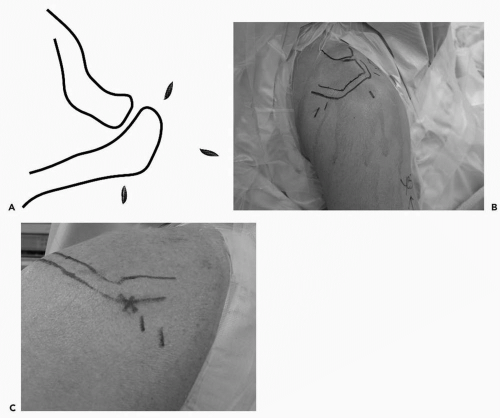 Figure 13-3 Diagram (A) and skin markings (B,C) showing the proper portal placement for arthroscopic rotator cuff repair. The posterior portal should be placed closer to the posterolateral corner of the acromion (X). |
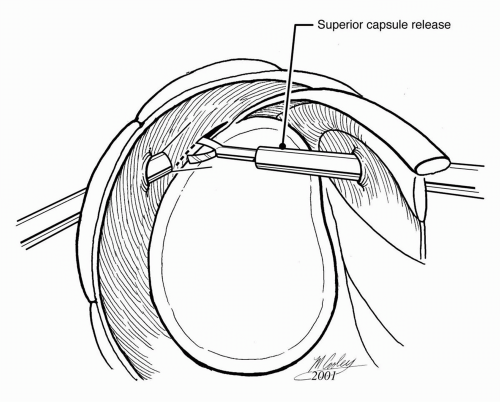 Figure 13-4 Release of the superior capsule and adhesions between labrum and rotator cuff. |
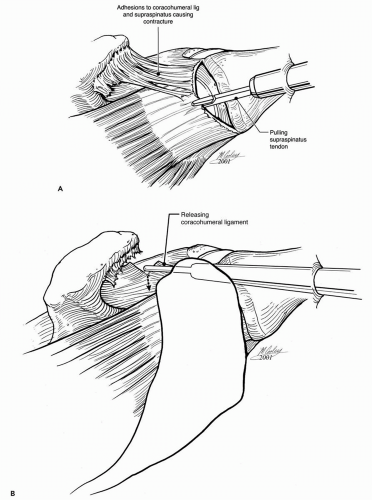 Figure 13-5 Coracohumeral adhesions (A) and their release (B) to mobilize a retracted supraspinatus tendon tear. |
For the most severely retracted large tears, a variety of interval releases and slides that aid in mobilizing the tendon have been described (Fig. 13-6) (30, 31, 32, 33). However, it is important to recognize that the ability to repair the tendon, either to itself or to the tuberosity, does not guarantee a durable repair or outcome. Consequently, the use of these heroic releases for a contracted chronic rotator cuff tear needs to be weighed against overall tendon and muscle quality.
Assessment of Tear Morphology
Assessment of tear geometry is essential for successful rotator cuff repair. Arthroscopy has served to enhance this aspect of repair, especially for the largest, most retracted tears. For U-shaped tears with significant medial retraction, margin convergence as described by Burkhart (12,34, 35, 36) has been used to facilitate a tension-free repair (Fig. 13-7). The technique foregoes heroic attempts to repair the most retracted portions of the tendon directly to bone in favor of side-to-side repair of the medial extension of the tear followed by tendon to bone repair so that a tension-free repair can be obtained.
The arthroscope is also invaluable for evaluating smaller tears and for distinguishing between partial thickness and full thickness tears. With the arthroscope in the glenohumeral joint, an O-polydiaxanone (O-PDS) suture can be placed through a spinal needle inserted across an articular side tear that has already been debrided to help localize the cuff defect within the subacromial space (13,37, 38, 39). In general, debrided tears that are less than 50% of the tendon thickness are not repaired (28), whereas highergrade tears are repaired. Various techniques to repair a partial thickness tear either in situ (40,41) or by first completing the tear (38,39) have been described.
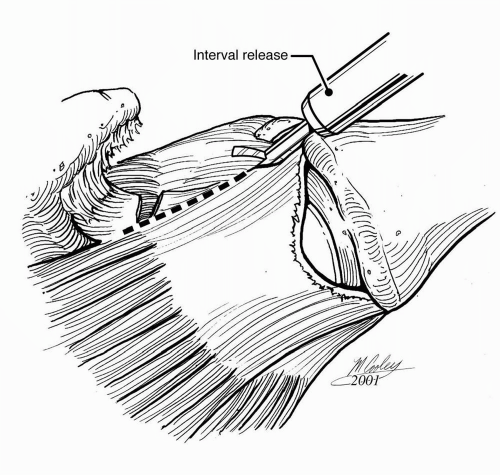 Figure 13-6 Rotator interval release. |
Assessment of tear reparability is important for rotator cuff repair and the arthroscope is ideally suited for this task (42). The two principal determinants of reparability are tendon excursion with the ability to obtain a tension-free repair and overall tendon quality. The former is established by thorough assessment of tear geometry and meticulous releases to mobilize the tendon. Tendon quality can be checked by placing braided no. 2 sutures across the tendon and applying the traction needed to advance the tendon to the repair site and slightly beyond. In tears that are delaminated or that have upper and lower leaves, the suture limb must be passed through both portions (13). Bone quality is also a determinant, and extremely osteopenic bone may preclude the placement of suture anchors. Although this problem is rarely encountered with currently available suture anchors, the security of each anchor should be tested immediately after it is inserted.
Bone Preparation
To improve tendon-to-bone healing, the rotator cuff insertion site or footprint must be prepared to accept the tendon. Traditional open techniques employ a trough prepared with a bur or osteotome (29) to facilitate the passage of sutures transosseously. The use of suture anchors obviates the need for a trough. Instead, the rotator cuff footprint is lightly abraded or decorticated to a depth of 1 to 2 mm
and to a width of at least 1 cm starting just lateral to the articular surface (9,10,37,43).
and to a width of at least 1 cm starting just lateral to the articular surface (9,10,37,43).
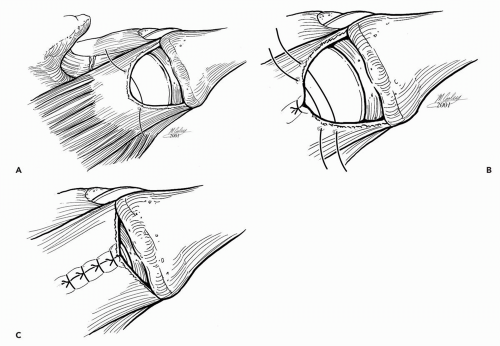 Figure 13-7 Margin convergence for a U-shaped tear. A: First suture passed near apex of tear. B: Second suture passed. C: Completed side-to-side repair and margin convergence. The tendon edge can be repaired to the tuberosity without tension. |
Arthroscopic Instruments
Familiarity with various instruments for suture passage is essential during arthroscopic rotator cuff repair. In general, sutures are passed through rotator cuff tissue using either a direct or an indirect method. The direct method uses instruments that directly pass the suture through the tendon or instruments that first pierce the tendon and then retrieve the suture. Examples of these instruments are Cuff Stitch, Cuff Sew, and Arthropierce (Smith-Nephew Endoscopy, Andover, MA), Viper and Penetrator (Arthrex, Naples, FL), ExpressSew (U.S. Surgical), and Blitz (Linvatec, Largo, FL). The indirect method involves placing a passing suture or shuttle relay through the rotator cuff tissue and then using this transport suture to pull the repair suture through the tissue. The Caspari suture punch or Spectrum instruments are examples of instruments that employ an indirect method of suture transport (Fig. 13-8). The Caspari suture punch and Spectrum instruments can also be used to pass a suture directly (e.g., for side-to-side repair with a monofilament suture) (10). The Viper and the ExpressSew are suture punches that allow direct passage of braided no. 2 suture.
The specific instrument used during tendon repair depends on multiple factors including tear geometry, location of the working portals, tissue thickness, and surgeon’s preference.
Direct methods are often employed during side-to-side repair of a rotator interval rent or during margin convergence (10,35). A suture punch is often used to pass sutures from suture anchors through the lateral edge of a tear when visualizing from the posterior portal. Most instruments easily penetrate rotator cuff tissue, but occasionally the tendon edge is so thick that suture punches cannot penetrate the tendon. This may occur during the repair of acute traumatic tears in younger patients. The Caspari suture punch has been modified with a longer needle that is helpful in this situation (38).
Direct methods are often employed during side-to-side repair of a rotator interval rent or during margin convergence (10,35). A suture punch is often used to pass sutures from suture anchors through the lateral edge of a tear when visualizing from the posterior portal. Most instruments easily penetrate rotator cuff tissue, but occasionally the tendon edge is so thick that suture punches cannot penetrate the tendon. This may occur during the repair of acute traumatic tears in younger patients. The Caspari suture punch has been modified with a longer needle that is helpful in this situation (38).
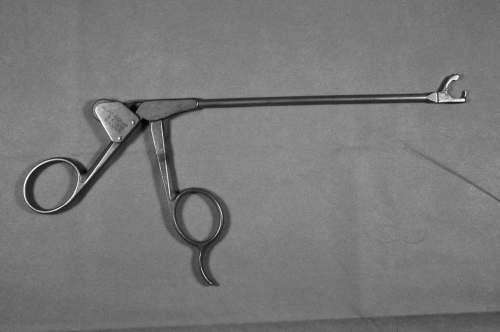 Figure 13-8 Caspari suture punch. (Reprinted with permission from Gartsman GM. Shoulder Arthroscopy. Philadelphia: WB Saunders, 2003.) |
The Spectrum instruments or the Caspari suture punch can be loaded with a shuttle wire, but this can abrade or damage tissue. An alternative is to use a 2-0 nylon suture folded in half so that the two free ends are passed into the suture punch and the loop end exits from the handle (Fig. 13-9) (10,20). Once the suture punch punctures the tendon and the two free ends are retrieved from the subacromial space through the anterior cannula, the suture punch is withdrawn from the lateral cannula, and one suture limb from the suture anchor is then retrieved from the lateral cannula. After placing a looping grasper around the nylon sutures to ensure they are not entangled with the suture limb from the anchor, the end of the suture limb is placed within the nylon loop. Finally, traction on the two ends of the nylon suture anteriorly is used to shuttle the suture limb from the lateral cannula into the subacromial space, through the tendon, and out through the anterior cannula (20).
Suture Anchors
Suture anchors represent a technical advance that has facilitated arthroscopic rotator cuff repair, but their use is not without risk. The senior author has put forth the following characteristics of the ideal suture anchor:
It should allow firm fixation in the greater tuberosity.
The surgeon should be able to select the type of suture loaded on the anchor.
The anchor should be inserted manually, without predrilling or power instruments.
The suture should slide easily in the anchor so that the eyelet orientation is irrelevant.
The anchor should be removable from bone if placed suboptimally or if the suture breaks.
The anchor must be fixed securely to the inserting device so that it does not dislodge within the subacromial space during insertion.
The anchor must be able to penetrate bone at an acute angle.
The anchor should be biodegradable (20).
No currently available suture anchor meets all these criteria, but many complications associated with the use of suture anchors can be minimized or avoided by knowing the specifics of the anchor being used. The surgeon should know whether the sutures are preloaded onto the anchor or they must be loaded in the operating room; whether the suture anchor accommodates one or two sutures and the type of suture employed; and whether the sutures can be switched. When an anchor accommodates two sutures, the surgeon should know whether the sutures are stacked within the same eyelet or in two eyelets and whether the eyelet has sharp edges or is made from suture material. When two sutures are stacked within the same eyelet, the top suture should be tied first so that it does not bind the bottom suture (Fig. 13-10) (10). When an anchor is used that has an eyelet with a sharp edge, the final orientation of the anchor is important. In general, the anchor should be inserted so that the eyelet is parallel to the tendon edge instead of facing the edge (10), because in this orientation the sutures make a 90 degrees turn with respect to the eyelet in order to minimize suture abrasion (Fig. 13-11) (10). Most anchors are inserted with devices that clearly mark the location of the eyelet to facilitate proper orientation (Fig. 13-12).
Related posts:
 Complications of Surgery to the Acromioclavicular and Sternoclavicular Joints
 Neurologic Injury
 Complications of Glenohumeral Arthrodesis
 General Complications of Arthroscopic Shoulder Surgery
 Arthroscopy: Complications of Surgery for Instability
 Complications of Arthroscopic Subacromial Decompression and Acromioclavicular Joint Resection
Stay updated, free articles. Join our Telegram channel

Full access? Get Clinical Tree


