Arthroscopicassisted Repair and Reconstruction of Acromioclavicular Joint Instability
Thomas M. DeBerardino
Augustus D. Mazzocca
Cory M. Edgar
Knut Beitzel
Andreas B. Imhoff
Robert A. Arciero
The surgical indications for operative treatment of high-grade acromioclavicular (AC) dislocations have continued to evolve as the precise biomechanical function of both AC and coracoclavicular instruments has been further elucidated. The success of open techniques, with and without allograft reconstruction, has stimulated surgeons to work at reproducing these techniques arthroscopically. Precise instrumentation and implants able to be manipulated and secured arthroscopically have enabled development of these techniques to the point where, in the hands of a skilled arthroscopist, the clinical results appear to approach the results of open techniques, at least in the short term.
It should be emphasized that these techniques are sophisticated arthroscopic techniques, necessitating a clear understanding of open and arthroscopic anatomy and relationships of the structures in proximity to the clavicle and coracoid and a clear understanding of and experience with the devices described for securing the clavicle to the coracoid process.
The following describes two techniques that have been successful in arthroscopic approaches to AC joint instability.
ANATOMIC CORACOCLAVICULAR LIGAMENT RECONSTRUCTION UTILIZING DOUBLE TIGHT ROPE© SUSPENSORY FIXATION (IMHOFF TECHNIQUE)
Indications and Surgical Techniques
Specific Arthroscopic Advantages
Surgical reconstruction techniques for unstable AC joint have advanced with the assistance of technology to more anatomic reconstructions. These techniques address the fundamental concept that the primary restraints of the AC joint have different functions. In recent years, arthroscopic techniques have been applied to the treatment of AC joint instability with good clinical results in the short-term setting (1, 2, 3, 4, 5, 6, 7, 8).
The technique presented has been applied for the surgical stabilization of acute AC joint separations classified as Rockwood type IV, V, and VI and in acute type III injuries among athletes or high-demand manual laborers. Arthroscopically assisted reconstruction techniques are intended for the skilled arthroscopist. There are clear advantages with this technique: the minimally invasive nature of arthroscopic surgery, deltotrapezial fascia is not removed from lateral clavicle, direct visualization of AC joint reduction, and placement of coracoid fixation under protected visualization. Additionally, arthroscopically assisted techniques allow for glenohumeral joint inspection that permits the surgical treatment of any concomitant glenohumeral pathology (3, 5, 9). There are situations, typically in chronic AC dislocations, where a distal clavicle resection or subdeltoid bursectomy is indicated and can be performed arthroscopically.
Patient Positioning and Setup
The patient is placed in the standard beach-chair position. Examination under anesthesia is performed to evaluate the glenohumeral joint (range of motion [ROM], stability, etc.) and the AC Joint (mobility, translation, etc.). It is important to prepare and drape a wide sterile field to the sternoclaviclar joint medial to allow for adequate exposure. The operative extremity is then held in a pneumatic arm holder or positioner (e.g., Spider, Smith & Nephew, TN or Tenet Medical, Calgary, Alberta, Canada). The limb positioner facilitates glenohumeral elevation back to the clavicle during the fixation placement. Fluoroscopy is used to ascertain AC joint reduction and, if needed, for anatomic verification during the approach or drilling ligament reconstruction tunnels. Mini-C-arm is typically used and is brought in sterile from the cephalad operative, and the image is taken in the anterior-posterior direction.
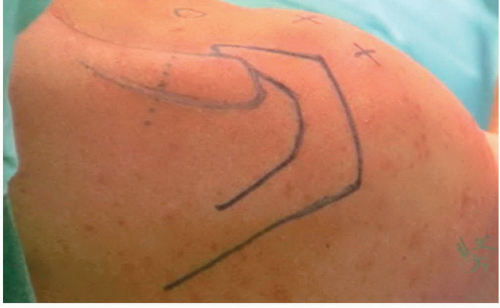
Standard 30-degree arthroscope is used, with working portals for the coracoid preparation done via a straight lateral and an accessory anterolateral portal, established just medial to the coracoacromial (CA) ligament (Fig. 14-1). The posterior portal is routinely placed 2 cm below and 2 cm medial to the posterolateral acromion corner. The anatomic trapezoidal and conoidal tunnel position (2.5 and 4.5 mm medial to the lateral end of the clavicle) is marked on the clavicle as a general location of an incision but is ultimately determined by the drill guide position.
Surgical Technique
This technique utilizes two Tight Rope (Fig. 14-2) devices placed through the clavicle and coracoid in an anatomic position corresponding to the native ligaments. The precise tunnel placement through the clavicle in line with coracoid positioning is done with the aid of drill guide system (Fig. 14-3). This dual anatomic fixation is designed to permit reproduction of the subtle difference in functioning between the native conoid and trapezoid ligaments in the CC ligament function (2, 3, 6).
The surgical procedure is a progression of these basic steps:
Diagnostic glenohumeral joint arthroscopy
Preparation of coracoid base
Guided superior skin incision and AC joint reduction
Placement of conoid and trapezoidal tunnel
Insertion and fixation of two Tight Rope devices
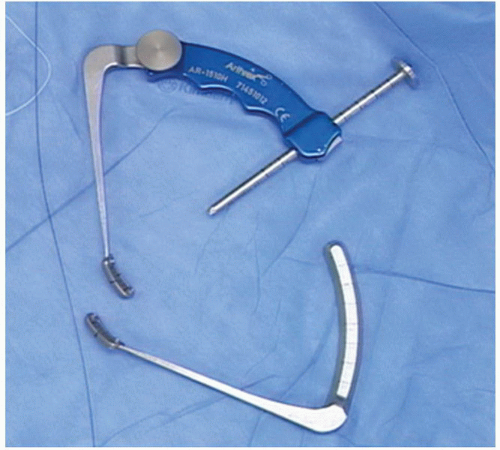 FIGURE 14-2 Adjustable AC joint drill guide with angulated tip for the left and right shoulder (Arthrex Inc., Naples, FL). |
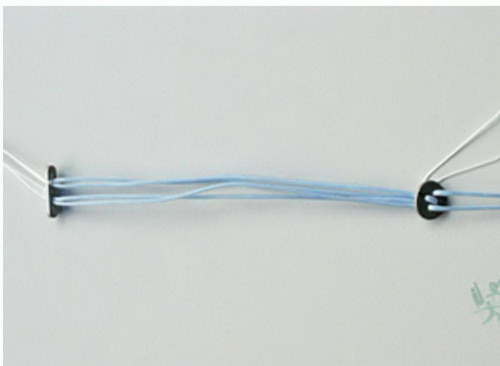 FIGURE 14-3 Tight Rope device (Arthrex Inc., Naples, FL), with flip button and passing suture on the left end and round clavicle button on the right end. |
Diagnostic Glenohumeral Joint Arthroscopy
A routine glenohumeral diagnostic arthroscopy is performed with the use of a 30-degree/4-mm scope through the standard posterior portal. The anterior-lateral portal is positioned using a spinal needle for guidance and should be within the anterior edge of the rotator interval but without damaging the biceps tendon or its stability within the grove. A secondary low anterior-medial portal is made under the CA ligament approximately 1-2 cm from the tip or the coracoid process and should allow for the introduction of an 8.25-mm cannula to allow passage and handling of the guide. It is important to make sure the portal is in a position to allow access to the coracoid basis unobstructed. Any intra-articular pathology can be addressed at this time with standard arthroscopic technique. To assist in AC joint reduction, especially in the chronic dislocation, the interposed soft tissue should be débrided within the space between the clavicle and coracoid process. Although we typically do not need to perform a distal clavicle resection, if necessary for reduction, a resection of no more than 8 to 10 mm can be performed easily. Care should be taken to not debride the superior or posterior acromioclavicular ligaments/capsule as these are very important to clavicle stability, especially in the AC joint injury compared to AC joint arthrosis. Distal clavicle resection is only performed if significant degenerative changes are present or it is needed to facilitate complete AC joint reduction.
Preparation of Coracoid Base
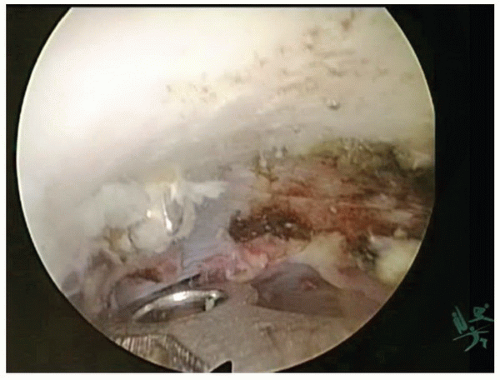
The rotator interval is cleared and the CA ligament is identified. A radiofrequency ablation device (e.g., Opes 90-degree/3.5-mm; Arthrex, FL) is inserted through the anterior portal. Débridement is taken down to the level of the coracoid anterior medially following the CA ligament. The coracoid undersurface is prepared circumferentially to ensure visualization of the medial and lateral edge of the undersurface of the coracoid elbow extending to the base (Fig. 14-4). As an alternative, a scope with 70-degree optic can be used; however, attention has to be given to thoroughly prepare and display the base of the coracoid for correct tunnel placement.
Guided Superior Skin Incision and AC Joint Reduction
Following arthroscopic preparation and visualization of the undersurface and base of the coracoid, a vertical 3-cm skin incision perpendicular to the clavicle approximately 3.5 cm medial to the lateral border of the clavicle is made. The overlying fascia is incised, elevated to expose the entire anterior/posterior extent of the clavicle, and tagged for repair on closure. The AC joint is held in reduction partially by pneumatic arm holder elevating the glenohumeral complex and acromion to the distal clavicle. Correct reduction in the coronal and axillary planes is verified manually, fluoroscopically, and by direct visualization with arthroscopy. It is essential that reduction is maintained throughout the following steps.
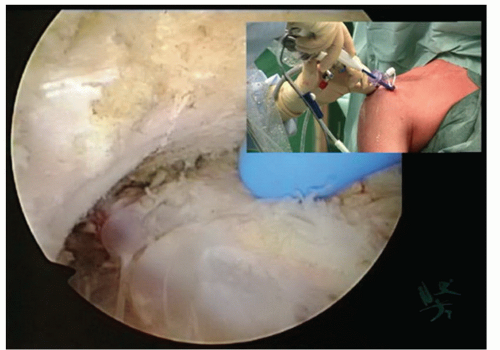 FIGURE 14-4 Arthroscopic and outside view of the thorough preparation of the undersurface and base of the coracoid (30-degree scope positioned in the anterolateral portal). |
Placement of Conoid and Trapezoidal Tunnel
A drill guide with a flip-able tip (Fig. 14-2) is introduced through the anterior portal. It is positioned to direct the placement of the first bone tunnel (conoid ligament) to exit through the coracoid close to the base and medial to the midline. It is important that this tunnel on the clavicle is positioned along the midline or just posterior and at least 4.5 cm medial to the lateral edge of the clavicle. A K-wire is placed to guide the 3.5-mm cannulated drill, which is done under arthroscopic visualization to ensure that the wire is not advanced any further than needed (Fig. 14-5). Note that to prevent a break-out of the tunnel, placing the clavicular tunnel too far anterior or posterior should be strictly avoided. The K-wire remains in place and the final tunnel is drilled (Fig. 14-6). Once the tunnel is made through both the clavicle and coracoid, the drill bit is left in situ while the K-wires and the guiding instrument are removed. A Suture Lasso or metal looped suture passing device is treaded through the central cannel of the cannulated drill bit, while it is visualized exiting the drill bit under the elbow of the coracoid process and removed through the anterior portal. Once the suture passing wire is secured, the cannulated drill bit may be removed under hand power. The retained suture lasso is used to pull the Tight Rope, retrograde, into the anterior portal and out the top of the clavicle after passing up from under the coracoid process through the bone tunnel.
Stay updated, free articles. Join our Telegram channel

Full access? Get Clinical Tree


