Arthroscopic Repair of Anterior Instability
Sven Lichtenberg
Peter Habermeyer
Shoulder dislocation occurs in 2% to 8% of the population and represents one-third of all emergency cases around the shoulder. Recurrence is age related and may be as high as 95% in patients younger than 20 years (1). Recurrence rates drop with age and will be less than 50% in patients older than 25 years (2).
In order to decrease perioperative morbidity, the former author of this chapter, Richard Caspari, and C. Morgan in the early 1980s have developed an arthroscopic suture technique of reconstruction. In the beginning of arthroscopic surgery, enthusiasm in these new techniques led to their uncritical use and therefore to high failure and recurrence rates up to 49%.
In the late 90s, there has been a tendency to reevaluate the indications/contraindications for arthroscopic stabilization. Analyses of mistakes and pitfalls, better understanding for the pathoanatomy, and improved instruments (e.g., suture anchors, suture passing devices) have led to a more careful treatment of unstable shoulder in regard to arthroscopic procedures (2).
Nevertheless, arthroscopic techniques always have to stand the comparison with the gold standard open Bankart procedure. Since this volume’s last edition, arthroscopic techniques have evolved and new instruments and implants have been introduced. Also more and more well-conducted trials have been published as well as meta-analyses are available to prove the efficacy of arthroscopic techniques for anterior instability repair.
Besides the management of lesions of the labrum, arthroscopic techniques for the treatment of pathologic hyperlaxity or even bony lesions are now possible via the arthroscope.
INDICATIONS/CONTRAINDICATIONS
Traumatic First Time Dislocation
First time anterior shoulder dislocation after an adequate trauma typically results in a labral tear off the glenoid of different extension and a Hill-Sachs lesion of the posterosuperior humeral head. These patients usually do not have a capsular redundancy. Reposition has to be performed by a physician, often under anesthesia. In young active patients like cadets or professional athletes, high recurrence rates of up to 95% have to be expected (2). Therefore, in such patients, primary operative repair by arthroscopic stabilization is recommended.
Chronic Posttraumatic Instability
Patients with recurrent posttraumatic instability without hyperlaxity (type II according to Gerber [3] [see Table 5-1] or Polar I according to Bayley (4) [see Table 5-2]) have experienced an adequate trauma that has damaged the passive stabilizers, the inferior glenohumeral ligament (IGHL), and the labral attachment, and this has caused an obligate Hill-Sachs lesion. Habermeyer et al. (5) proved that with increasing number of dislocations the pathologic changes of the capsule also will increase. The structures undergo plastic deformation, and recurrences occur much easier and less traumatic, in severe cases at night while sleeping. The presence of a robust IGHL is a key selection criterion. This leads to the recommendation that a patient should not have more than five dislocations prior to arthroscopic surgery. Some authors have demonstrated that there was a higher recurrence rate after arthroscopic stabilization when the patients had more than five dislocations prior to surgery (6).
TABLE 5.1 Gerber’s classification of instability | ||||||||||||
|---|---|---|---|---|---|---|---|---|---|---|---|---|
|
Recurrent instability with hyperlaxity (type III according to Gerber or Polar II according to Bayley) first appears by an adequate or more often by minor trauma to the shoulder in an abducted and externally rotated position. The lesions of the labrum and capsule are similar. Examining the contralateral shoulder will show the hyperlaxity. These patients usually will have earlier recurrences with less or even without trauma and are capable to reduce the shoulder themselves.
Multidirectional Instability
Real multidirectional instability with anterior-inferior and posterior dislocations is a very rare entity. More often, the term is wrongly used for instability with hyperlaxity as mentioned above. In our experience, the real multidirectional instability is an indication for open surgery. You even have to consider a combined surgical approach from anterior and posterior. Arthroscopic approaches are described in Chapter 8.
In those cases with an anterior dislocation and hyperlaxity (type III according to Gerber), the posterior laxity has to be controlled too by a capsular plication, which will also be described later.
Anterior Subluxation
There is a subset of patients who do not suffer from a true dislocation of the shoulder but rather complain about the inability to stabilize the shoulder under certain circumstances with pain while the shoulder subluxes. Often patients involved in overhead sports experience this subluxation caused by repetitive microtrauma while throwing, pitching, or playing overhead racket sports. Hyperlaxity can be found in theses patients.
Pathologic Muscle Pattering
Bayley (4) describes in his Polar group III patients with hyperlaxity (capsular deficiency) and a pathologic muscular pattering. The patients present with an inability to stabilize their scapula to the thorax. Therefore, the glenoid version is directed anteriorly facilitating the humeral head to dislocate. Such patients are no candidates for surgical stabilization procedures.
Indications for Arthroscopic Stabilization
First time traumatic dislocation in young active patients, overhead and contact athletes
First time traumatic dislocation with a bony Bankart lesion
Recurrent dislocations without hyperlaxity
Recurrent dislocations with hyperlaxity, with bony Bankart lesion
Recurrent subluxation
Contraindications
Recurrent dislocations with severe glenoid bone loss and/or engaging Hill-Sachs lesion
Recurrent dislocation due to a humeral avulsion of glenohumeral ligaments (HAGL lesion)
Chronic instability with pathologic muscular patterning
Chronic voluntary instability
TABLE 5.2 Bayley’s classification of instability | ||||||
|---|---|---|---|---|---|---|
|
PREOPERATIVE PLANNING
History
Important information can be obtained by the patient’s history. The mechanism of injury and whether the trauma was a high-speed injury or a minor trauma are of interest to judge if there will be concomitant hyperlaxity or not. The patient is asked if the reduction was performed by himself or by a physician with or without anesthesia or if the shoulder reduced spontaneously. The number of dislocations will lead to a critical review of the pathology and the chosen procedure. In cases of recurrent instability after a surgical procedure, it is mandatory to reevaluate all facts with special emphasis on bony lesions of the glenoid. A CT with three dimensional (3-D) reconstruction of the glenoid in an en-face view will show how much of the glenoid bone is missing and whether an arthroscopic procedure is possible or not.
Examination
After testing range of motion (ROM), which is usually normal, isometric strength tests follow to exclude rotator cuff (RC) tears. In chronic instability cases, external rotation can be limited. Typical signs for instability are a positive apprehension sign, positive relocation test, and positive fulcrum test. In case of a susceptible hyperlaxity, the following laxity tests have to be carried out. The anterior and posterior drawer test will show a ++ translation, allowing the humeral head to subluxate as far as to the glenoid rim in the anterior and posterior direction.
The sulcus sign is positive when the rotator interval is too wide. By pulling the arm caudally, there appears a sulcus between the lateral border of the acromion and the humeral head.
The hyperabduction test is performed by passively abducting the arm with one hand while fixing the scapula with the other hand. The test is positive if the arm can be abducted more than 100 degrees without moving the scapula.
Again in this state, the muscular patterning has to be addressed by watching the patient lift his arms at the same time and looking for asymmetric motion of the scapulae. If pathologic patterning is present, the scapula will lift off the thorax earlier than on the healthy side and the patient feels apprehensive.
In severe cases with concomitant hyperlaxity, very often the humeral head subluxes or dislocates posteriorly at about 120 degrees of anterior elevation. Sometimes it can be helpful to perform a bilateral EMG to confirm pathologic innervation of the muscles.
Radiography
Routinely the following x-rays should be obtained:
True a.p.: This view can show a concomitant bony lesion of the glenoid.
Y-view: It is important to rule out a posterior dislocation.
Axillary view: With this x-ray, glenoid fractures can be ruled out.
Bernageau view: This view shows a good profile of the glenoid and also helps to rule out bony lesions.
Stryker notch view: The Hill-Sachs lesion is determined.
Magnetic Resonance Imaging
Preoperatively an Arthro-MRI with intra-articularly applied gadolinium contrast medium can be obtained to view the type of labral lesion and the size of the capsular structure, and also it gives you a clue of capsular redundancy. Rotator cuff lesions are to be ruled out. In the coronal view, a HAGL lesion can be detected if the contrast medium leaks out of the capsule inferiorly at the humeral capsular attachment.
The weakness of MRI is its poor depiction of the bony structures.
Computed Tomography
For that reason, a CT scan has to be ordered if the surgeon has any doubt about the bony structures and their integrity. On the 3-D reconstruction of the glenoid with an en-face view, a quantitative evaluation of the missing glenoid bone can be performed. In our daily practice, a CT scan is ordered in all preoperative patients with a bony lesion on their x-ray and in all patients who come with a recurrent instability after previous instability repair.
Diagnostic Arthroscopy
At the beginning of the stabilizing procedure, the diagnostic arthroscopy serves to reassure the preoperative diagnosis and findings and to rule out or find any additional lesions (see also Fig. 5-1).
Glenoid Labrum
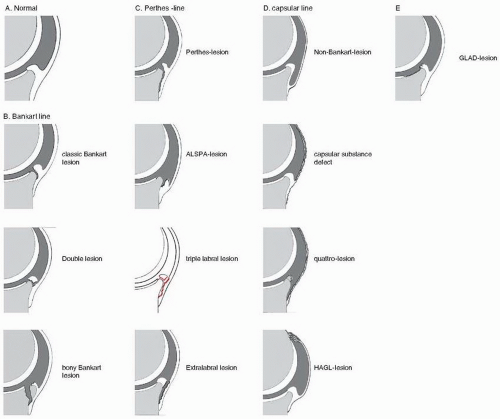
Pathologic findings are a disruption of the labrum off the glenoid rim with or without disruption of the glenohumeral ligaments (Bankart lesion). A periosteal avulsion of the labrum together with the glenohumeral ligaments off the scapular neck is referred to as a Perthes lesion. The
labrum tends to ectopically scar beneath the glenoid rim to the scapular neck, diminishing the glenoid cavity (anterior labrum periosteal sleeve avulsion (ALPSA) lesion).
labrum tends to ectopically scar beneath the glenoid rim to the scapular neck, diminishing the glenoid cavity (anterior labrum periosteal sleeve avulsion (ALPSA) lesion).
In traumatic cases, the force leading to the labral tear continues either inferior-posteriorly or superior-posteriorly thus creating a capsulolabral tear beyond the 6 o’clock position at the inferior glenoid or a superior labral tear from anterior to posterior (SLAP lesion). These lesions are crucial since they increase instability and therefore have to be repaired, too. It is mandatory to palpate the labrum with a probe to find even small lesions.
Be sure to distinguish a real traumatic lesion of the labrum from a sublabral hole, meaning the labrum is not firmly attached to the glenoid with a strong middle glenohumeral ligament (MGHL), and a Buford Complex, in which the anterosuperior labrum is missing.
Glenohumeral Ligaments and Capsule
Pay attention to the capsular insertion at the labrum. Check the insertion site of the IGHL and MGHL, whether they are still attached to the labrum, whether they are disrupted from the labrum, or whether they are scared in a dislocated position beneath the glenoid rim. With a probe, make sure the quality of the capsule and its ligaments is normal or thinned. Of course, it is difficult to determine whether the capsule is normal or not; you can judge if the capsule is thinned or fragile by just touching and pulling it. Pay attention to look at the humeral insertion site not to miss a humeral avulsion (HAGL lesion). In case of a HAGL lesion or a substantial defect of the capsule-ligament complex, open surgery is advisable.
Hyperlaxity and elongation are obvious in the presence of
Drive-through sign (you can easily drive with the scope from anterior-superior down into the axillary pouch along the anterior glenoid without damaging the humeral head.)
Non-Bankart defect
Open or elongated rotator interval
Glenoid
You have to check for chondral lesions and especially for chondral defects of the glenoid rim, the so-called GLAD lesion. In order to determine the size of a bony defect of the glenoid during arthroscopy, one can use a probe and measure the distance from the central bare spot of the glenoid to the anterior and posterior rim. The distances should be the same. Any difference with less distance to the anterior rim is suspicious for a bony defect.
Also looking from the anterosuperior portal, the normal pear shape of the glenoid can be controlled. If that shape shows irregularities or even an inverted pear shape, severe bony deficiency is present. The arthroscopic means to check for bony deficits is difficult, and in any doubt, a preoperative CT scan with 3-D reconstruction has to be obtained.
Humeral Head
Visualizing the whole humeral head is only possible by rotating the arm in all directions. At the posterosuperior aspect, an impression fracture (Hill-Sachs lesion) emphasizes the traumatic onset. According to Calandra, there are three grades of defects:
Chondral
Osteochondral
Osseous
The typical Hill-Sachs lesion is no contraindication for arthroscopic repair. Burkhart et al. (7) have emphasized the importance of the shape and direction of the Hill-Sachs lesion. If the lesion is more oblique, it can engage at the anterior glenoid rim during abduction and external rotation. Therefore this lesion is called engaging Hill-Sachs lesion. In the presence of a concomitant bony glenoid defect, this is the indication for a bone block procedure like the coracoid transfer according to Latarjet.
In the absence of a bony glenoid defect, an arthroscopic procedure called “remplissage” can be performed to fill the defect with soft tissue and avoids engaging. The technique is described later.
Patient Positioning
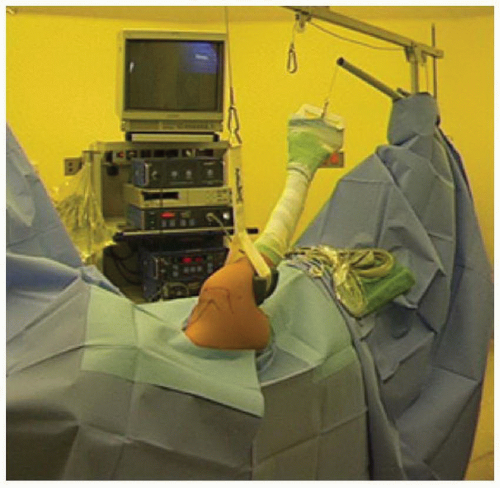
After induction of general anesthesia, the patient is placed in the lateral decubitus position with the scapula dorsally rotated by 30 degrees in order to have the glenoid parallel to the ground. The arm is placed in a double arm holder (Arthrex Inc., Naples, FL) with horizontal traction weight of 5 kg and a vertical traction weight of 3 kg. Place the arm in about 30 to 45 degrees of abduction and neutral rotation. Prep the arm from the mandible to the low ribs, from sternum to the spinous process and down to the wrist (Fig. 5-2). Mark the bony landmarks.
Make sure that the anesthesiologist and his machines are moved to the contralateral side and ask him to use long hoses, so you can stand freely cranial of the patient’s head.
The beach-chair position is also possible for this procedure and the surgeon should choose the position he prefers or he was trained with.
Portals
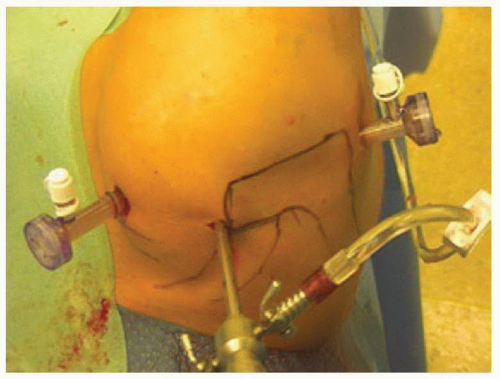
Enter the joint through a standard posterior portal that is located 2 cm distally and medially to the posterolateral corner of the acromion (Fig. 5-3). First use a sharp obturator to go gently through the deltoid fascia, and then switch to a blunt obturator to penetrate the capsule. Ride along the humeral head to feel the joint space between the head and glenoid and fall into it. Then with gentle force, penetrate the capsule. A first “dry” look follows. Then infuse the fluid, irrigate the joint, and inspect it thoroughly. Use a continuous flow pump to have a steady intra-articular pressure of 60 mm Hg with high flow rate. Try to avoid higher fluid pressure in order to minimize fluid extravasation.
An anterior-inferior portal is established in outside-in technique. Locate the portal with a needle in the rotator interval just superior to the subscapularis tendon and make sure you can reach the glenoid rim from the 12 to the 6 o’clock position easily. Always stay lateral to the coracoid process. We use an 8.25-mm translucent twist-in cannula so the instruments and sutures are visible. Now introduce a probe and perform an inspection of the joint. Pay attention to all possible pathologies as mentioned above under “Diagnostic Arthroscopy.”
 FIGURE 5-2 Positioning of the patient in the lateral decubitus position. The arm (right shoulder) is extended by 5 kg horizontally and 3.5 kg vertically. |
After deciding that arthroscopic surgery is adequate, a third anterior-superior portal has to be placed. Introduce a needle anterior to the AC joint so it will penetrate the capsule posterior to the biceps anchor. Then incise the skin and introduce a changing rod. Take the arthroscope out of the cannula and place another changing rod through the posterior portal. Then take the cannula of the arthroscope and insert it into the joint over the rod in the anterior-superior portal. Using the rod in the posterior portal, another 8.25-mm translucent twist-in cannula is inserted. Now two cannulas are located anterior and posterior while the scope is superior (Fig. 5-3).
A lower anterior portal can be necessary especially when internal fixation of bony lesions is wanted. This is placed through the subscapularis from about 8 cm distal to the coracoid process and just lateral of the axillary fold (8). After a skin incision, blunt dissection is performed using a Wissinger rod. The subscapularis tendon is perforated at its lower half. The portal should be placed far enough on the humeral side ensuring enough working space.
For performing a posteroinferior capsular plication, sometimes the standard posterior portal is located too low in the joint to have a good angle of attack to the tissue. Then a posterolateral portal is needed. From just behind the mid portion of the lateral acromion, a needle is pushed toward the joint. It should become visible at the 10 o’clock position in a right shoulder (or 2 o’clock position in a left shoulder) and aim similar to the anteroinferior portal toward the glenoid rim. This portal is crucial to perfectly perform a posterior stabilization or a posteroinferior plication.
Surgery
Today there are two technical options to perform an anterior instability repair using either standard suture anchors in which you have to tie knots or knotless anchors.
The following steps are crucial for either type of a sufficient capsulolabral repair:
Release and mobilization of the ectopically scared tissue, often medially on the scapula neck
Decortication of the scapular neck
Correct placement of suture anchors
Labral fixation
Sufficient ligament shift
Handling of sutures and knot management
Stable knot tying (only for suture anchors)
Secure fixation of tissue by the knotless anchor
Release and Mobilization of the Ectopically Scared Tissue
Good stabilization depends on this surgical step. Only an extensive release enables you to perform a ligament shift to the more anatomic position to reduce joint volume.
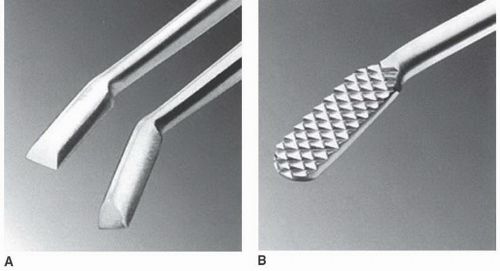
Use a meniscal punch or small elevator to release the labrum-ligament-complex (LLC) off the glenoid rim. At the beginning, you may find it difficult to find a starting point because the tissue is scared tight to the scapular neck. In this case, take a tissue elevator (Figs. 5-4A and 5-5) to sharply dissect the tissue off the bone for a short distance. From this point, use the punch. In addition, an Arthrocare or some other electrocautery device may be of assistance. Continue the dissection all the way down to the 6 o’clock position. Since you view the glenoid rim from superior, you have easy access to the scapular neck. Release all tissue off the neck in order to reach good mobilization of the LLC. If you cannot reach down inferior enough, use a glenoid rasp (Figs. 5-4B and 5-6) to get all tissue off the
bone. Once a good release is achieved, the tissue will float up to the level of the glenoid. The release is finished when you can see the subscapularis muscle (Fig. 5-6). Sometimes it will bleed from there, but it is not worrisome.
bone. Once a good release is achieved, the tissue will float up to the level of the glenoid. The release is finished when you can see the subscapularis muscle (Fig. 5-6). Sometimes it will bleed from there, but it is not worrisome.
Stay updated, free articles. Join our Telegram channel

Full access? Get Clinical Tree


