Uncemented Extensively Porous-Coated Femoral Components
C. Anderson Engh Jr., Christi J. Sychterz Terefenko and Charles A. Engh Sr.
Key Points
• 98% stem survivorship at 20 years
• The implant can be used for all diagnoses and in all qualities of bone.
• The surgical technique is a reamed technique.
• The goal of the surgical technique is to obtain 5 cm of diaphyseal scratch fit.
Introduction
In response to early failures of some cemented femoral components, porous-coated femoral stem technology was developed in the 1970s. The concept behind the design was that live bone in contact with a three-dimensional metal implant surface would grow into and interdigitate with the porous surface to provide a means of stable implant fixation1–3 (Fig. 68-1).
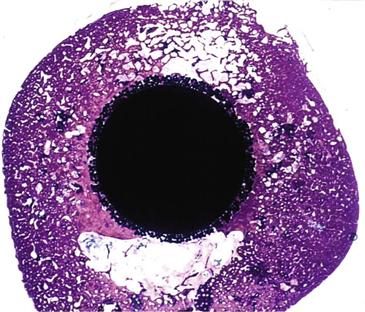
Figure 68-1 Histologic slide showing cross-section of a femoral porous-coated total hip prosthesis with bone ingrowth into the beaded implant surface.
In 1983, the Food and Drug Administration approved the first porous-coated femoral implant for use without cement. This implant, the anatomic medullary locking stem (AML, DePuy, Warsaw, Ind), was characterized by a circumferentially porous-coated, straight, nontapered distal cylindrical rod coupled with a circumferentially porous-coated proximal metaphyseal triangular shape. Current studies of the AML have documented 98% femoral component survivorship at 20 years.4 Excellent results with this stem have been reported in scenarios historically not deemed appropriate for porous-coated fixation, as in patients with avascular necrosis or rheumatoid arthritis, and in the elderly with osteoporosis.5–7
Today, extensively porous-coated femoral implants are available from many manufacturers. Hallmarks of these implants include the presence of a three-dimensional beaded circumferential porous coating on two thirds or more of the femoral stem. Because application of the porous surface requires reheating, which weakens the metal substrate, these stems are typically made of cobalt-chrome rather than titanium. The shape of the typical extensively porous-coated stem is a cylinder distally for fixation in the femoral diaphysis, and a triangle proximally to fit the patient’s femoral metaphysis. Diaphyseal diameters range from 10.5 mm to 22.5 mm, usually in 1- to 1.5-mm increments. Each diaphyseal diameter is accompanied by two to three metaphyseal sizes, which allow for different femoral offsets (Fig. 68-2).
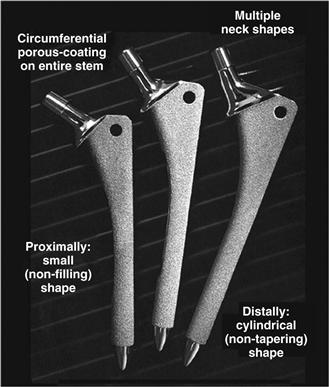
Figure 68-2 The shape of the typical extensively porous-coated stem is a cylinder distally for fixation in the femoral diaphysis, and a triangle proximally to fit the patient’s femoral metaphysis. Pictured here are extensively porous-coated anatomic medullary locking (AML) femoral components.
Surgical implantation of an extensively porous-coated stem is a reamed technique wherein the femur is machined to fit the implant. The cylindrical parallel sides of the implant contact the diaphyseal femoral cortex. Initial fixation is attained with a “scratch fit” of the porous coating, which contacts at least 5 cm of diaphyseal bone. The initial rigid fixation obtained with this technique allows subsequent ingrowth of bone or osseointegration of the stem. This osseointegration accounts for the extremely durable implant fixation.
Through analyses of well-functioning implants retrieved postmortem,8–15 extensively porous-coated femoral implants have been studied more thoroughly than many other designs of cementless stems. The extent and quality of bone ingrowth, the amount of implant micromotion, and the bone remodeling process have been well documented through such studies8–15 and serve to complement an ever growing clinical experience.4,16-20 Clinical experience has further addressed design concerns such as thigh pain and periprosthetic bone loss secondary to stress shielding.21,22 Both thigh pain and stress shielding are thought to result from the mismatch of modulus between the host bone and the much stiffer cobalt-chrome stem. To date, however, the proximal bone loss that occurs to some extent with all uncemented implant systems has not demonstrated negative long-term clinical consequences.22 Clinical experience has not shown practical complications such as failure of fixation, implant fracture, or femoral fracture from bone remodeling.
Indications and Contraindications
Indications, contraindications, and alternative treatment options for the use of extensively porous-coated femoral components are the same as they are for any other form of hip arthroplasty. The patient should be skeletally mature with clinical and radiographic evidence of hip joint deterioration. The patient should have had an adequate trial of nonoperative care and should not have active infection at the surgical site. Patients with a femoral diaphysis smaller than 10.5 mm are not candidates for this type of implant. For those with a femoral diaphysis larger than 22.5 mm, although standard implant sizes are not available, custom implants can be used. Femoral angular and rotational deformities can be addressed with the use of a femoral osteotomy.
Preoperative Planning
Surgical planning of a total hip replacement with an extensively porous-coated femoral component is similar to planning for other implants. A preoperative physical examination is needed to confirm adequate abductor strength and must include an assessment of leg length. Radiographic evaluation should include a low anteroposterior (AP) pelvic film and a true lateral of the proximal one half of the femur. The AP pelvic film should be centered at or below the level of the lesser trochanter and should include approximately 2 cm of pelvic bone above the acetabulum, as well as the femoral diaphysis distally. For this radiograph, the patient ideally internally rotates the femur approximately 15 degrees, so that the femur is imaged in the same plane in which the implant template is created. Signs of a properly rotated femur include overlapping of the anterior and posterior portions of the greater trochanter and a reduced lesser trochanteric profile. With the femur properly rotated, the patient’s offset and the shape of the femoral metaphysis are most accurately displayed for templating. Although offset and metaphyseal dimensions are visible on a unilateral AP femoral view, it is not possible to determine the radiographic hip length relative to the patient’s contralateral side. Before surgical planning with templates is begun, the surgeon must reconcile any differences that exist between the leg length determined by physical examination and the length determined with an AP pelvic radiograph. With those two measurements, the surgeon can determine the targeted surgical leg length correction and can begin the templating process.
The templating process begins by placing the acetabular template on the AP pelvic film to determine the rotational center of the hip joint (Fig. 68-3). Attention then is turned to the femur. The femoral diaphysis dictates stem diameter and stem alignment. A template that appears to contact the medial and lateral diaphyseal bone for a length of 5 cm is chosen (see Fig. 68-3). The template is raised and lowered along the femoral axis until the center of the implant coincides with the previously determined acetabular center. If the target leg length correction includes lengthening of the leg, then the femoral implant center will sit above the acetabular center by the planned correction amount. A metaphyseal size is chosen to re-create or slightly increase femoral offset. On the radiograph, relative horizontal locations between the femoral head and the acetabular center represent femoral offset.
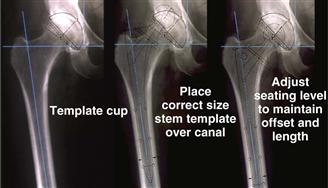
Figure 68-3 Radiographs demonstrating the templating process. First, the acetabular template is placed on the anteroposterior pelvic film to determine the rotational center of the hip joint. Next, a femoral implant template that appears to contact the medial and lateral diaphyseal bone for a length of 5 cm is chosen. Finally, the template is raised and lowered along the femoral axis until the center of the implant coincides with the previously determined acetabular center.
With the femoral template positioned, the distance from the tip of the greater trochanter to the lateral aspect of the femoral template and the distance from the lesser trochanter to the calcar aspect of the femoral template are recorded, so that these measurements can be checked and duplicated at surgery (Fig. 68-4). Additionally, the extent to which the greater trochanter overhangs the axis of the femur is noted. This is helpful in determining how lateral the surgeon needs to be to avoid varus alignment of the stem. Last, with a straight 6-inch-long template on the lateral radiograph, the surgeon must confirm that the femoral component will not create a notch in the distal anterior femoral cortex.
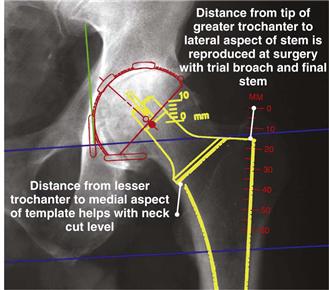
Figure 68-4 With the femoral template positioned correctly, radiographic measurements are recorded for later use during surgery.
Surgical Technique
Extensively porous-coated femoral stems are well suited for posterior and modified Hardinge surgical approaches to the hip joint. Because the stem is straight, oriented to the diaphysis, and 6 inches long, it is not easily used with anterior approaches that emphasize protection of the gluteus medius. After dislocation of the hip joint, the level of the femoral neck osteotomy is determined by the templating process. When visible, the lesser trochanter is a good reference, but the exact distance from the lesser trochanter can be difficult to measure because of its rounded contours. With today’s smaller incisions, the greater trochanter, or more specifically, the junction of the anterior portion of the greater trochanter and the superior femoral neck, can be a more accurate reference. Some patients with a valgus neck shaft angle will have a neck cut that is high and simply transects the femoral neck (Fig. 68-5). Other patients with some degree of coxa vara will have a neck cut that requires an osteotomy below the superior aspect of the femoral neck and likely will require a second more vertical cut to complete the full osteotomy (see Fig. 68-5). It is acceptable to be conservative with a high femoral neck cut and leave bone to be milled away at a later time. However, a high femoral neck cut that leaves too much femoral neck may make acetabular exposure more difficult.
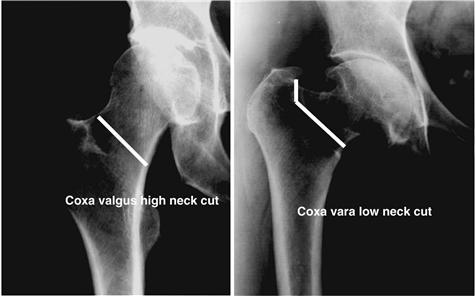
Figure 68-5 Radiograph demonstrating the level of femoral neck resection for different femoral geometries. Patients with a valgus neck shaft angle will have a neck cut that is high and simply transects the femoral neck. Patients with some degree of coxa vara will have a neck cut that requires an osteotomy below the superior aspect of the femoral neck and will likely require a second more vertical cut to complete the full osteotomy.
Next, a chisel or a high-speed bur is used to create the pilot hole at the piriformis fossa. For the pilot hole, most if not all of any remaining posterior and lateral femoral neck typically is removed. An initial 8-mm reamer finds the femoral canal and is passed by hand. As the femoral diaphysis guides the initial reamer, the surgeon notes whether the location of the pilot hole needs to be changed. At all times, the surgeon must ensure that reamers are directed by the distal endosteal cortices, and that the direction of reaming is not influenced by an overhanging greater trochanter or a portion of the femoral neck. Reaming is continued in 0.5-mm increments until the surgeon encounters distal cutting resistance over at least 5 cm of the femoral isthmus. Typically, the final reamer diameter will be 0.5 mm smaller than the size of the actual stem to be implanted to obtain a tight “scratch fit” and ensure adequate stem-femur contact. Markings on the reamer that correspond to the level of the femoral calcar or the tip of the greater trochanter help the surgeon determine the depth of reaming. When combined with the templated positions of the stem, these reamer marks are helpful for preventing distal over-reaming, which could weaken the anterior cortex by endosteal notching. These reamer markings are also helpful for determining the length of scratch fit that will be attained.
Proponents of extensively porous-coated stems agree that diaphyseal fixation requires precise cylindrical reaming. However, an equally precise proximal metaphyseal preparation is also important. The last step in femoral preparation is preparing the proximal femur to accept the proximal triangular geometry of the stem. This can be done by using broaches or a milling-type reamer. When possible, a larger proximal triangle should be used to increase femoral offset, thus enhancing rotational stability and increasing the amount of porous surface available for bone ingrowth. Precise proximal preparation will prevent gaps between the bone and the implant, protecting against the ingress of joint fluid, which could result in a pathway for late-onset femoral osteolysis.
When the broach can be inserted to the templated location and the neck is flush with the broach, the hip is reduced with the use of a trial neck segment. Hip joint stability, leg length, and femoral offset are then checked. If the leg is too long, the broach is lowered in the femur with care not to fracture the proximal femur. Occasionally, a milling device or a high-speed bur is needed to remove proximal cortical bone, allowing the stem to be lowered further. If leg length is good but additional femoral offset is required for hip stability, there are two options. First, if the femoral metaphysis can accommodate it, offset can be increased without lowering the stem by simply using a larger proximal triangular shape. Alternatively, the stem can be lowered and combined with the use of a longer ball, resulting in more offset without lengthening the leg. With currently available larger-diameter heads, the latter option is viable because femoral head skirts that limit range of motion are not as common with larger heads as they were with smaller head sizes. A final technique tip is to perform the trial reduction with a ball of mid length. This allows the use of a ball of shorter or longer length once the femoral implant is inserted.
The stem is inserted by hand until cortical contact requires the use of a hammer. If the stem is 10 cm or more proud of its final seating level, if it does not advance easily at first, or if the patient has strong bone, the surgeon can decide to further ream the femoral canal to the diameter of the implant rather than keeping it under-reamed by 0.5 mm. This decision, like that of how hard to hit the stem without fracturing the femur, is a matter of experience. As a guideline, the initial femoral impaction blows should seat the stem about 5 mm at a time. As the stem advances, the same hammer blows will move the stem only 0.5 to 1.0 mm. This amount of advancement over the final 2 cm of seating is appropriate. Stems being implanted into patients with hard bone may advance only every other hammer blow. Often the force of each hammer blow will have to be increased slightly for the final 5 mm of femoral seating. The force required to implant an extensively porous-coated femoral component is considerably greater than that needed for a tapered stem. A tapered stem inserted with the same force will likely split the proximal femur. The parallel sides and cylindrical shape of an extensively porous-coated stem make this stem less prone to insertional femoral fracture than a triangular or wedge-shaped stem.


Stay updated, free articles. Join our Telegram channel

Full access? Get Clinical Tree


