Acetabular Revision
Impaction Bone Grafting
Matthew J. Wilson and Jonathan R. Howell
Key Points
• Acetabular impaction grafting allows restoration of bone stock and normal hip biomechanics.
• The creation of a stable, contained acetabular defect is essential to its success.
Introduction
Loss of acetabular bone stock is a major challenge in revision hip surgery, and the facility to restore bone stock and thereby re-create the normal biomechanics of the hip joint is an attractive solution. This can be achieved with impaction grafting of the acetabulum, which is an established technique and should be an essential tool in the armamentarium of the modern revision hip surgeon.
Use of large amounts of cement in isolation for the reconstruction of loose acetabular components has been well described,1 with Sotelo-Garza concluding that there was no difference in the outcome of hip replacement in protrusio whether or not bone graft was used.2 However, the results of this technique in the revision setting are generally poor, with Amstutz reporting 83% radiographic loosening at only 2 years postoperatively.3 Callaghan’s review of 146 revisions revealed a 34% rate of radiologic loosening or mechanical failure at 3.6 years.4 Similar results from the Mayo Clinic review of 166 revisions at a mean of 4.5 years revealed probable or possible acetabular loosening in 37.7% of hips, and complete radiolucent lines in 70.9% of cases.5 Following removal of loose acetabular components, the acetabular interface is often found to be sclerotic, particularly following removal of a cemented socket. In these circumstances, it is not possible to gain adequate osteointegration6 of the cement at revision, and early loosening is common; therefore the reconstruction of acetabular defects with cement has largely been abandoned. However, impaction bone grafting provides an ideal surface for cement integration and has the ability to incorporate, restoring bone stock and re-creating anatomy.
The use of bone graft has its roots in the early days of modern surgery. In 1859, Ollier was credited with describing the first clinical experiment of bone grafting when he attempted to transplant the radius from a rabbit into a tibial nonunion. Subsequent work by Macewen and Ponset on the use of allograft from amputated limbs led to increased interest in the subject.7 However, the clinical use of bone grafting was hampered by the limited availability of autograft and the inability to store allograft properly. It was the development of bone banks and of methods of freezing allograft at the Hospital for Special Surgery in New York in the late 1940s that secured the future of bone grafting in reconstructive orthopedic surgery. In the 1970s, the first reports on the use of bone graft to treat acetabular deficiencies began to appear. In 1975, Hastings and Parker suggested the use of medial bone graft with a Vitallium mesh, in combination with a cemented acetabular component, for the treatment of primary acetabular protrusio.8 Further reports by McCollum, Harris, and Heywood confirmed the success of bone graft in acetabular reconstruction.1,9,10
The development of cementless techniques for implant fixation has offered an alternative method of acetabular reconstruction. Good results have been reported, both with and without bone graft,11–13 and most acetabular revisions are performed using these types of implants, particularly in cases where a defect is uncontained and cannot be contained using reinforcement mesh. In our opinion, the successful use of bone graft in large defects relies on adequate loading of the impacted graft, and this can be achieved reliably only by using a cemented socket. The use of an uncemented shell relies on contact with host bone, and loading will occur preferentially at these points of contact. The use of a cemented socket also allows circumferential use of bone graft, in which the cement is in contact with impacted graft over 100% of its interface. This allows restoration of bone stock in all areas of the acetabulum—something that is precluded by the necessity for host bone contact with cementless shells.
In the field of revision hip surgery, the modern techniques of impacting morselized graft to re-create anatomy and to restore bone in the femur and acetabulum have been popularized by units in Nijmegen and Exeter.14–16 Essential to the technique is the creation of a contained acetabular defect. This in itself can be technically challenging and may require the use of metal reinforcement mesh. Once the acetabular defect has been contained, morselized autograft or allograft is impacted within the cavity to form a stable base before cementation of a polyethylene acetabular component.
This chapter describes the indications, technique, and limitations of impaction bone grafting, in combination with a cemented acetabular component, in the reconstruction of acetabular defects.
Indications/Contraindications
Indications
There are three main reasons for the loss of acetabular bone stock in revision hip arthroplasty:
The main indication for revision of the acetabular component is painful socket loosening. There are notable differences in the patterns of bone loss that occur around cemented and uncemented components, specifically in their tendencies to migrate or cause extensive osteolysis.
There is no doubt that the survival of a cemented acetabular component is dependent on the quality of the original operation. Previously well-fixed, cemented acetabular components will loosen because of osteolysis caused by particulate debris or by infection. Loosening of cemented sockets has been defined as the development of lucent lines of between 1 mm17 and 2 mm18 at the bone-cement interface, or as progressive migration. Once a cemented socket becomes radiologically loose, it will start to migrate and it will often, although not always, become symptomatic, alerting the surgeon to the need for revision surgery.
Periprosthetic bone loss around uncemented components is often classed as silent.19 Gross suggests that an uncemented shell with at least 50% coverage requires no additional support.20 A well-supported socket that loses bony support because of osteolysis may need only 50% bony adherence, possibly even less, to remain well-fixed and therefore asymptomatic—despite significant loss of bone stock. Regular, long-term follow-up of these patients is essential to avoid late presentation with catastrophic bone loss. Hartofilakidis performed a comparison review of cemented and uncemented acetabular shells and concluded that the lysis around cemented sockets was linear. However, the lysis around uncemented shells was more aggressive and expansile.21
Acetabular impaction grafting is also indicated in primary procedures where there is loss of host bone, such as protrusio acetabuli, acetabular dysplasia, and trauma.
Contraindications
The only absolute contraindication to impaction grafting is the inability to contain a segmental defect, medial or peripheral, as defined by D’Antonio.22 Although large defects can be successfully contained, it is the stability and durability of that containment that are essential to the success of impaction grafting. It can be impossible to contain significant defects of the anterior and posterior columns with enough stability to allow effective impaction grafting, and other techniques for reconstruction should be considered in these circumstances. Similarly, large superolateral defects extending down the anterior and posterior columns are difficult to contain with a mesh, and cementless implants may be required in these cases.
Although infection is thought to be a relative contraindication to the use of impacted graft, Rudelli reported a 6.2% recurrence of infection at 8.6 years in 32 patients who underwent one-stage revision of infected, loose total hip replacements. Of these patients, 25 underwent impaction grafting of both the femur and the acetabulum, and half required the use of mesh to contain the graft.23 These results are similar to those reported using a two-stage procedure.24–26
Equipment
A major part of planning any surgery is predicting which equipment is likely to be required. With particular reference to impaction grafting of the acetabulum, the following items should be available in the operating room:
1. Fresh frozen femoral heads: two to three for an average defect
2. Concave femoral head reamers (see Fig. 91-4)
3. A bone mill capable of producing large bone chips. Alternatively, rongeurs may be used.
4. A selection of rim and medial meshes
5. 3.5-mm small fragment screw set
6. Hemispherical acetabular impactors in a selection of sizes.
Description of Technique
Preoperative Procedure
A lateral position is preferred, ensuring that the pelvis is adequately secured with appropriately placed padded props. It is important to align the anterior superior iliac spines in the vertical plane. This, in combination with an assessment of the transverse ligament, helps with final orientation of the new acetabular component.
Perioperative antibiotics should be administered. Multiple tissue samples are sent for culture and, where infection is suspected, frozen section may be requested. The frozen femoral heads are removed from the freezer and are allowed to defrost in sterile, warmed saline while the exposure continues.
Surgical Exposure
An extensile posterior approach generally gives excellent exposure of the acetabulum and the posterior wall and column should plating be necessary. The proximal femur is mobilized; sufficient soft tissue is released, and thickened capsular tissue is removed to allow dislocation of the hip.
Retention of the femoral component can limit visualization and hamper acetabular reconstruction, but the authors’ strategy toward the femoral component depends on its method and state of fixation. Clearly, a loose femoral component should be revised using the surgeons’ preferred technique for the femoral conditions that exist at the time of revision. However, well-fixed stems do not necessarily require full revision, be they cemented or cementless, and indeed revision of a well-fixed stem or cement mantle may cause unnecessary damage to the femur. For a soundly fixed cemented stem and cement mantle, it is relatively easy to burr away cement over the shoulder of the prosthesis and tap the femoral component from its intact cement mantle. After acetabular reconstruction is complete, a new femoral component can be recemented into the old mantle—the so-called cement-in-cement technique.27 If a cementless femoral component is to be retained and the anterior acetabular wall is intact, then a pocket can be made in the anterosuperior tissues to accommodate the femoral head or trunnion. However, it is often difficult to create a space large enough for the proximal femur, and it is important to avoid imparting excessive force on the anterior wall during exposure of the socket. An alternative approach for well-fixed uncemented stems is use of the trochanteric slide,28 through which the abductors are safely separated from the femur, thereby allowing circumferential exposure of the acetabulum. Alternatively, if it is necessary to remove a well-fixed uncemented femoral component, an extended trochanteric osteotomy can be used, which also gives excellent exposure of the whole acetabulum.
Whichever, approach is used, retractors are placed anteriorly and posteroinferiorly, with care taken to protect the thin walls of the acetabulum and the sciatic nerve. It is important to identify the transverse ligament, which helps with orientation of the acetabular component and acts as a guide to the level of socket placement. If it is present, the transverse ligament is retained because, apart from its role as a guide to socket placement, it also helps to constrain the bone graft during the impaction process. If the transverse ligament is absent, the teardrop is identified as a guide to the inferior margin of the acetabulum.
Acetabular Assessment
Curettes are used to remove any acetabular membrane, although some medial membrane may be retained if the medial wall is deficient because its removal may be hazardous to structures within the pelvis. Care is taken to preserve the walls of the acetabulum, and the use of reamers is kept to a minimum to avoid removal of host bone. The rim of the defect is completely cleared of soft tissue, the acetabulum lavaged, and the defect assessed (Fig. 91-1).
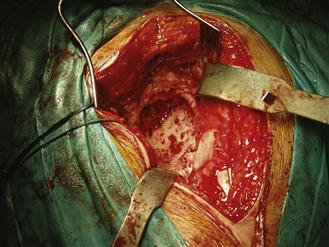
Figure 91-1 The cleared acetabulum prior to assessment of defect.
Once the integrity of the anterior and posterior columns has been confirmed, the acetabulum is assessed for central and peripheral segmental defects. It is useful to position an appropriately sized trial component or acetabular impactor at the level of the transverse ligament in an anatomic position. With the instrument held in the intended anteversion and inclination of the final component, the surgeon can assess the extent of any peripheral defects and how easily they may be contained (Fig. 91-2).

Figure 91-2 Impactor placed in an anatomic position helps to define the defect.
Acetabular Reconstruction
Cavitary Defects
For pure cavitary defects, no additional reconstruction with mesh is required. It is important to establish a bleeding bed for the bone graft, so areas of sclerotic bone should be reamed gently, burred, or drilled with a 2-mm drill until bleeding points are seen throughout the socket.
Medial Segmental Defects
Medial segmental defects are common and require reinforcement before impaction grafting is performed. Specific medial meshes or a small rim mesh can be trimmed to size and laid over the defect. A wafer of femoral head or a layer of cancellous graft laid over the defect before insertion of the mesh enhances the stability of the mesh and can improve the reconstruction. If needed, the mesh can be stabilized with two or three small fragment screws. Massive medial segmental defects may require protection with a support ring or cage.
Peripheral Segmental Defects
In the revision of loose cemented sockets, segmental defects are commonly restricted to the superolateral region from approximately 10 o’clock to 2 o’clock. Larger defects involving the anterior and posterior walls may also be seen and can occur after removal of uncemented shells.
Superolateral defects are best closed by applying a rim mesh to the outer aspect of the acetabulum and ilium. Some fibers of the glutei need to be elevated to allow correct placement of the mesh. The mesh should be trimmed to size, ensuring that the sharp edges of cut mesh are not situated along the posterior border, where they risk irritating the sciatic nerve.
When judging the size and orientation of the rim mesh, it is useful to place an appropriately sized impactor within the acetabulum in the orientation intended for the final component. This helps to ensure that the defect is fully contained, and that the mesh is aligned correctly.
The rim mesh is secured to the acetabulum using multiple small fragment screws. Once the rim mesh has been cut to size, the assistant holds it in place with an artery forceps while the surgeon inserts the first screw. This should be placed at the apex of the proximal edge, roughly halfway between its anterior and posterior margins. Having placed this screw, the surgeon reassesses the orientation of the mesh and, if necessary, makes any minor adjustments to its anteversion by rotating the mesh around the apical screw. The next two screws are placed at the anterior and posterior extremities; they are critical to the success of the operation. The screws should be directed into the anterior and posterior columns to establish fixation of the two ends of the mesh. Once they are positioned, the remaining screws are placed at 1-cm intervals around the periphery. All screws should be bicortical, and it does not matter unduly if the screws pass through the cavitary defect, as long as they do not interfere with insertion of the impactor or with cup placement (Fig. 91-3).
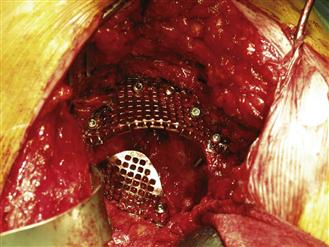
Figure 91-3 Rim mesh held in place with screws. Here an anterior rim mesh has also been inserted.
Anterior wall defects should be closed with rim mesh; however, for these defects it is usually easier to lay the mesh on the inner surface of the acetabular wall. When they are placed in this fashion, the anterior rim meshes are often stable enough to allow impaction without further stabilization, although screws may be added superiorly and inferiorly with caution to avoid vascular injury (see Fig. 91-3).
Graft Preparation
Fresh frozen femoral heads are the preferred source of graft for impaction grafting. It is occasionally possible to plan revision surgery after a contralateral primary hip arthroplasty is performed. In these cases, the femoral head from the primary can be stored for use as autograft, but most defects require more than one femoral head; therefore it is necessary to use a mixture of allograft and autograft.
The preparation of morselized graft can be accomplished by hand, using a saw to section the head, followed by rongeurs, or by using a commercially available bone mill. Surgeons in Nijmegen advocate the use of large chips of approximately 0.5 to 1 cubic centimeter,27,29 and good evidence suggests that better initial stability is achieved with the use of larger chips.30 The use of pulse lavage to wash the graft before impaction also improves stability, probably by allowing tighter impaction,30–32 and it may reduce the risk of disease transmission.33 Van der Donk showed that graft incorporation was not compromised by washing with pulse lavage.34 Most commercially available bone mills are not capable of producing chips large enough to meet the demands of impaction grafting in the acetabulum. It has been shown that the average chip size in milled bone is less than 3.5 mm.35
The authors recommend that the surgeon remove any remaining cartilage and the cortical bone with concave femoral head reamers (Fig. 91-4). The femoral head is sectioned into quarters with a saw, and then large rongeurs are used to create cancellous bone chips of approximately 0.5 to 1 cm3. The chips should be washed in a sieve using pulse lavage to remove excess fat and blood. Where there is concern about prior infection or where one-stage revision is performed for infection, 1 g of vancomycin antibiotic powder can be added to each morselized femoral head after lavage and before the time of impaction.
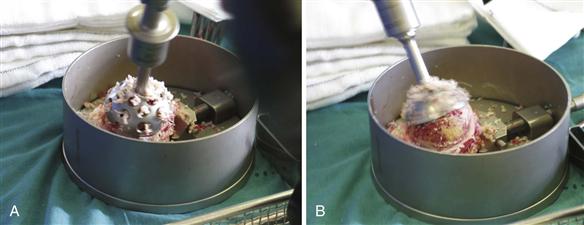
Figure 91-4 Reverse femoral head reamers in use.
Acetabular Impaction
Bone chips are introduced into the acetabulum and are impacted in layers. Initially, chips are placed into the superior defect (Fig. 91-5) and are impacted around any screws that may be passing across the defect; the surgeon should concentrate on filling the superior cavitary defect. It is a technical mistake to place too much graft medially because this risks lateralizing the socket.
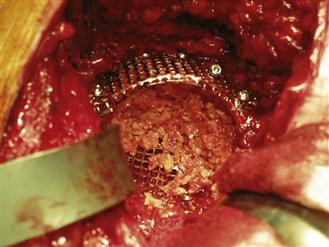
Figure 91-5 Chips are placed into the superior defect.
Various impactors are available in commercially available systems. Small impactors and punches should be used to fill small cysts, defects, and gaps around screws. Once these are filled, the graft is impacted using hemispherical impactors of increasing size. Small aliquots of bone are sequentially introduced into the socket defect, and impaction is performed with vigorous hammering using a metal mallet. Impaction needs to be firm enough to create a solid base of bone, but not so hard as to fracture the acetabulum. It is thought that multiple light impactions are superior to fewer, heavy hammer blows. The process of adding bone followed by impaction is repeated until the acetabulum is reconstructed back to the planned anatomic position. The final impactor used should be 4 to 6 mm larger than the true outer diameter of the proposed polyethylene socket to allow for an adequate cement mantle.
Once central impaction is complete, attention should be turned to peripheral impaction, which is a vital step in producing a densely packed bone bed ready for cementing. The assistant maintains pressure on the final impactor, which is left in position, while the surgeon places pieces of graft around the superolateral periphery of the impactor. These bone chips are then impacted using a narrow punch, followed by the addition of more chips around the periphery (Fig. 91-6). This process is repeated until it is no longer possible to impact any further graft under the rim of the socket or mesh.
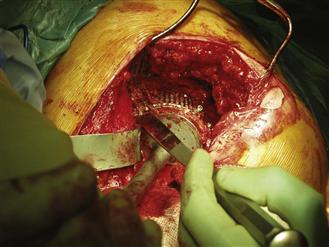
Figure 91-6 Peripheral impaction with the hemispherical impactor held in place.
During peripheral impaction, the hemispherical impactor can be backed off by 1 or 2 mm to allow a better peripheral pack, but care should be taken that peripheral packing does not force the hemispherical impactor out of the socket because this risks lowering the acetabular center of rotation. The final maneuver is to hammer the central impactor back into place. When impaction has been done properly, the packed bone is often so firm that the impactor is gripped by the graft, and some force is required to remove it.
The final impaction should be at least 5 mm thick circumferentially and should have the consistency of cortical bone (Fig. 91-7). At this stage, the trial socket can be offered up and the acetabulum cleaned and dried. A specially designed mesh for washing the graft is available and is used to protect the graft during lavage. Hydrogen peroxide–soaked gauzes are placed in the acetabulum and are pressurized to clean and dry the graft ready for cementing. The authors prefer to use a flanged polyethylene component and pressurized cement. The cement is prepared in a closed system with fume extraction and is inserted into the acetabulum once it has reached the correct consistency. This usually happens at least 3 minutes after the addition of monomer. The cement is then pressurized in the acetabulum to force it into the graft for at least an additional minute. As the cement is pressurized, the surgeon may observe fat extruding from the superolateral bone graft surface; this is entirely normal. Cement may leak around the periphery of the graft underneath the pressurizer device, but its extrusion out through the superolateral graft bed indicates inadequate graft packing. The polyethylene socket is inserted at approximately 5 minutes for the cement used by the authors, and considerable force is required to seat the flanged socket. After socket insertion, pressure is maintained on the introducer until the cement has polymerized. The final appearance of the reconstructed socket is shown in Figure 91-8.
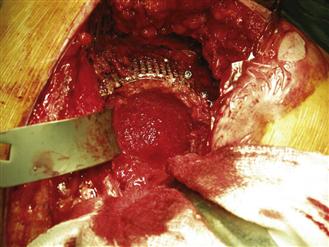
Figure 91-7 Final appearance of impacted socket prior to lavage and drying.
Related posts:


Stay updated, free articles. Join our Telegram channel

Full access? Get Clinical Tree


